> ## Documentation Index
> Fetch the complete documentation index at: https://docs.cyberwave.com/llms.txt
> Use this file to discover all available pages before exploring further.
# Bring your own hardware
> Integrate a custom hardware device with Cyberwave: create an asset from its URDF, write a driver, declare the cw-driver.yml interface, and run it as a digital twin.
export const EdgeSetup = ({exclude = []}) => {
const showMac = !exclude.includes("mac");
const showLinux = !exclude.includes("linux");
const macCode = `curl -fsSL https://cyberwave.com/install.sh | bash\ncyberwave pair`;
const linuxCode = `curl -fsSL https://cyberwave.com/install.sh | bash\nsudo cyberwave pair`;
const linuxTip =
First time on a Raspberry Pi? See{" "}
Raspberry Pi Setup.
First time on a Jetson Orin Nano? See{" "}
Jetson Orin Nano Setup
.
;
if (showMac && showLinux) {
return {macCode}
{linuxTip}
{linuxCode};
}
if (showMac) {
return {macCode};
}
if (showLinux) {
return <>
{linuxTip}
{linuxCode}
;
}
return null;
};
This tutorial walks through integrating a **custom hardware device**: a custom robot, an in-house prototype, or any hardware with an API, serial interface, or network protocol that isn't already in the [catalog](https://cyberwave.com/catalog). By the end you'll have:
* A custom **asset** created from your own URDF, visible in your workspace
* A live **digital twin** spawned from that asset inside an environment
* A working **driver** (a Docker container) that bridges your device's native protocol to the twin
* Your hardware streaming telemetry and taking commands through the platform
You build two things: an **asset** (the 3D and kinematic definition of the hardware) and a **driver** (the bridge between Cyberwave and the device). The twin, transport, UI, and data tooling already exist.
***
## What you'll need
* The device you want to integrate (robot arm, mobile base, sensor, drone, anything with a controllable interface)
* Knowledge of its **native interface**: ROS 1 / ROS 2, VDA5050, OPC UA, Modbus TCP/RTU, gRPC, REST, or raw serial / USB
* An edge machine to run the driver on: a Raspberry Pi, a Jetson, the robot's onboard computer, or even your Mac for local development
The CLI and Edge Core require a **64-bit architecture** (arm64/aarch64) on
Raspberry Pi.
* A Cyberwave account ([request access](https://cyberwave.com/request-early-access) if you don't have one)
* An API token from your dashboard (**Profile → API Keys**)
* **Docker** installed on the machine where you'll build and run the driver
* **Python 3.10+** if you scaffold with the Python SDK
* Optionally, [Claude Code](https://claude.ai/claude-code) to scaffold the driver with the AI driver skill
* A **URDF** of your hardware plus its meshes (we'll prepare these in Step 1)
***
## Step 1: Prepare your URDF package
Every twin starts from an asset, and every asset starts from a **URDF**: the 3D meshes and kinematic model that describe your hardware. Cyberwave accepts a single **ZIP archive** containing one main `.urdf` (or `.xacro`) file and every file it references.
```text theme={null}
my-robot/
urdf/
robot.urdf
meshes/
base_link.stl
arm_visual.obj
textures/
arm_albedo.png
```
Use **relative paths** inside the URDF that match your ZIP structure. If the
URDF references `meshes/arm_visual.obj`, that file must exist at that path
inside the ZIP. Cyberwave unpacks and validates the archive after you create
the asset.
Don't have a URDF yet? Most robots ship one with their ROS package, or you can
export one from your CAD tool. For a sensor-only device (like a camera) you can
start from a simple placeholder mesh and refine it later.
### Sample URDF
If you want a concrete reference, download this sample drone URDF (a DJI Mini 4 Pro) and open it alongside the steps below. It defines a `base_link` plus four propeller links connected by `continuous` joints, and references its meshes by relative path.
A complete single-file URDF (5 links, 4 continuous joints, materials, mesh references). Unzip to read it, add your `meshes/` folder, and re-zip to upload.
```xml theme={null}
```
The downloadable sample references its meshes with `package://` URIs (a ROS
convention). When you build your upload ZIP, switch those to **relative paths**
that match the archive (for example `meshes/body.stl`) and include the
referenced `.stl` files in a `meshes/` folder.
***
## Step 2: Create the asset
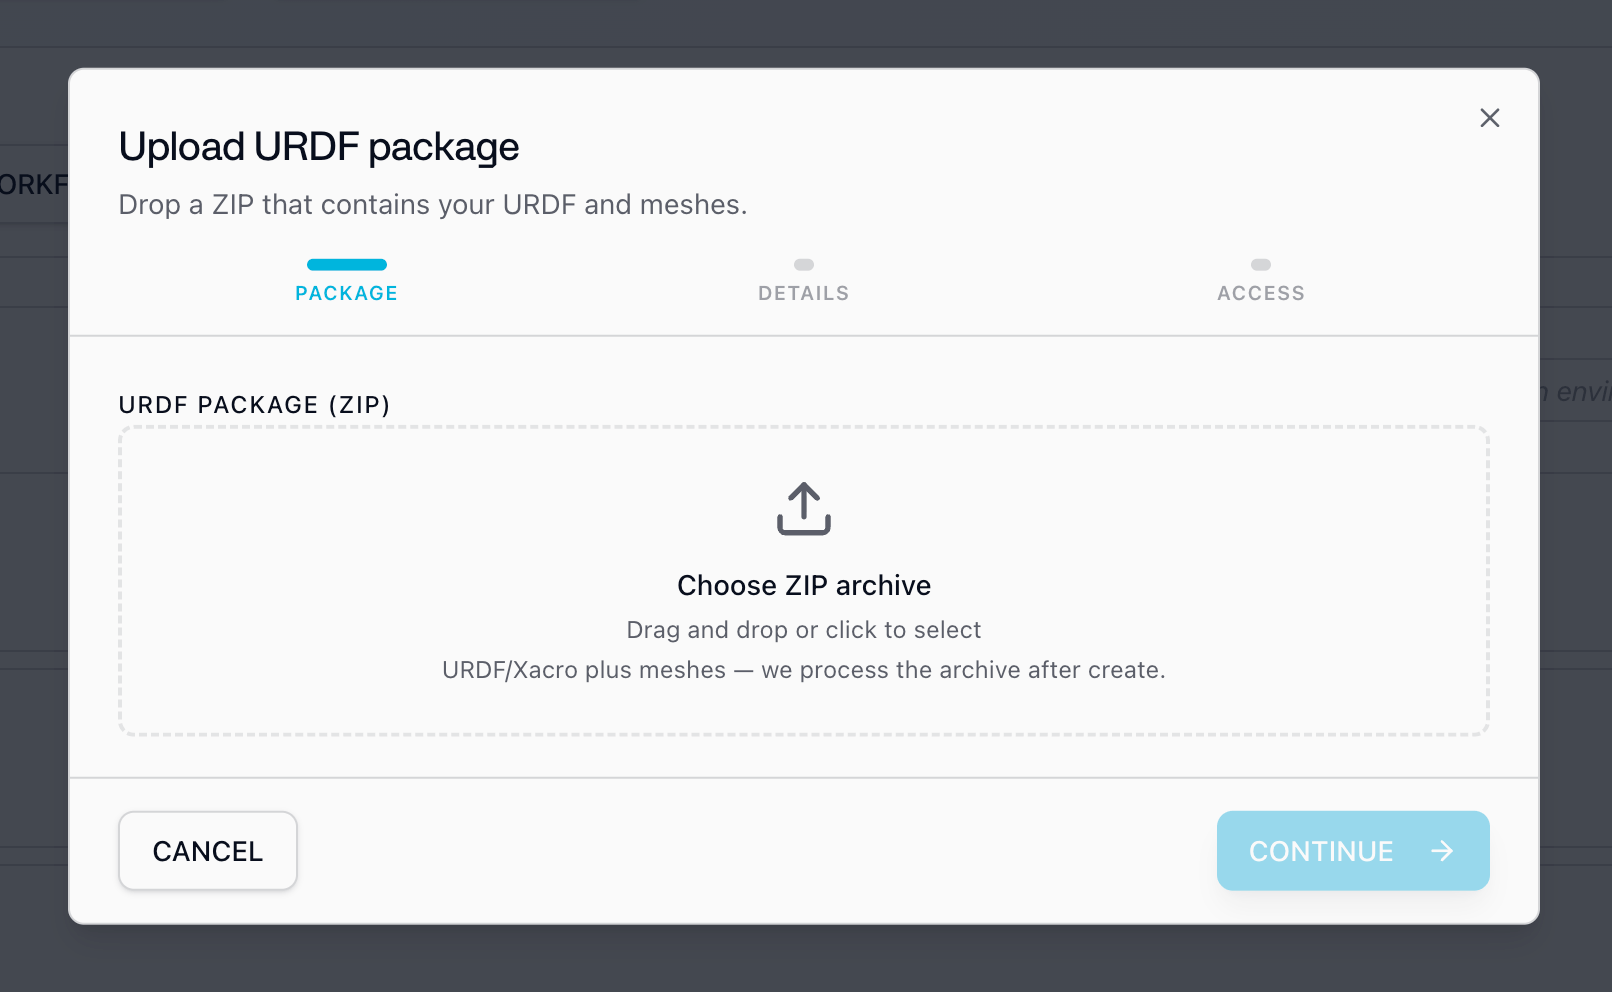
Open the **Upload URDF package** wizard from the [dashboard](https://cyberwave.com/dashboard), then complete its three steps.
On the **Package** step, drag and drop your ZIP into the **URDF Package
(ZIP)** drop zone, or click to select it. Click **Continue**.
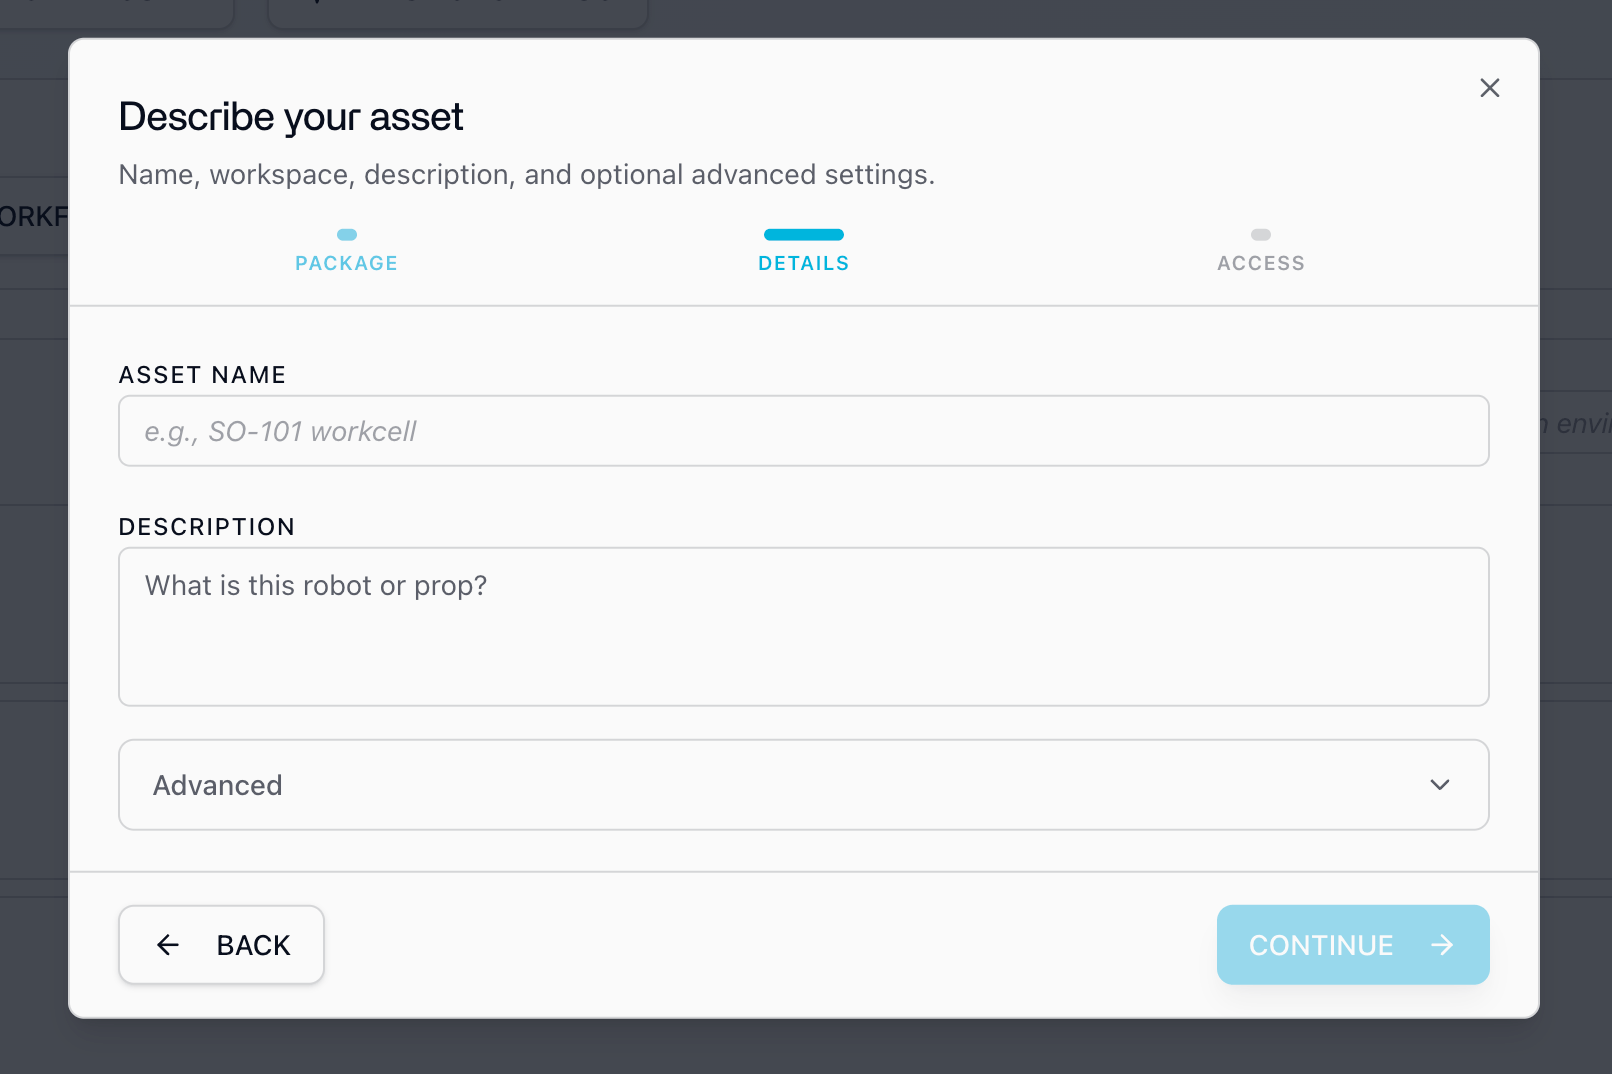
Give the asset a clear **name** (for example, `Acme Arm v1`) and a short
**description**.
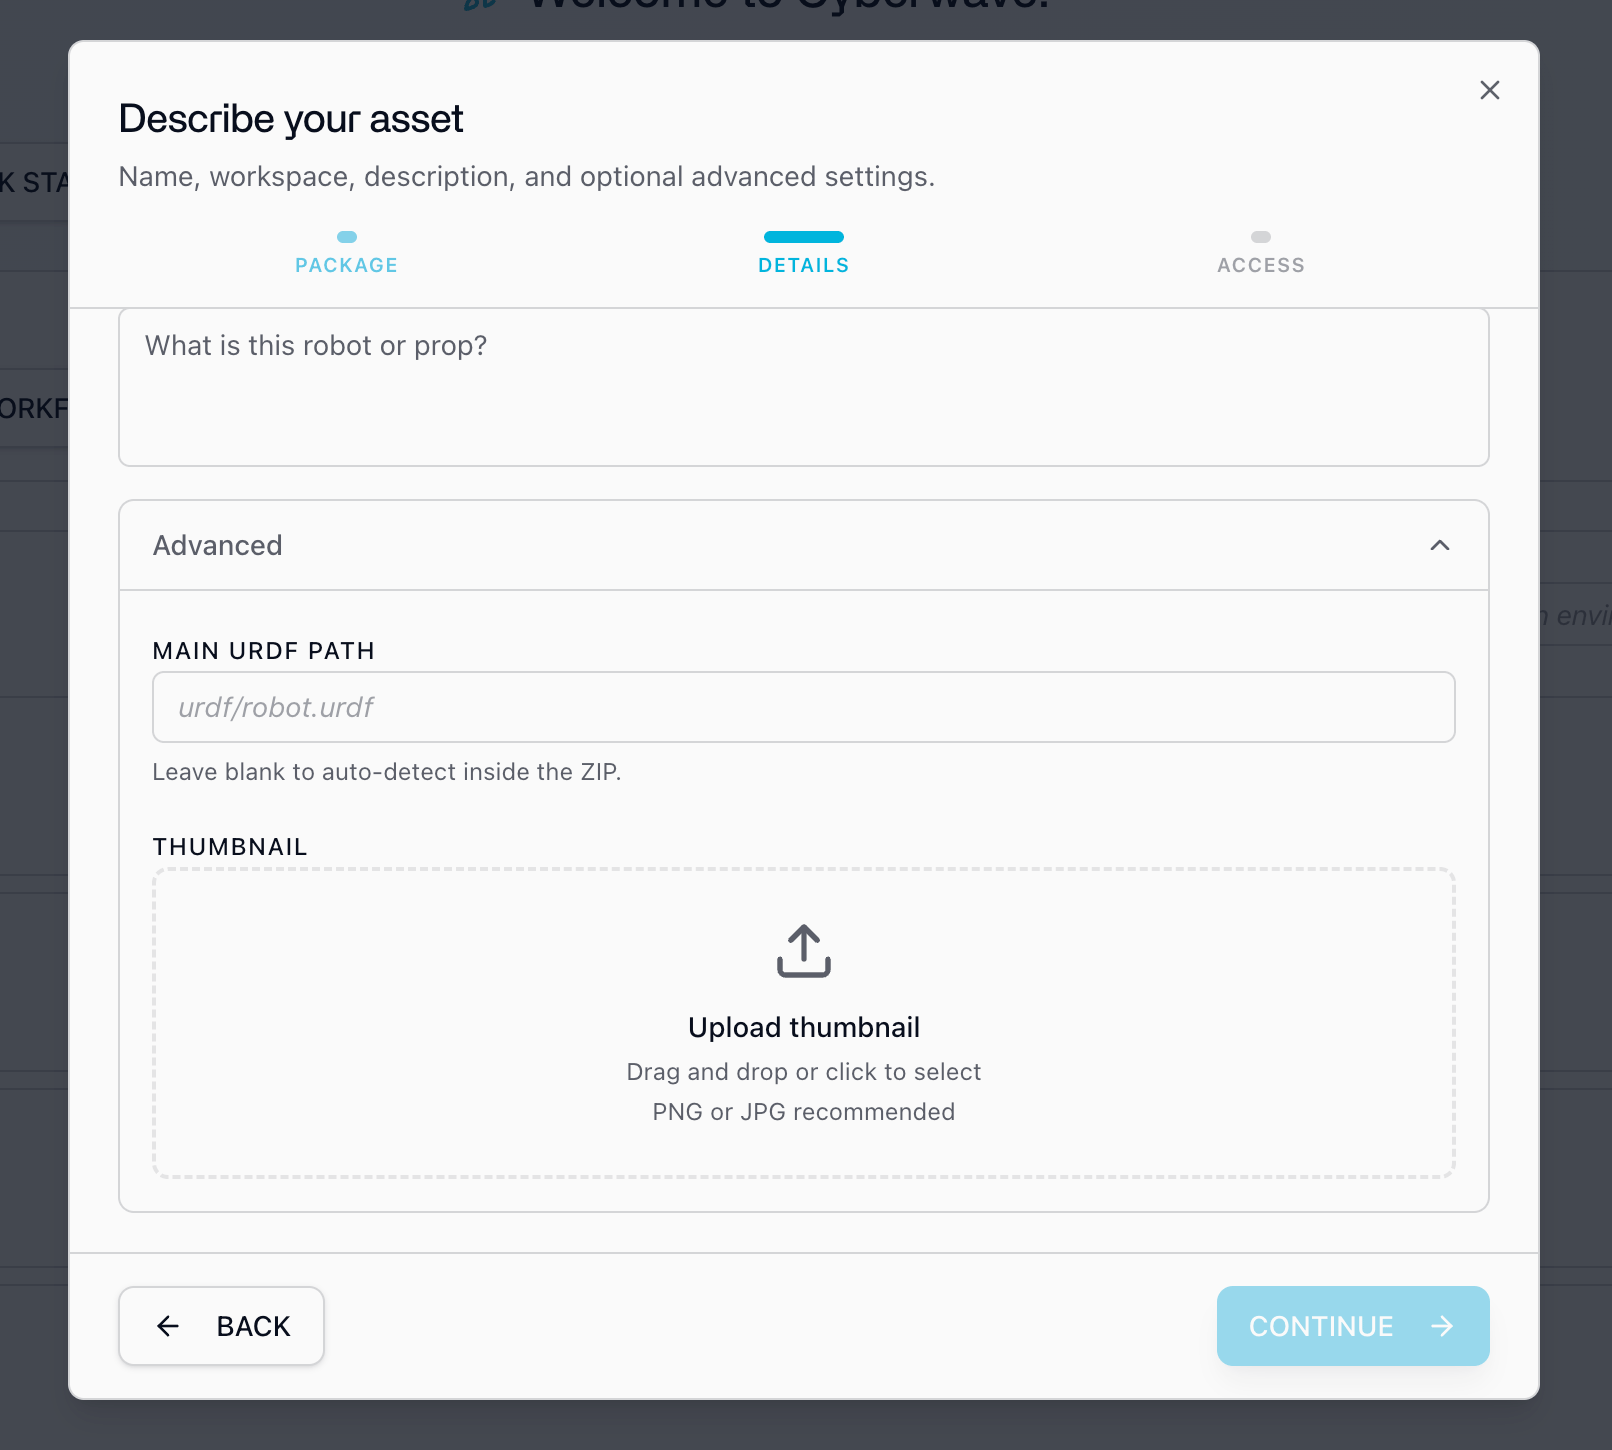
Expand **Advanced** for two optional fields:
* **Main URDF path**: the path to the main URDF inside the ZIP (for example,
`urdf/robot.urdf`). Leave it blank to auto-detect, and set it only when the
ZIP contains more than one URDF.
* **Thumbnail**: an optional preview image (PNG or JPG) for the asset card.
Click **Continue**.
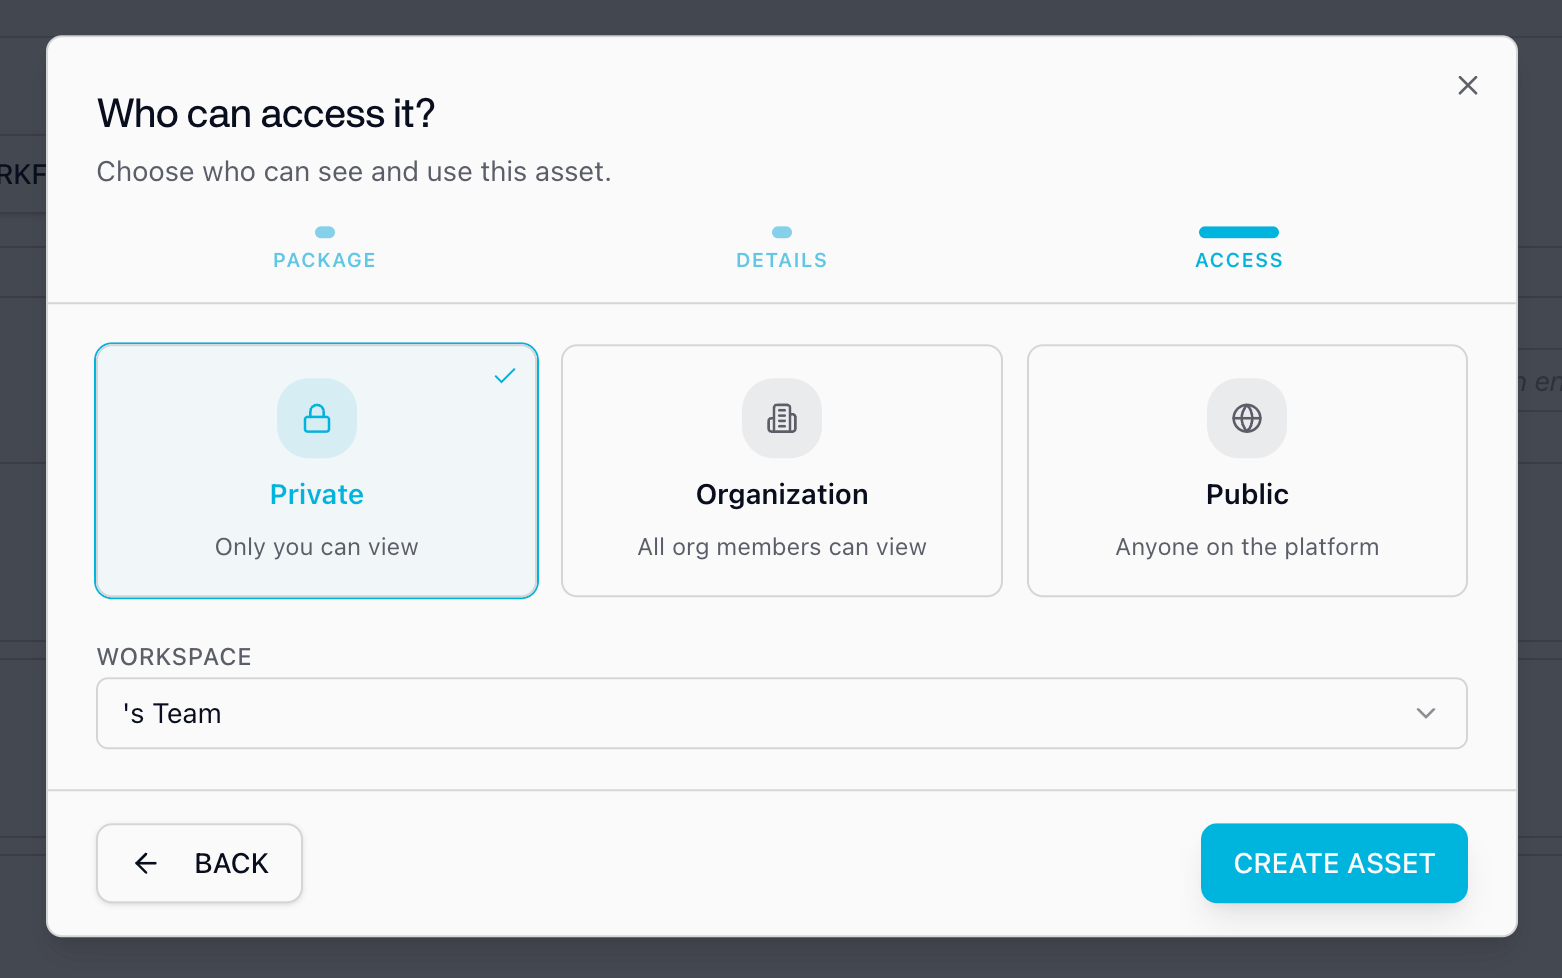
Choose who can see and use the asset, then pick the **workspace** it belongs to.
| Visibility | Who can view |
| ---------------- | -------------------------------- |
| **Private** | Only you |
| **Organization** | All members of your organization |
| **Public** | Anyone on the platform |
Click **Create Asset**.
Cyberwave processes the archive. Once it's ready, the asset is available to spawn twins from in the dashboard, the [Python SDK](/overview/tools/python-sdk), or the REST API. Note its **`registry_id`** (or `slug`, for example `acme-corp/acme-arm-v1`). Your driver manifest will target this id in Step 5.
Start **Private** while you iterate on the URDF and driver, then switch to
**Organization** or **Public** when it's ready to share. Visibility can be
changed after creation.
More detail on URDF packaging and the upload wizard, including the REST and SDK paths.
***
## Step 3: Spawn a digital twin
An asset is a reusable definition. A **twin** is a live instance of it inside an [environment](/feature-reference/architecture/key-concepts).
1. In the dashboard, create a **New Environment** and give it a name like `Acme Arm Lab`.
2. Click **Add from Catalog** in the left panel and search for the asset you just created (it appears in your workspace catalog).
3. Add it and position it to roughly match where the real hardware sits.
The twin shows up in the environment but isn't connected to anything yet. Note the twin's **UUID** (visible in its properties panel); your driver receives this at runtime.
You now have a custom asset and a twin spawned from it. Everything from here is
the driver: the bridge between this twin and your real hardware.
***
## Step 4: Scaffold the driver
A **driver** is a **Docker container** that bridges your device's native interface (ROS, serial, REST, gRPC, VDA5050, OPC UA, Modbus, or any other protocol) to Cyberwave's MQTT layer. It publishes telemetry (joint states, odometry, camera frames, sensor data) up to the twin and turns dashboard, SDK, and workflow commands into actions on the device.
Pick one of these starting points:
The **Cyberwave Driver skill** for [Claude Code](https://claude.ai/claude-code)
asks a few questions about your hardware and scaffolds a driver project: the
Dockerfile, local dev setup, `cw-driver.yml`, and a working twin connection.
Install the skill:
```bash theme={null}
git clone https://github.com/cyberwave-os/driver-skill ~/.claude/skills/cyberwave-driver
```
Then in any Claude Code session:
```
/cyberwave-driver
```
The skill source is open source at [cyberwave-os/driver-skill](https://github.com/cyberwave-os/driver-skill).
Build on one of the official SDKs, which handle twin synchronization, file
I/O, and reconnection logic so you focus on the hardware integration:
* **Python SDK**: [`cyberwave`](https://pypi.org/project/cyberwave/)
* **C++ SDK**: see the [C++ SDK docs](/overview/tools/cpp-sdk)
```bash theme={null}
pip install cyberwave
```
Copy a Cyberwave driver whose hardware shape matches yours, then trim what
you don't implement:
| Repository | Good template for |
| --------------------------------------------------------------------------------------------------------------- | -------------------------------------------- |
| [cyberwave-edge-so101](https://github.com/cyberwave-os/cyberwave-edge-so101) | Joint-bus manipulator (arm) |
| [cyberwave-edge-camera-driver](https://github.com/cyberwave-os/cyberwave-edge-camera-driver) | USB / RTSP camera as a twin |
| [cyberwave-edge-ros-ugv](https://github.com/cyberwave-os/cyberwave-edge-nodes/tree/main/cyberwave-edge-ros-ugv) | Mobile base with locomotion + onboard camera |
The complete container contract, environment variables, MQTT catalog, and packaging.
***
## Step 5: Declare your interface with `cw-driver.yml`
Add a **`cw-driver.yml`** at your driver repo root, next to the `Dockerfile`. This file is the **contract** between your hardware bridge, the platform APIs, the web UI, and the SDK. It lists which MQTT topics you use and which command strings you accept, so teleop overlays, SDK methods, and agents all line up with what the hardware actually does.
Point `registry_ids` at the asset you created in Step 2, then declare the topics and commands your code will handle:
```yaml theme={null}
registry_ids:
- acme-corp/acme-arm-v1 # the registry_id of YOUR asset
mqtt:
schema_version: 1
driver_family: python # ros_cpp, python, android, ...
joint:
update:
direction: both
payload_schema_ref: JointStatesPayload
description: Joint targets in, observed joint states out
twin:
command:
direction: in
payload_schema_ref: TwinCommandPayload
description: Discrete and continuous commands for the arm
telemetry:
direction: out
payload_schema_ref: TelemetryPayload
description: Lifecycle and status JSON
commands:
supported:
- stop # discrete (one-shot)
- { name: move_forward, continuous: true, rate_hz: 10 } # stick-held
```
Each YAML path compiles to a flat MQTT topic. For example `mqtt.joint.update` becomes `cyberwave/joint/{twin_uuid}/update`, and `mqtt.twin.command` becomes `cyberwave/twin/{twin_uuid}/command`.
Only declare what you actually implement. Arm / joint-bus drivers should omit
the WebRTC topics; camera video flows through child camera twins and the media
service, not WebRTC topics on the arm twin.
Use the reference manifests as templates: the
[SO-101 arm](https://github.com/cyberwave-os/cyberwave-edge-so101/blob/main/cw-driver.yml)
for a joint bus plus command topic, or the
[UGV Beast](https://github.com/cyberwave-os/cyberwave-edge-ros-ugv/blob/main/cw-driver.yml)
for continuous locomotion. Copy the namespaces that match your robot and delete the rest.
***
## Step 6: Implement the hardware bridge
Now wire your device's native protocol to those topics. Edge Core injects these environment variables when it runs your container, so you can assume they're always set:
| Variable | Description |
| ---------------------------- | ------------------------------------------------------------------------- |
| `CYBERWAVE_TWIN_UUID` | UUID of the twin this driver manages |
| `CYBERWAVE_API_KEY` | API key scoped to this driver |
| `CYBERWAVE_TWIN_JSON_FILE` | Path to a writable JSON file with the twin's current state |
| `CYBERWAVE_CHILD_TWIN_UUIDS` | *(optional)* Comma-separated UUIDs of attached child twins (e.g. cameras) |
A driver does two things: **subscribe** to commands and turn them into hardware actions, and **publish** telemetry and state back up to the twin. The Python SDK gives you helpers for both:
```python theme={null}
from cyberwave import Cyberwave
import os, time
cw = Cyberwave(api_key=os.environ["CYBERWAVE_API_KEY"], source_type="edge")
twin_uuid = os.environ["CYBERWAVE_TWIN_UUID"]
# --- Publish observed joint states up to the twin ---
def on_hardware_state(names, positions):
cw.data.publish("joint_states", {
"ts": time.time(),
"names": names,
"positions": positions,
})
# --- Subscribe to incoming commands and drive the hardware ---
def handle_command(cmd):
if cmd["command"] == "stop":
my_device.stop()
elif cmd["command"] == "move_forward":
my_device.move(cmd["data"].get("linear_x", 0.0))
# Wire handle_command to cyberwave/twin/{twin_uuid}/command, then run your loop:
while True:
names, positions = my_device.read_joints() # your native protocol here
on_hardware_state(names, positions)
time.sleep(0.05)
```
Publishing to the **edge data bus** with `cw.data.publish(...)` makes the data available to local worker containers and ML models with zero network overhead. Canonical channels include `joint_states`, `frames/default`, `position`, `imu`, and `battery`. You can also publish over MQTT directly for cloud consumers (frontend, telemetry, workflows).
Your driver must exit with a **non-zero** code when it can't access required
hardware (a missing `/dev/video*` device, a disconnected peripheral). That's
how Edge Core detects startup failures and triggers its restart logic.
The complete list of MQTT topics and payload schemas: joint states, navigation, telemetry, and more.
***
## Step 7: Register the manifest on your twin
Once `cw-driver.yml` is written, register it on **your** twin with the Python SDK. This compiles the YAML, persists it on the twin's metadata, refreshes the catalog cache, and binds catalog-derived command methods on `twin.commands`.
```python theme={null}
from cyberwave import Cyberwave
cw = Cyberwave(api_key="...")
twin = cw.twin("your-twin-uuid") # the twin from Step 3
# Compile cw-driver.yml, persist on this twin, re-bind catalog methods
twin.commands.set_schema("./cw-driver.yml")
# Inspect the catalog the UI and SDK now use
print(twin.commands.get_schema()["commands"]["supported"])
# Call any command you declared
twin.commands.stop()
twin.commands.move_forward(linear_x=0.3, duration=0.5, rate_hz=10)
```
Re-run `set_schema` whenever you change the manifest so teleop, agents, and SDK callers stay aligned with your driver.
`set_schema` updates **this twin's** metadata, so you can iterate without
changing a shared asset definition. When the driver is solid, you can apply the
same `metadata.mqtt` to the asset so every new twin inherits it.
***
## Step 8: Run the driver
Package the driver as a Docker image and run it. For local development, run it yourself with the same environment variables Edge Core uses:
```bash theme={null}
docker run --rm \
-e CYBERWAVE_TWIN_UUID="your-twin-uuid" \
-e CYBERWAVE_API_KEY="your-api-key" \
-e CYBERWAVE_DATA_BACKEND=zenoh \
--device /dev/ttyUSB0 \
acme-arm-driver:latest
```
For production, let **Edge Core** manage it. On the machine wired to your hardware, install the CLI and pair:
Edge Core pulls and runs your driver image with the environment variables injected automatically, beside the device, on the robot, in the cloud, or on your laptop. Check progress with `cyberwave edge logs`.
Open the environment from Step 3. Your twin should show an **online** presence
indicator, with joint states or telemetry updating live as the real hardware
moves. If it doesn't, check `cyberwave edge logs` and confirm the driver isn't
exiting on a hardware-access error.
***
## Step 9: Use the platform features
With an asset and a driver registered, your twin exposes the same platform features as any catalog device. The same MQTT topics and command surface drive all of them:
Chain perception, models, and motion into repeatable automations, low-code or in Python.
Record episodes, scrub the timeline, and export datasets for training and review.
Drive your hardware from anywhere and take over from an AI policy with one click.
Assign keyboard, teleop, or trained AI policies as the controller for your twin.
Validate behavior against the digital twin before it ever touches real hardware.
A live, synced virtual mirror of your hardware that the whole platform builds on.
***
## Where to go next
The reference overview for bringing your own hardware, plus open-source drivers.
The full driver contract: env vars, MQTT catalog, sensor output, and packaging.
Everything about preparing a URDF and creating an asset.
How Edge Core runs and manages your driver in production.
 Expand **Advanced** for two optional fields:
* **Main URDF path**: the path to the main URDF inside the ZIP (for example,
`urdf/robot.urdf`). Leave it blank to auto-detect, and set it only when the
ZIP contains more than one URDF.
* **Thumbnail**: an optional preview image (PNG or JPG) for the asset card.
Expand **Advanced** for two optional fields:
* **Main URDF path**: the path to the main URDF inside the ZIP (for example,
`urdf/robot.urdf`). Leave it blank to auto-detect, and set it only when the
ZIP contains more than one URDF.
* **Thumbnail**: an optional preview image (PNG or JPG) for the asset card.
 Click **Continue**.
 Click **Create Asset**.