
Set up the UGV Beast

1. Product Assembly

Follow the steps mentioned in this tutorial for the product assembly. This assembly tutorial mainly includes two parts. The first is a tutorial on installing Raspberry Pi 4B/5 for ACCE model products, and the second is a tutorial for installing lithium batteries. Precautions: Verify correct battery polarity before powering on to avoid hardware damage. Refer to this guide to learn more about the precautions.

2. First Time Setup

For first-time use of the UGV, you’ll have to configure the robot as per the instructions detailed out in this setup guide. This guide has detailed instructions to follow every phase mapped out below. Please use this guide to follow the step-by-step instructions for every phase. Here’s a quick work through of all the phases you need to perform for first-time use:
  1. First Time Power On: Insert the pre-configured TF card, connect power, and wait for the OLED screen to display the robot’s IP address.
  2. Connect to the Robot: Join the robot’s default Wi-Fi hotspot (AccessPopup) and open the web control interface in your browser.
  3. Network Configuration: Switch the robot from its default hotspot to your local Wi-Fi network using the JupyterLab terminal.
  4. Enable SSH: Turn on the SSH service via raspi-config so you can remotely access the Raspberry Pi from your terminal or IDE.
  5. SSH into the Raspberry Pi: Once SSH is enabled, connect to the Raspberry Pi from your local terminal:
ssh ws@<UGV_IP> -p 22
Replace <UGV_IP> with your UGV Beast’s actual IP address, which is displayed on the OLED screen (the W: line). For example: ssh ws@192.168.0.144 -p 22. Credentials:
  • Username: ws
  • Password: ws
SSH Troubleshooting: In case you’re unable to enable SSH with the guide instructions, refer to this section to use an alternative way to establish a SSH connection.

3. End and Disable the Main Program

When the UGV Beast is powered on, it automatically runs the Raspberry Pi’s default main program, which occupies the serial port and camera. This prevents ROS 2 (and our custom Cyberwave stack) from accessing the hardware. Before proceeding, you need to end and disable the main program. Follow both steps from the official Waveshare preparation guide:
  1. 1.1 End the main program — Stop the currently running main program to free the serial port and camera
  2. 1.2 Disable the main program from running automatically — Prevent it from starting again on reboot
In the standard Waveshare setup, after disabling the main program you would start their Docker remote service. Skip that step. Instead, you’ll pull and run the custom Cyberwave Docker image, which replaces the default Docker container with one that includes the MQTT Bridge, Cyberwave SDK, and pre-configured ROS 2 stack.

Phase 1: Install the Cyberwave Docker Image

Now that the UGV Beast is set up and the default main program is disabled, you need to install the custom Cyberwave Docker image. This image contains the complete Cyberwave stack — the MQTT Bridge, Cyberwave SDK, ROS 2 drivers, and everything needed to connect the UGV Beast to its Cyberwave digital twin.

Step 1: SSH into the Raspberry Pi

In case you haven’t already, from your local terminal, SSH into the UGV Beast’s Raspberry Pi:
ssh ws@<UGV_IP> -p 22
Replace <UGV_IP> with your UGV Beast’s actual IP address, displayed on the OLED screen (the W: line). For example: ssh ws@192.168.0.144 -p 22. Credentials:
  • Username: ws
  • Password: ws
  • Port: 22

Step 2: Pull the Docker Image

Once connected to the Raspberry Pi, pull the Cyberwave Docker image:
docker pull cyberwaveos/cyb_ugv_beast:latest

Step 3: Create and Run the Service Installer

To run the Cyberwave stack, you’ll create a service installer script on the Raspberry Pi. This script sets up a systemd service that automatically manages the Docker container, starting it on boot, restarting on crash, and keeping it running unattended. What the installer does:
  1. Checks for image updates: Compares local and remote image versions, prompts to update if newer is available
  2. Syncs container files: Merges the container’s /home to the Pi’s local /home, adding missing files without overwriting your existing configuration
  3. Creates a systemd service (cyb-ugv-beast.service) that starts the container on boot and restarts it on crash
  4. Enables and starts the service immediately

Create the Script

Run the following command on the Raspberry Pi to create the service installer script:
cat > /home/ws/cyb_ugv_beast_service_install.sh << 'SCRIPT_EOF'
#!/bin/bash
################################################################################
# Cyberwave UGV Beast Docker Container Service Installer
#
# This script creates a systemd service to keep the Docker container
# cyberwaveos/cyb_ugv_beast always running and auto-start on boot.
#
# Features:
#   - Checks for newer image versions and prompts to update
#   - Syncs container /home files to local /home without deleting existing files
#
# Usage:
#   sudo ./cyb_ugv_beast_service_install.sh
#
################################################################################

set -e

# Colors
RED='\033[0;31m'
GREEN='\033[0;32m'
YELLOW='\033[1;33m'
BLUE='\033[0;34m'
NC='\033[0m'

log_info()    { echo -e "${BLUE}[INFO]${NC} $1"; }
log_success() { echo -e "${GREEN}[SUCCESS]${NC} $1"; }
log_warning() { echo -e "${YELLOW}[WARNING]${NC} $1"; }
log_error()   { echo -e "${RED}[ERROR]${NC} $1"; }

# Root check
if [[ $EUID -ne 0 ]]; then
   log_error "This script must be run as root (use sudo)"
   exit 1
fi

# Configuration
CONTAINER_IMAGE="cyberwaveos/cyb_ugv_beast:latest"
CONTAINER_NAME="cyb_ugv_beast"
SERVICE_NAME="cyb-ugv-beast"

log_info "========================================"
log_info "Cyberwave UGV Beast Docker Service Installer"
log_info "========================================"
echo ""

# Check if Docker is installed
if ! command -v docker &> /dev/null; then
    log_error "Docker is not installed. Please install Docker first."
    exit 1
fi

# Check if Docker service is running
if ! systemctl is-active --quiet docker; then
    log_info "Starting Docker service..."
    systemctl start docker
    sleep 2
fi

################################################################################
# STEP 1: Check for image updates
################################################################################
log_info "Checking for image updates..."

IMAGE_UPDATED=false

if docker image inspect "$CONTAINER_IMAGE" &> /dev/null; then
    LOCAL_DIGEST=$(docker image inspect "$CONTAINER_IMAGE" --format '{{index .RepoDigests 0}}' 2>/dev/null | cut -d'@' -f2)
    
    log_info "Local image digest: ${LOCAL_DIGEST:-unknown}"
    log_info "Fetching remote image info from Docker Hub..."
    
    if docker pull "$CONTAINER_IMAGE" --quiet > /dev/null 2>&1; then
        REMOTE_DIGEST=$(docker image inspect "$CONTAINER_IMAGE" --format '{{index .RepoDigests 0}}' 2>/dev/null | cut -d'@' -f2)
        log_info "Remote image digest: ${REMOTE_DIGEST:-unknown}"
        
        if [[ "$LOCAL_DIGEST" != "$REMOTE_DIGEST" ]] && [[ -n "$REMOTE_DIGEST" ]]; then
            log_warning "A newer version of the image is available!"
            echo ""
            read -p "Do you want to update to the latest image? [y/N]: " UPDATE_RESPONSE
            if [[ "$UPDATE_RESPONSE" =~ ^[Yy]$ ]]; then
                log_info "Updating image..."
                if docker pull "$CONTAINER_IMAGE"; then
                    log_success "Image updated successfully!"
                    IMAGE_UPDATED=true
                else
                    log_error "Failed to update image"
                    exit 1
                fi
            else
                log_info "Keeping current image version."
            fi
        else
            log_success "Image is already up to date!"
        fi
    else
        log_warning "Could not check for remote updates. Using local image."
    fi
else
    log_warning "Docker image '$CONTAINER_IMAGE' not found locally."
    log_info "Pulling image from Docker Hub..."
    if docker pull "$CONTAINER_IMAGE"; then
        log_success "Image pulled successfully!"
        IMAGE_UPDATED=true
    else
        log_error "Failed to pull image '$CONTAINER_IMAGE'"
        exit 1
    fi
fi

################################################################################
# STEP 2: Sync container /home to local /home (without deleting local files)
################################################################################
log_info "========================================"
log_info "Syncing container /home to local /home..."
log_info "========================================"

TEMP_CONTAINER="cyb_ugv_beast_temp_sync_$$"

log_info "Creating temporary container to extract /home contents..."
docker create --name "$TEMP_CONTAINER" "$CONTAINER_IMAGE" /bin/true > /dev/null 2>&1

TEMP_DIR=$(mktemp -d)

log_info "Extracting container /home contents..."
docker cp "$TEMP_CONTAINER:/home/." "$TEMP_DIR/" 2>/dev/null || {
    log_warning "Could not extract /home from container (may not exist)"
}

merge_directories() {
    local src="$1"
    local dst="$2"
    local indent="${3:-}"
    
    for item in "$src"/*; do
        [[ -e "$item" ]] || continue
        
        local basename=$(basename "$item")
        local dst_item="$dst/$basename"
        
        if [[ -d "$item" ]]; then
            if [[ ! -d "$dst_item" ]]; then
                log_info "${indent}[+] Adding directory: $dst_item"
                cp -r "$item" "$dst_item"
            else
                log_info "${indent}[~] Merging directory: $dst_item"
                merge_directories "$item" "$dst_item" "  $indent"
            fi
        else
            if [[ ! -e "$dst_item" ]]; then
                log_info "${indent}[+] Adding file: $dst_item"
                cp "$item" "$dst_item"
            else
                log_info "${indent}[=] Keeping local: $dst_item"
            fi
        fi
    done
}

if [[ -d "$TEMP_DIR" ]] && [[ "$(ls -A $TEMP_DIR 2>/dev/null)" ]]; then
    log_info "Performing deep recursive merge (local files will NOT be overwritten)..."
    echo ""
    merge_directories "$TEMP_DIR" "/home"
    echo ""
    log_success "Home directory sync completed!"
else
    log_info "No /home contents to sync from container."
fi

rm -rf "$TEMP_DIR"
docker rm "$TEMP_CONTAINER" > /dev/null 2>&1
log_info "Temporary container removed."

echo ""
log_info "Docker image found locally: $CONTAINER_IMAGE"

CONTAINER_RUNNING=false
if docker ps --format '{{.Names}}' | grep -q "^${CONTAINER_NAME}$"; then
    CONTAINER_RUNNING=true
    log_info "Container '$CONTAINER_NAME' is already running"
fi

if systemctl is-active --quiet "$SERVICE_NAME" 2>/dev/null; then
    log_info "Stopping existing service for reconfiguration..."
    systemctl stop "$SERVICE_NAME"
    CONTAINER_RUNNING=false
fi

if docker ps -a --format '{{.Names}}' | grep -q "^${CONTAINER_NAME}$"; then
    log_info "Cleaning up existing container..."
    docker stop "$CONTAINER_NAME" 2>/dev/null || true
    docker rm "$CONTAINER_NAME" 2>/dev/null || true
fi

log_info "Creating systemd service file..."

cat > "/etc/systemd/system/${SERVICE_NAME}.service" <<SERVICEFILE
[Unit]
Description=Cyberwave UGV Beast Docker Container
Documentation=https://github.com/cyberwave-os/cyberwave-edge-ros
After=docker.service network-online.target
Requires=docker.service
Wants=network-online.target

[Service]
Type=simple
TimeoutStartSec=300
Restart=always
RestartSec=10

ExecStartPre=/bin/bash -c '/usr/bin/docker image inspect ${CONTAINER_IMAGE} >/dev/null 2>&1 || /usr/bin/docker pull ${CONTAINER_IMAGE}'
ExecStartPre=-/usr/bin/docker stop ${CONTAINER_NAME}
ExecStartPre=-/usr/bin/docker rm ${CONTAINER_NAME}

ExecStart=/usr/bin/docker run \
    --name ${CONTAINER_NAME} \
    --privileged \
    --network host \
    --pid host \
    --init \
    -v /dev:/dev \
    -v /sys:/sys \
    -v /proc:/proc \
    -v /run/udev:/run/udev:ro \
    -v /tmp/.X11-unix:/tmp/.X11-unix \
    -v /home:/home \
    -e DISPLAY=\${DISPLAY} \
    -e ROS_DOMAIN_ID=0 \
    ${CONTAINER_IMAGE} \
    /bin/bash -c "/ssh_entrypoint.sh && exec tail -f /dev/null"

ExecStop=/usr/bin/docker stop -t 10 ${CONTAINER_NAME}
ExecStopPost=-/usr/bin/docker rm ${CONTAINER_NAME}

[Install]
WantedBy=multi-user.target
SERVICEFILE

log_success "Service file created: /etc/systemd/system/${SERVICE_NAME}.service"

systemctl daemon-reload

log_info "Enabling service to start on boot..."
systemctl enable "$SERVICE_NAME"

log_info "Starting the service..."
systemctl start "$SERVICE_NAME"

log_info "Waiting for container to start..."
for i in {1..30}; do
    if docker ps --format '{{.Names}}' | grep -q "^${CONTAINER_NAME}$"; then
        break
    fi
    sleep 1
    echo -n "."
done
echo ""

if systemctl is-active --quiet "$SERVICE_NAME"; then
    log_success "Service is running!"
else
    log_warning "Service may still be starting. Check status with:"
    log_info "  sudo systemctl status $SERVICE_NAME"
fi

if docker ps --format '{{.Names}}' | grep -q "^${CONTAINER_NAME}$"; then
    log_success "Container is running!"
else
    log_warning "Container may still be starting. Check with:"
    log_info "  docker ps -a"
fi

echo ""
log_success "========================================"
log_success "Installation Complete!"
log_success "========================================"
echo ""
log_info "Service name: $SERVICE_NAME"
log_info "Container name: $CONTAINER_NAME"
log_info "Image: $CONTAINER_IMAGE"
Close the heredoc and make the script executable:
SCRIPT_EOF
chmod +x /home/ws/cyb_ugv_beast_service_install.sh

Run the Installer

sudo ./cyb_ugv_beast_service_install.sh
Useful management commands:
# Check service status
sudo systemctl status cyb-ugv-beast

# Stop / Start / Restart
sudo systemctl stop cyb-ugv-beast
sudo systemctl start cyb-ugv-beast
sudo systemctl restart cyb-ugv-beast

# View container logs
docker logs -f cyb_ugv_beast

Step 4: SSH into the Docker Container

Once the container is running, SSH into the Docker container to configure Cyberwave credentials. This is a different SSH session from the Raspberry Pi host — it connects directly into the Docker container on port 23:
ssh root@<UGV_IP> -p 23
Replace <UGV_IP> with the same IP address from the OLED screen (e.g., ssh root@192.168.0.144 -p 23). Docker Container Credentials:
  • Username: root
  • Password: ws
The Raspberry Pi host is accessible on port 22 (for system and network tasks), while the Docker container is accessible on port 23 (for ROS 2 and Cyberwave configuration). These are two separate SSH sessions into different environments on the same device.

Phase 2: Configure and Launch Cyberwave

With the Docker container running and accessible via SSH (port 23), you can now configure the Cyberwave credentials, build the MQTT bridge, and launch the stack.

Step 1: Add the UGV Beast Twin in Cyberwave

Before configuring the edge, set up the digital twin on the Cyberwave platform:
  1. Log in to your Cyberwave Dashboard
  2. Create a new Project (or use an existing one)
  3. Create a new Environment within the project
  4. Click Add Scene Object and select UGV Beast from the Catalog
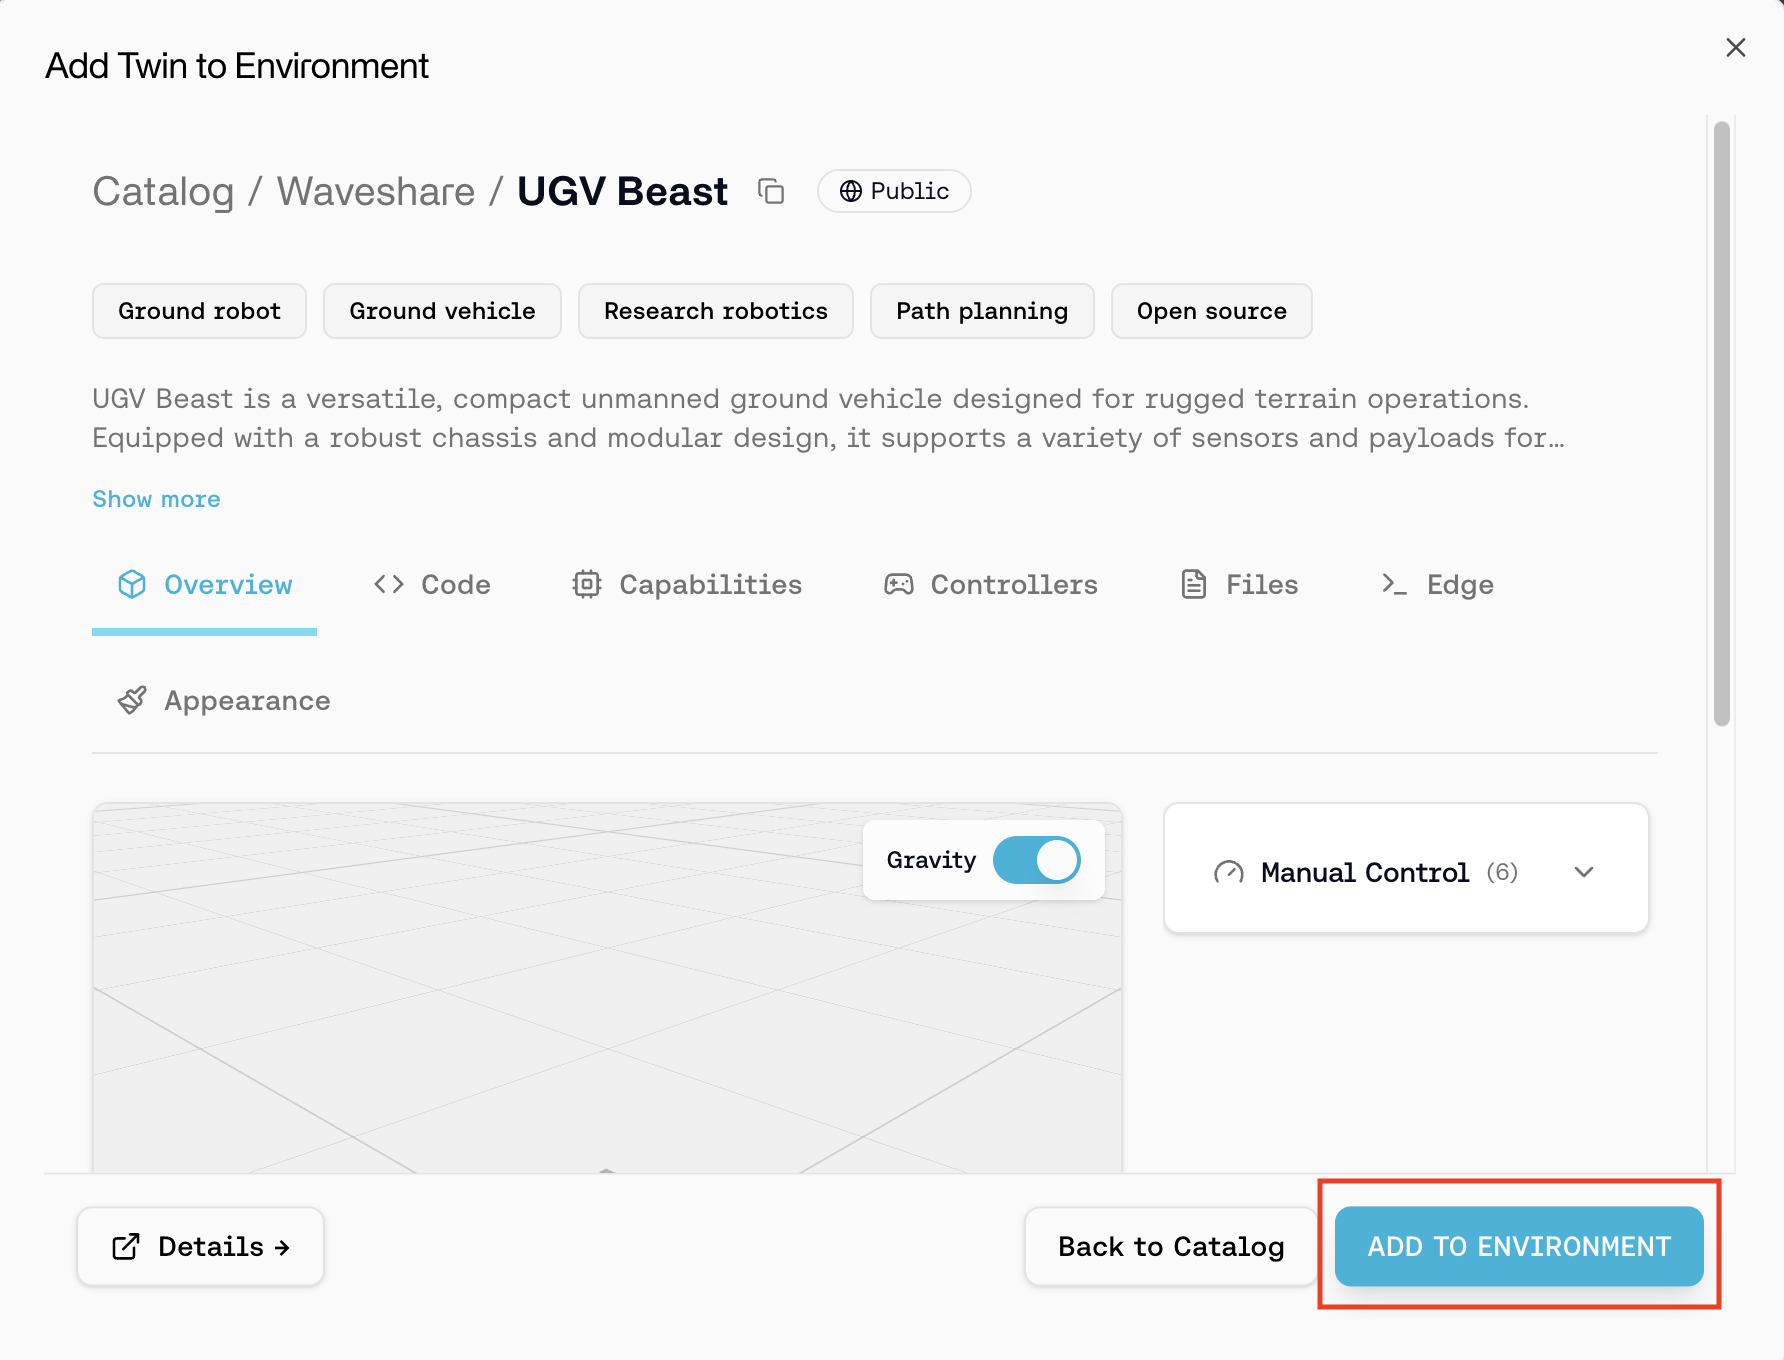
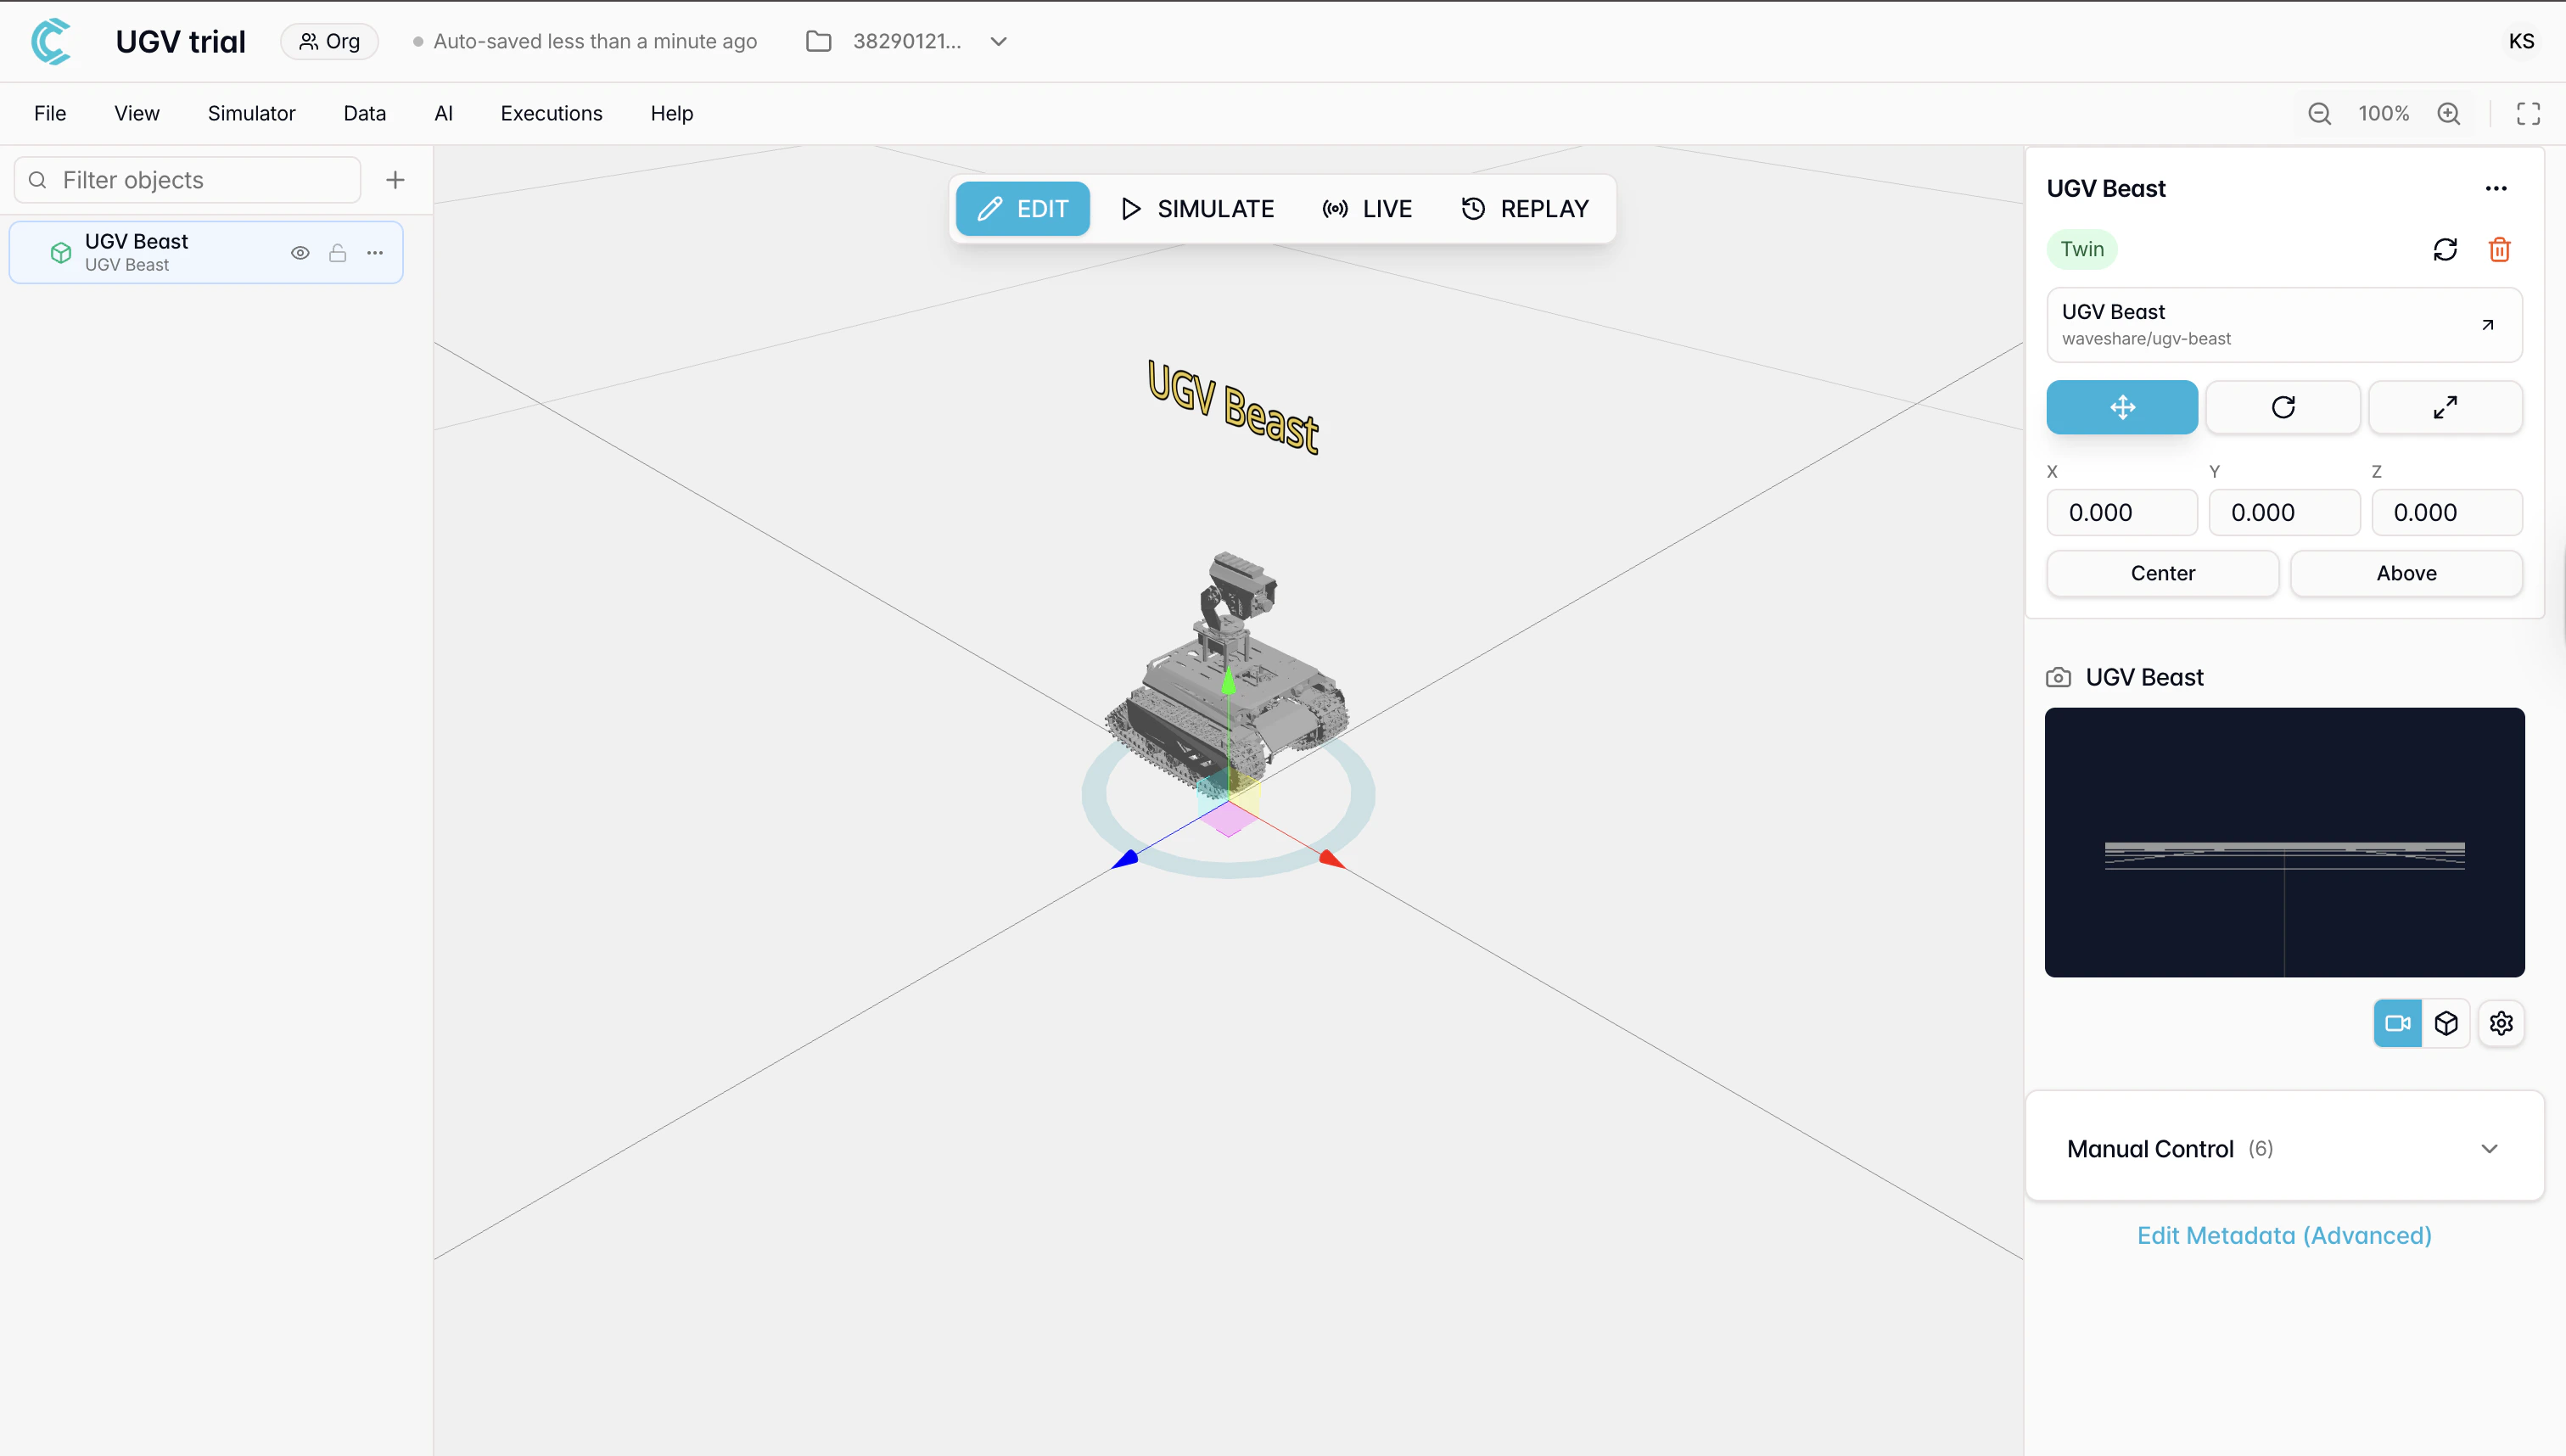
  5. The twin is added to your environment with the required capabilities pre-configured
Copy the Twin UUID — you’ll need it in the next step. Hover over the three dots next to the asset in the sidebar and click Copy Twin UUID.

Step 2: Set Your Cyberwave Token

Inside the Docker container (SSH’d in on port 23), navigate to the ROS workspace:
cd /home/ws/ugv_ws
This is where the ROS workspace for the UGV Beast lives. You’ll see the build, install, log, and src folders here. Open the parameters file and set your Cyberwave API token: File: src/mqtt_bridge/config/params.yaml
broker:
  cyberwave_token: "your-api-token-here"
You can find your API token in the Cyberwave dashboard under Settings → API Keys.

Step 3: Set Your Twin UUID

Open the mapping file and set the Twin UUID you copied in Step 1: File: src/mqtt_bridge/config/mappings/robot_ugv_beast_v1.yaml
metadata:
  twin_uuid: "your-twin-uuid-here"
Save both files before proceeding.

Step 4: Build the MQTT Bridge

After updating the credentials, rebuild the MQTT bridge to apply the changes:
cd /home/ws/ugv_ws
chmod +x src/mqtt_bridge/scripts/ugv_beast/clean_build_mqtt.sh
./src/mqtt_bridge/scripts/ugv_beast/clean_build_mqtt.sh --logs
You must rebuild the MQTT bridge every time you change the token or twin UUID.

Step 5: Launch the UGV Beast Stack

Start the full UGV Beast ROS 2 stack with the MQTT bridge by running the launch script:
cd /home/ws/ugv_ws
chmod +x ugv_run.sh
./ugv_run.sh
Once launched, the MQTT bridge establishes a connection to Cyberwave and begins streaming telemetry data from the robot to the digital twin.
Connection Established: If successful, you should see the digital twin in your Cyberwave environment updating in real time with the robot’s joint states and sensor data.

Step 6: Add the Cyberwave UGV Beast Controller

Go back to your Cyberwave environment and switch to Live Mode to view updates in real time. Add a UGV Beast controller policy to enable keyboard control. From here, you can:
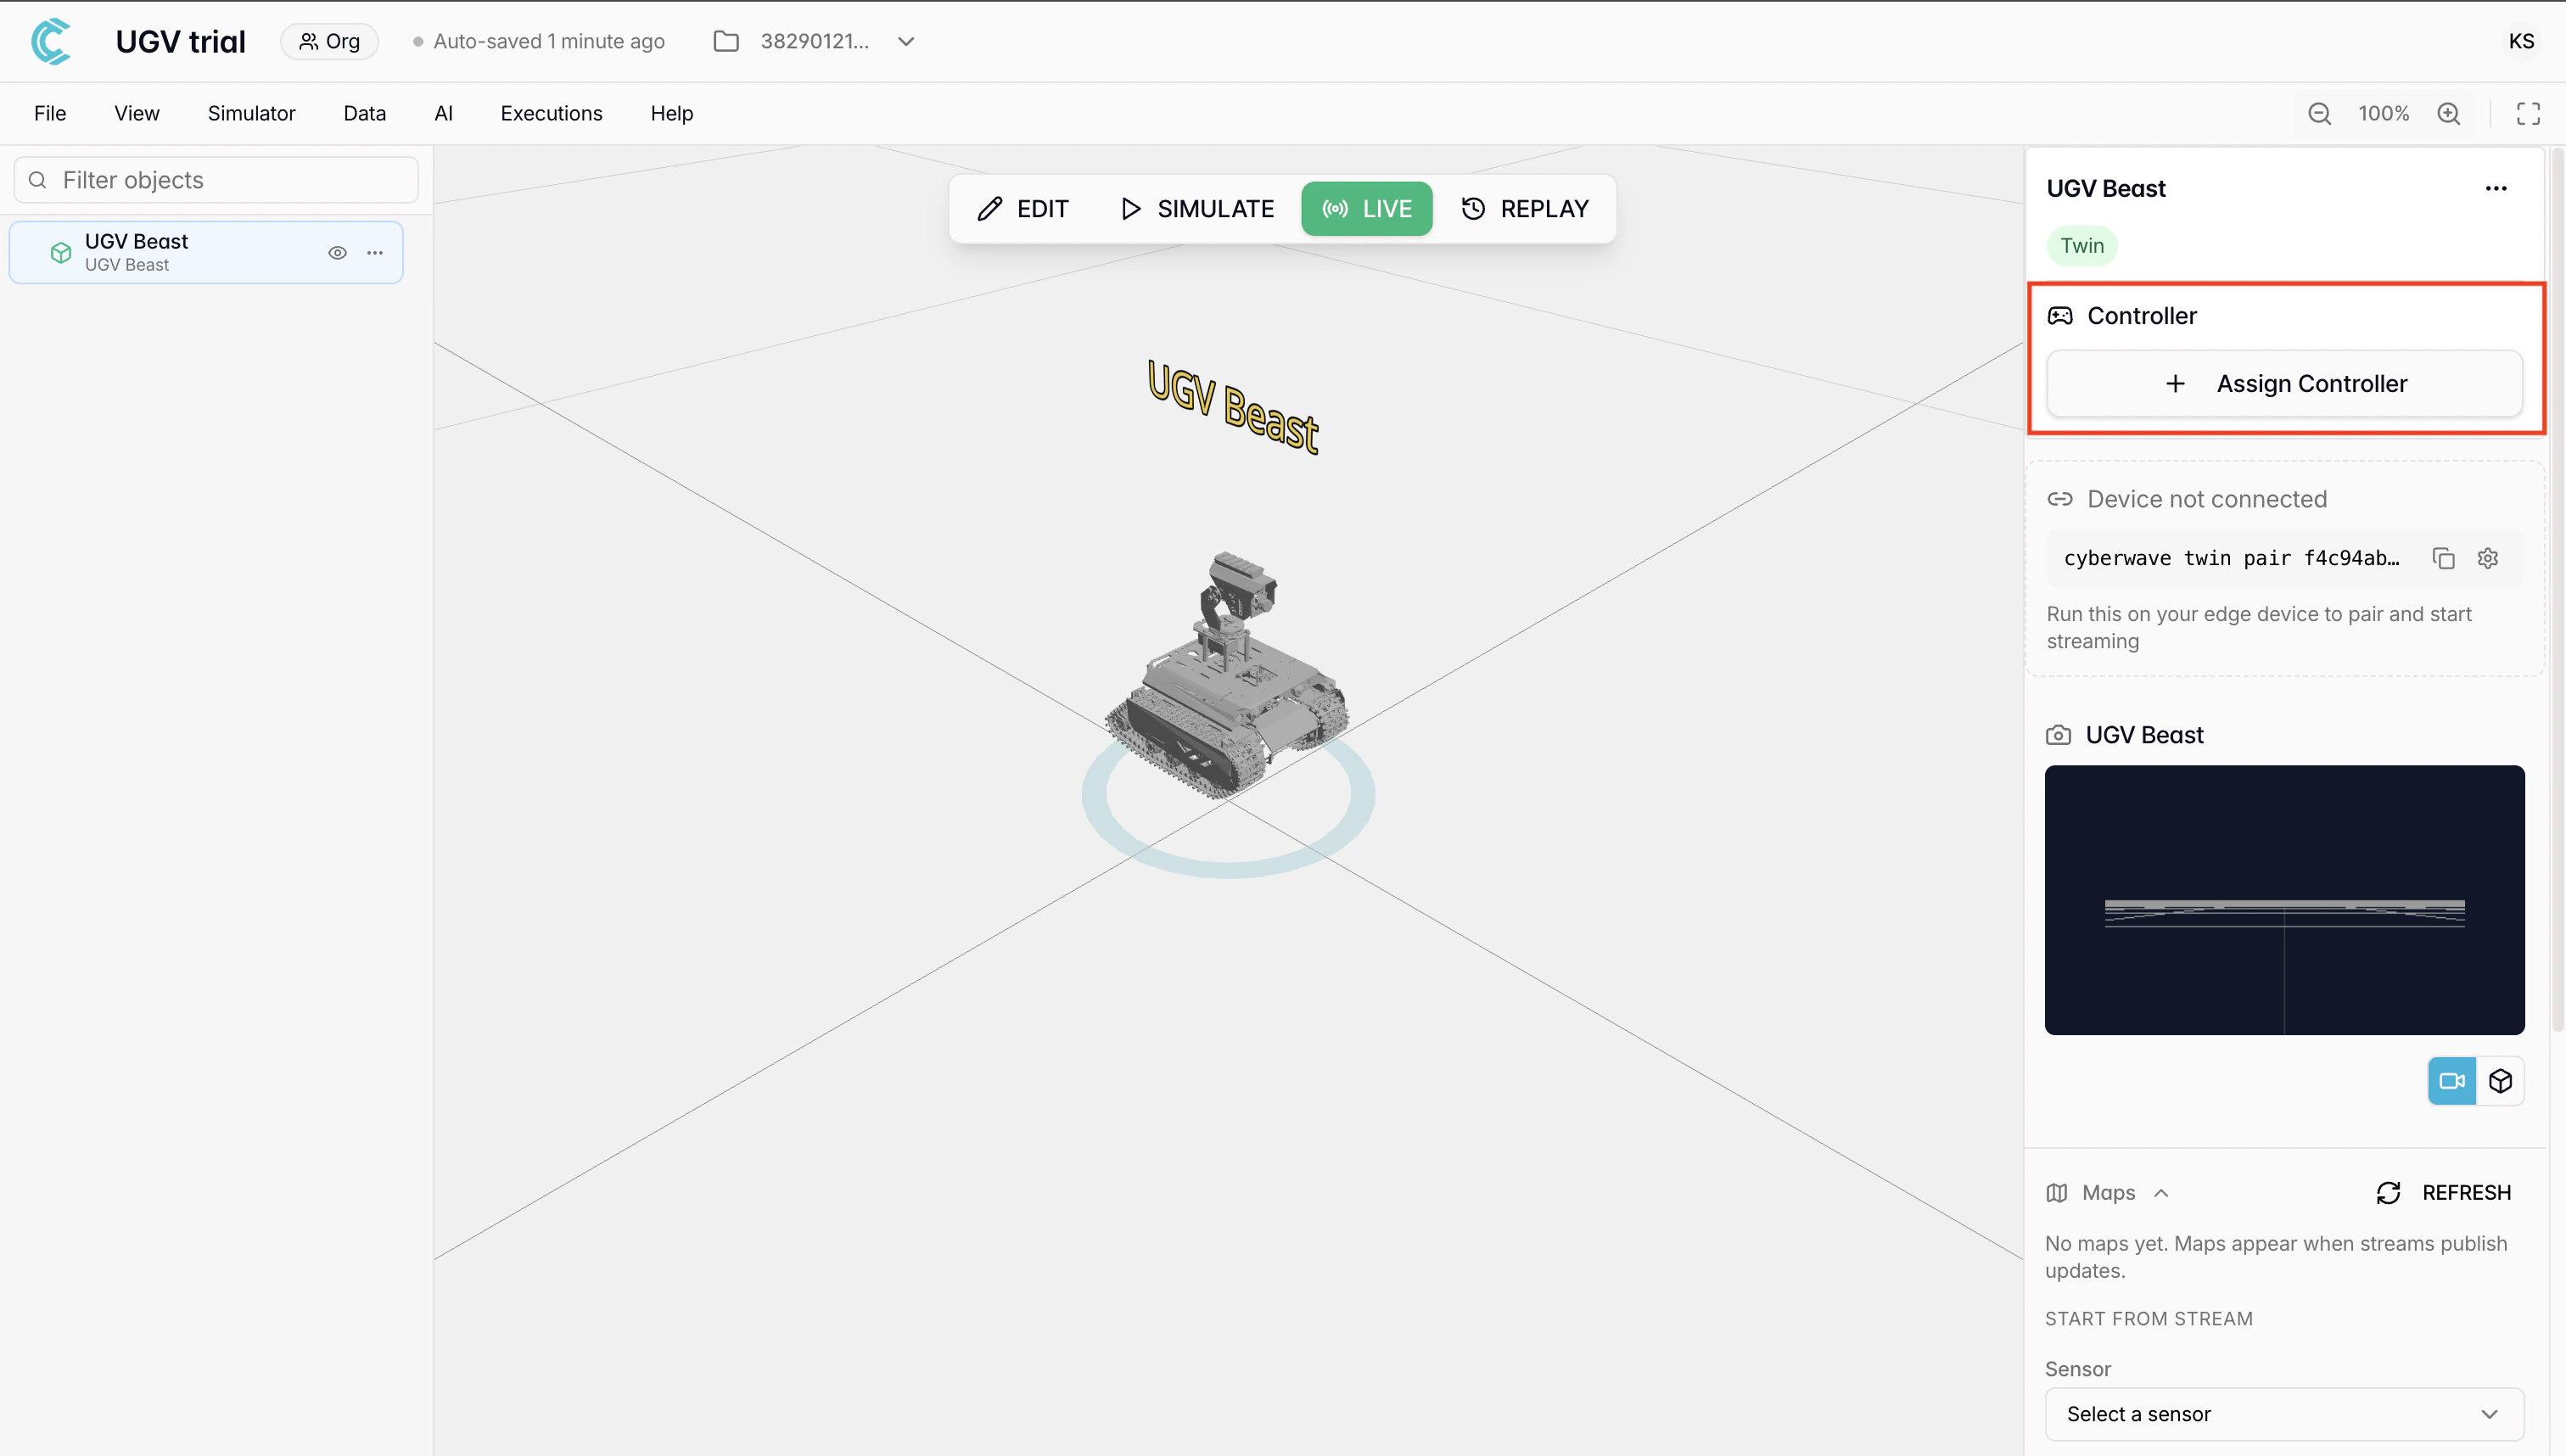
  • Move the rover using keyboard input
  • Turn on the onboard camera
  • Record video datasets
  • Interact with the robot in real time

Miscellaneous

Establish SSH Connection

The UGV Beast has two separate SSH hosts on the same device. Both use the UGV’s IP address (displayed on the OLED screen, the W: line), but they connect to different environments on different ports:
HostUserPortPurpose
Raspberry Piws22System administration, Docker management, network config
Docker Containerroot23ROS 2, MQTT Bridge, Cyberwave configuration

Option 1: Direct SSH Commands

Connect directly using the IP from the OLED screen:
# Into the Raspberry Pi host
ssh ws@<UGV_IP> -p 22

# Into the Docker container
ssh root@<UGV_IP> -p 23
Replace <UGV_IP> with your UGV’s actual IP (e.g., 192.168.0.144). Default password for both is ws. Add the following entries to your local ~/.ssh/config file for quick, repeatable access. Replace the HostName with your UGV’s actual IP from the OLED screen:
Host ugv-ubuntu
    HostName <UGV_IP>
    User ws
    Port 22

Host ugv-ubuntu-docker
    HostName <UGV_IP>
    User root
    Port 23
Once saved, you can connect with a short alias:
# Into the Raspberry Pi host
ssh ugv-ubuntu

# Into the Docker container
ssh ugv-ubuntu-docker

Option 3: Via Your IDE (e.g., VS Code Remote SSH)

If you use VS Code or Cursor with the Remote - SSH extension:
  1. Add both ugv-ubuntu and ugv-ubuntu-docker hosts to your ~/.ssh/config (as shown above)
  2. Open the Remote Explorer panel in your IDE
  3. Select the host you want to connect to and open a remote window
This lets you edit files, run terminals, and debug directly on the Raspberry Pi or inside the Docker container from your IDE.