
Documentation Index
Fetch the complete documentation index at: https://docs.cyberwave.com/llms.txt
Use this file to discover all available pages before exploring further.
Get Started with SO101
Goals
This guide helps you:- Set up an SO101 arm and an external camera in a real environment and replicate the same setup in Cyberwave.
- Configure teleoperation and remote operation to control the follower arm using a leader arm and Cyberwave data.
- Create datasets for specific tasks and use them to train and deploy ML models.
- Use deployed ML models as controller policies to control the follower arm directly from Cyberwave.
Prerequisites
Before you begin this quick start guide, ensure you have the following:- Hardware
- Credentials
- SO101 robot arm set (leader and follower arms) (Contact us if you want access to this hardware)
- External camera (USB or IP camera) to record video feeds for datasets
- Computer or single-board computer (SBC, e.g., Raspberry Pi with 64-bit OS)
- USB or serial connection to the SO101 devices
Set Up Teleoperation
Step 1: Set Up the Cyberwave Environment
An environment is a 3D virtual space that mirrors your real-world robot setup. It’s where your digital twins live, sensors stream data, and controllers send commands, all in real time. You’ll create one environment that contains both the SO101 arm and camera twins. Create the environment:- Go to the Cyberwave dashboard and click on New Environment.
- Give your environment a name (e.g., “SO101 Teleoperation Setup”) and description.
- Inside your environment, click Add from Catalog in the left panel.
- Search for and select SO101.
- Add it to your environment and position it to match your physical setup.
- Click Add from Catalog again.
- Search for and select Standard Camera.
- Add it to your environment.
Some cameras may use different frameworks and support lower resolutions, which
can limit video streaming quality.
- Click on the Standard Camera twin and switch to Edit Mode.
- In the Dock to Twin option, select the SO101 twin.
- In the Parent Root dropdown, select wrist.
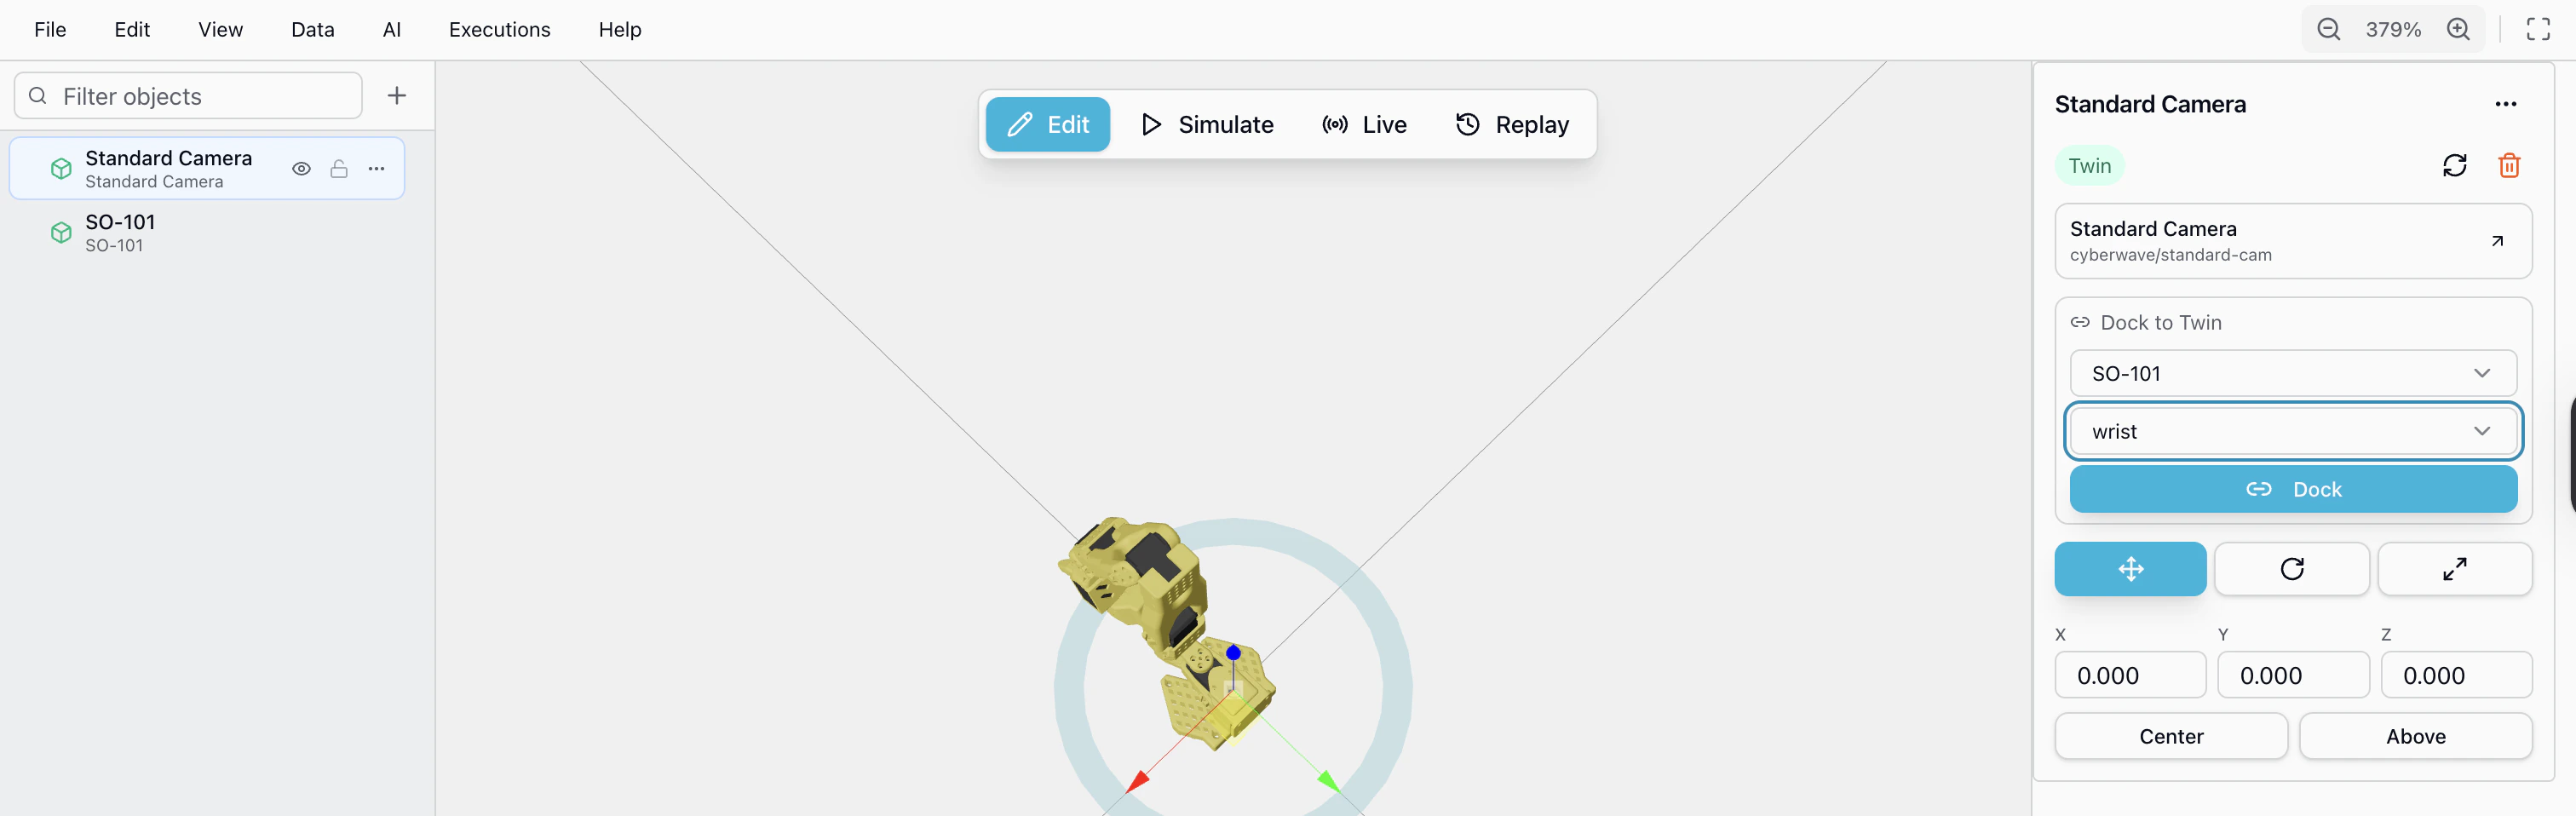
Docking the camera to the wrist angle means the camera physically follows the
arm’s end-effector. This is essential for manipulation tasks where the camera
needs to see what the gripper is doing, the resulting video feed stays aligned
with the arm’s workspace during teleoperation and dataset recording.
Step 2: Install the Cyberwave Edge
The Cyberwave CLI is the command-line tool used to authenticate, pair, and manage your physical hardware with the Cyberwave platform. The Edge Core acts as the bridge between the SO101 hardware and the Cyberwave cloud backend. SSH into your edge device: Connect to the device that is physically connected to the SO101 arms and camera (e.g., Raspberry Pi, Jetson, or your local computer):macOS: USB device passthrough via USB/IP
macOS: USB device passthrough via USB/IP
Docker Desktop on macOS cannot pass USB devices (serial controllers, cameras) directly to containers. During Verifying the setup:Inside a driver container, USB devices should be visible:Check that the USB/IP server is running on the host:If not running, you can tear down and rebuild the entire setup from scratch:Or restart the service manually:
cyberwave edge install, the CLI automatically sets up a USB/IP server that bridges this gap.Requirements:- Rust toolchain (
cargomust be in your PATH) - Docker Desktop 4.35+
- The CLI clones and builds the jiegec/usbip host server
- A shell wrapper and
launchdagent are created so the server starts automatically on login - macOS extended attributes are stripped and file ownership is corrected (even when installed via
sudo) - Driver containers use
--pid=hostand auto-attach all USB devices at startup - Serial controllers appear as
/dev/ttyACM*, cameras as/dev/video*
Auto-discovery attaches all USB devices exported by the host USB/IP server. If you need to limit which devices are attached, set
CYBERWAVE_USBIP_BUSID to a specific bus ID.macOS: Camera stream (automatic)
macOS: Camera stream (automatic)
On macOS, Docker cannot access USB cameras directly. During This re-prompts for camera selection and restarts the stream and edge-core service.
cyberwave edge install, the CLI automatically sets up an MJPEG camera stream bridge:- The installer prompts you to select which camera to use from the list of detected AVFoundation devices.
- An
ffmpegprocess captures from the selected camera and serves an MJPEG stream onhttp://localhost:8091. - A
launchdagent ensures the stream starts automatically on login. - Edge Core passes
CYBERWAVE_METADATA_VIDEO_DEVICE=http://host.docker.internal:8091to driver containers. - The driver’s
cv2.VideoCapturenatively supports HTTP MJPEG URLs — no driver code changes needed.
- ffmpeg (
brew install ffmpeg)
This fallback does not work for Intel RealSense depth cameras (which require raw USB access).
- Select the environment you created.
- Select the SO101 digital twin.
- The appropriate driver will be automatically installed and configured.
- Repeat for the camera twin.
Step 3: Calibrate the Arms
Calibration is a required step before using an SO101 arm for teleoperation or control. It teaches the software where each joint’s zero (reference) position is, what its valid movement range is, and how the physical arm maps to the software model. Without calibration, the robot won’t know where its joints actually are and commands won’t translate correctly to hardware movements.When you first connect a robot, it will have no calibration, you must
complete calibration before the arm can be used. If you ever need to
recalibrate (e.g. after reassembly or mechanical adjustments), you can delete
the existing calibration from the platform and redo it.
- Open the Cyberwave dashboard and navigate to your environment.
- Select the SO101 twin, you’ll see an option to Calibrate both arms (leader and follower).
- Click Calibrate and follow the on-screen prompts.
- Manually move every joint of the leader arm through its full range when prompted.
- Repeat for the follower arm.
- Once both arms are calibrated, the platform will confirm the calibration is complete.
Step 4: Set Up Teleoperation
Teleoperation lets you control the follower arm using the leader arm in real time. When you physically move the leader arm, the follower arm mirrors those movements instantly, giving you an intuitive, hands-on way to operate the robot. This is the primary method for performing tasks, collecting training data, and demonstrating behaviors to the system. How Teleoperation Works: The teleoperation system creates a synchronized connection between:- Physical leader arm → captures human-guided joint movements
- Physical follower arm → executes the movements in real-time
- Digital twin → receives telemetry data from both arms for monitoring and recording
- Open your environment in the Cyberwave dashboard.
- Click the Assign Controller button.
- Select Local Teleop from the list of available controllers.
- The teleoperation session will start, the follower arm is now linked to the leader arm.
Teleoperation is active. Try moving the leader arm — the follower arm will
replicate your movements in real time.
Controller types and data quality:
- Local Teleop — actively generates high-frequency control data as you move the leader arm. This produces smooth, consistent datasets suitable for training ML models.
- Keyboard — still generates data, but at a much lower control frequency. Keyboard-generated data is not recommended for datasets as the low frequency results in jerky, inconsistent demonstrations that don’t train well.
Set Up Remote Operation
Remote operation lets you control the follower arm without a physical leader arm. Instead, you assign an external controller to the robot’s digital twin and send commands directly from the Cyberwave platform. This is useful when you want to control the arm from a distance, test different control strategies, or run autonomous policies. How Remote Operation Works: In teleoperation, the leader arm drives the follower. In remote operation, a controller takes the place of the leader arm. The controller can be anything, a keyboard, a gamepad, a scripted sequence, or an AI model (like a VLA). You assign the controller to the SO101 digital twin, and it sends commands to the physical follower arm in real time via the edge runtime. Set Up Remote Operation:- Open your environment in the Cyberwave dashboard.
- Click the Assign Controller button on the SO101 twin.
- Select a controller from the list, for example:
- Keyboard — control individual joints using keyboard keys
- VLA Model — a trained vision-language-action model that executes tasks from prompts
- Custom Controller — any controller you’ve registered in the platform
- Once assigned, the follower arm will respond to commands from the selected controller.
Remote operation is active. The follower arm is now being controlled by the
assigned controller, no leader arm needed.
Follower rest behavior (SO101)
stub — Behavior details may be refined before publication.
- After calibration completes, or when a controller is detached and the follower is no longer driven by Cyberwave, the follower arm returns to a sit pose when it disconnects from the active control session (safe resting configuration).
- When you attach any controller other than Local Teleop (for example Keyboard, VLA, or another remote policy), the follower moves to zero pose as soon as that controller session is up and running, before you send task-specific commands.
- For those controller modes (not Local Teleop), collision detection is on by default on the follower. Expect alerts that describe near-collision conditions (what is close to contacting) so you can adjust the pose or workspace.
Always keep clearance around the arm; automatic moves to sit or zero pose can still contact objects or people if the workspace is cluttered.
Alerts and disabled controls
stub — Alert copy and exact UI rules may change before publication.The dashboard uses an alerting flow to guide setup:
- Missing calibration (or calibration files not available on the twin/edge as expected) triggers alerts so you calibrate before relying on motion.
- Controller lifecycle — attaching, removing, or swapping controllers triggers alerts so the robot and UI state stay aligned with what is actually running on the edge.
- Collision / proximity — when the follower is driven by any controller except Local Teleop, collision detection runs by default. Alerts can explain what is nearing collision (e.g. links or constrained geometry) so you can clear interference or change commands before a clash.
- While alerts require action, parts of the UI may be disabled so you cannot click through to operations that could misconfigure the arm or cause unexpected motion.
Create and Export Datasets
Once teleoperation is set up and working, you can create datasets by recording episodes of the robot performing specific tasks. These datasets can later be used to train machine learning models for autonomous operation.For recording datasets with the SO101, we recommend using teleoperation
rather than remote operation. Controlling the follower arm with a physical
leader arm gives you finer, more intuitive control resulting in smoother
demonstrations and higher-quality training data.
- Joint positions and movements over time
- Camera video feed showing the task execution
- Timing and sequence data
Step 1: Record Episodes
Recording episodes captures the manual operations performed through teleoperation. Each recording can contain multiple task demonstrations that you’ll later trim into episodes. Start Recording in Live Mode:- Navigate to your Cyberwave environment in the dashboard
- Switch to Live Mode in the environment viewer
- Turn on the camera:
- Locate the camera icon in the upper-right corner
- Click the Turn On icon to activate the camera feed
- Click Start Recording to begin capturing data
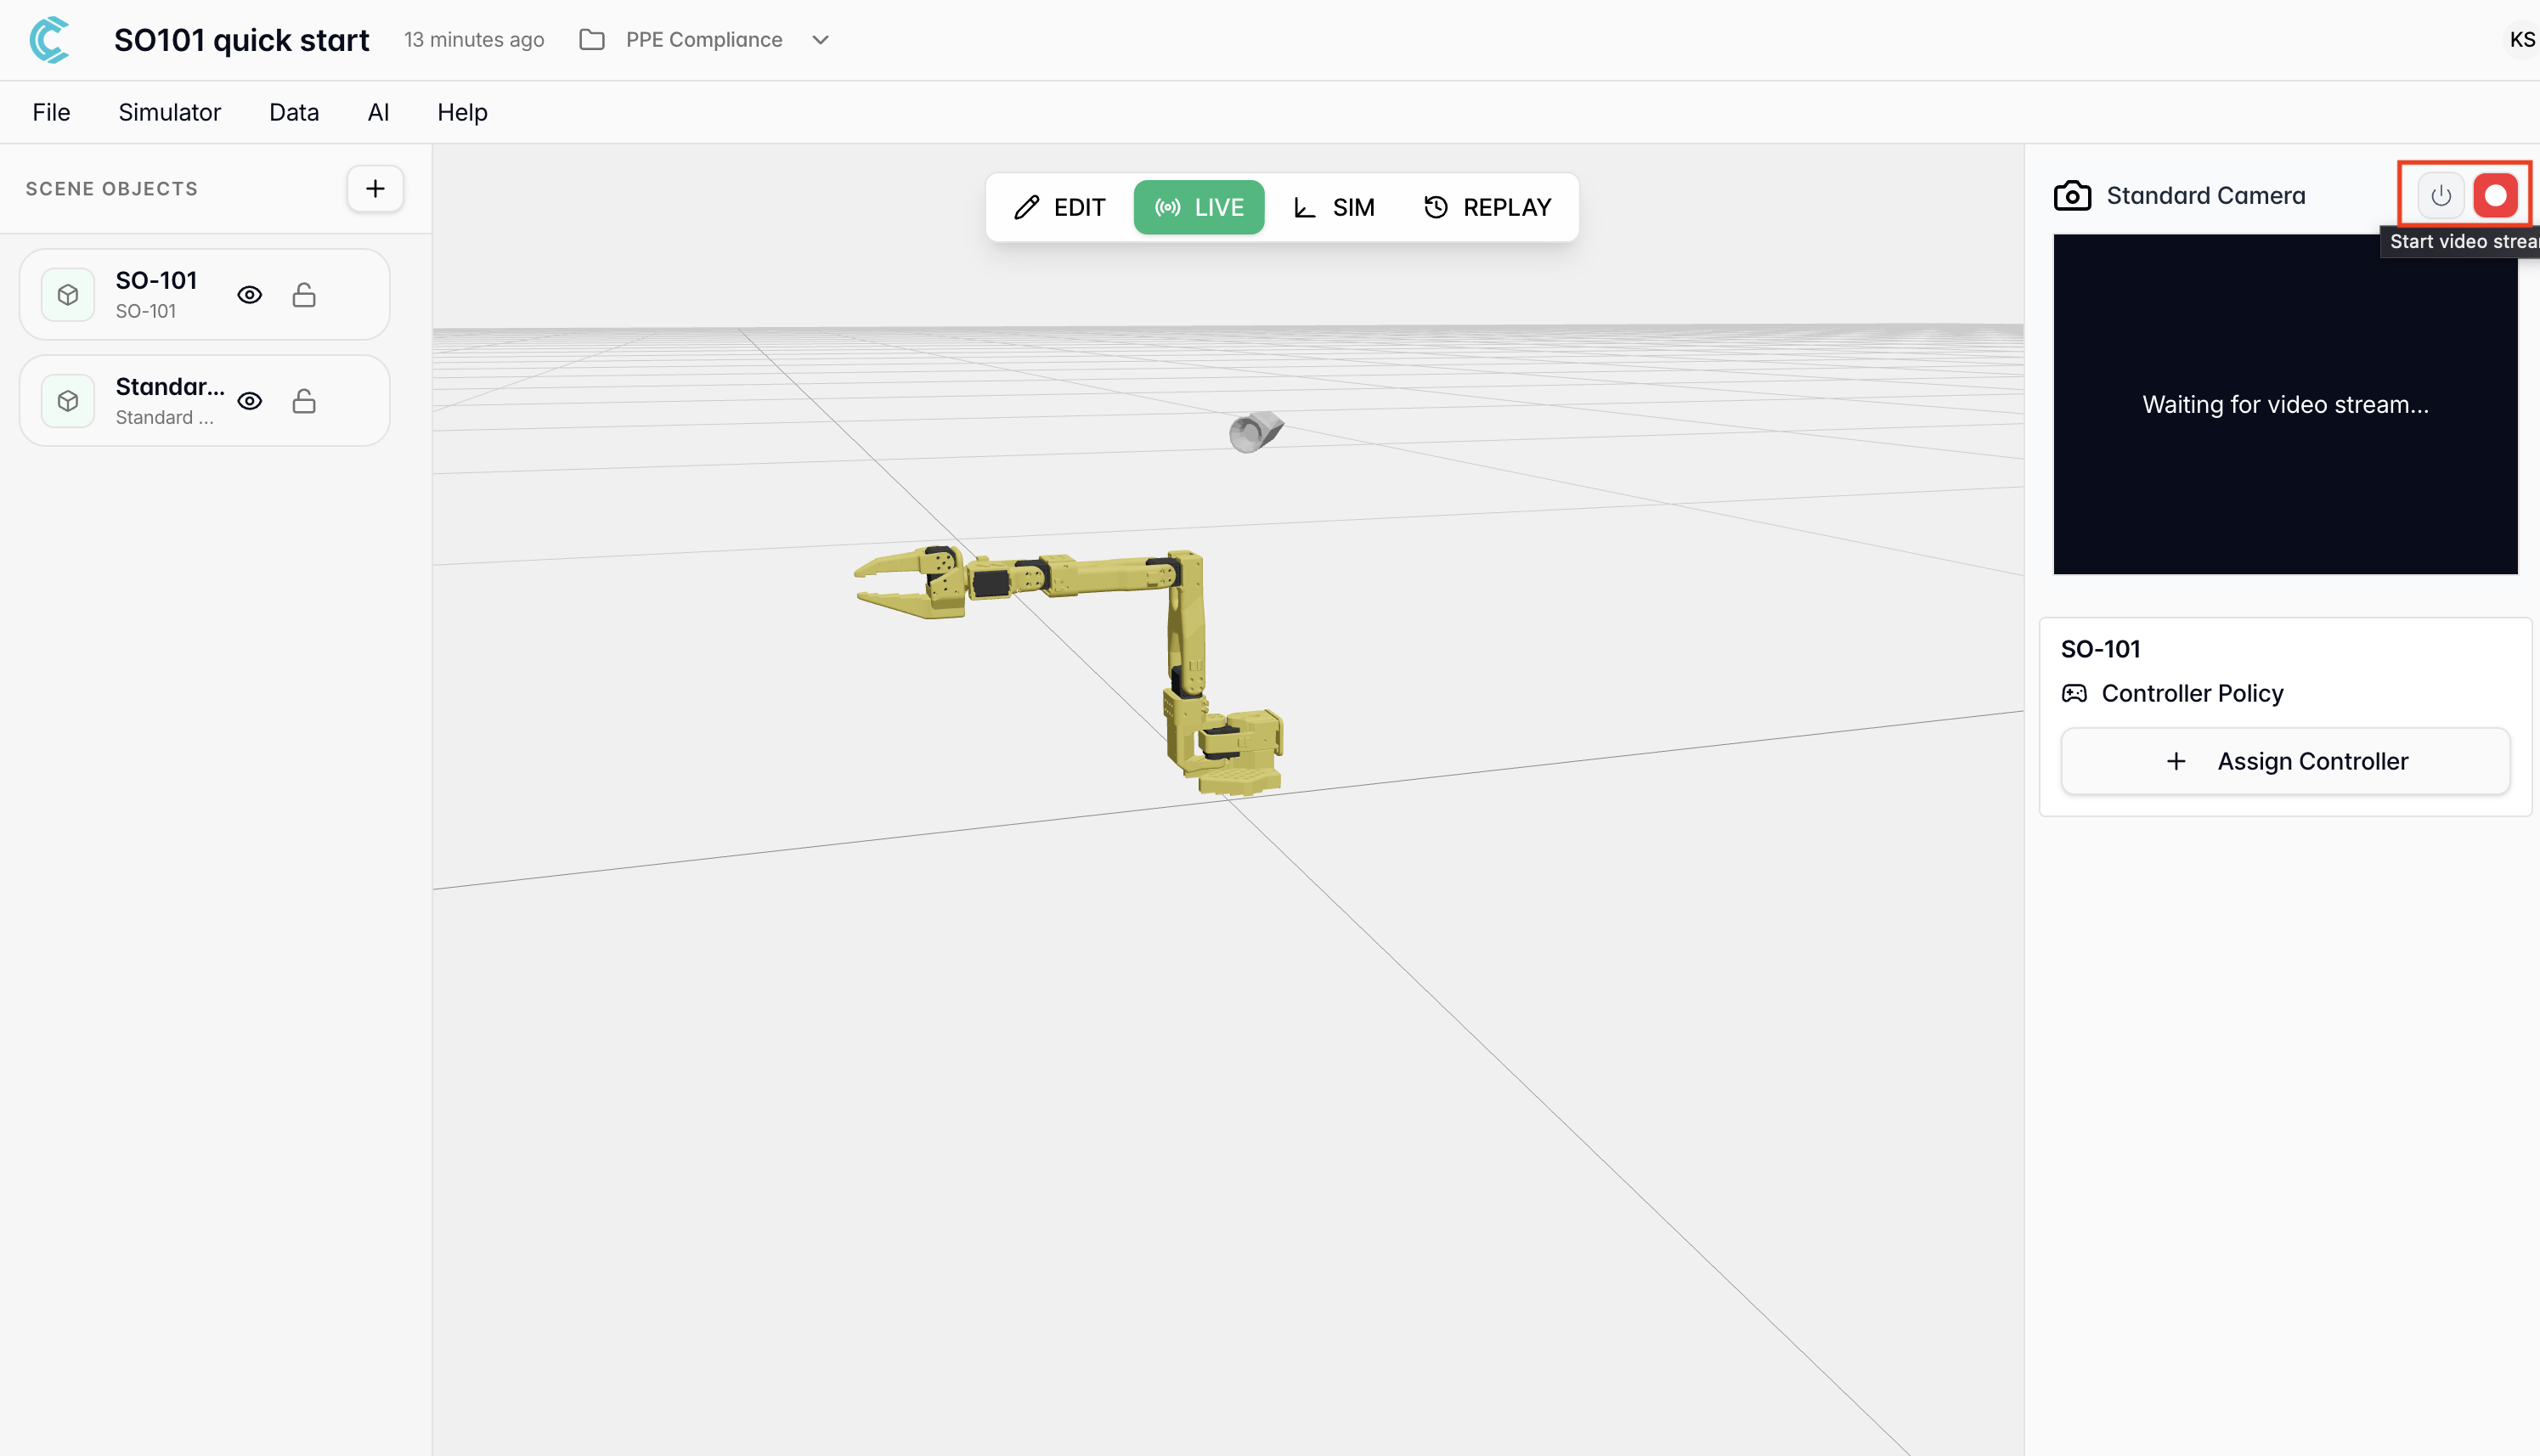
Make sure teleoperation is running (from Step 4: Set Up Teleoperation) before you start recording.
The recording captures both the arm movements and camera feed simultaneously.
- Position the robot at the starting configuration
- Execute the task smoothly using the leader arm
- Complete the task fully (e.g., pick up object → move → place in box)
- Repeat the same task multiple times to create variety in the dataset
Example: Pick and Place Task
Example: Pick and Place Task
Goal: Train the SO101 to pick up an object and drop it inside a box.Recording process:
- Start with the gripper open near the object
- Move the leader arm to position the follower over the object
- Close the gripper to pick up the object
- Move to the box location
- Open the gripper to release the object
- Return to starting position
- Repeat about 30 times with slight variations
- Detach the local teleop controller from the robot
- The recording will be saved and ready for processing
Step 2: Export Dataset
After recording, you’ll trim the raw recording into discrete episodes and export them as a structured dataset. Create Episodes from Recording:- Open the recorded session in your Cyberwave environment.
- Review the timeline: You’ll see the full recording with video and telemetry data.
- Trim episodes:
- Identify the start and end of each successful task demonstration
- Use the trim tool to isolate each episode
- Remove any failed attempts, pauses, or unwanted sections
- Label episodes (optional): add descriptive names for organization.
Each episode should contain one complete task execution from start to finish.
Keep episodes focused and remove any unnecessary setup or reset time between
demonstrations.
- Review all episodes to ensure quality.
- Select the episodes you want to include in the final dataset.
- Check the box next to each desired episode
- Deselect any that have errors or poor quality
- Click Create Dataset.

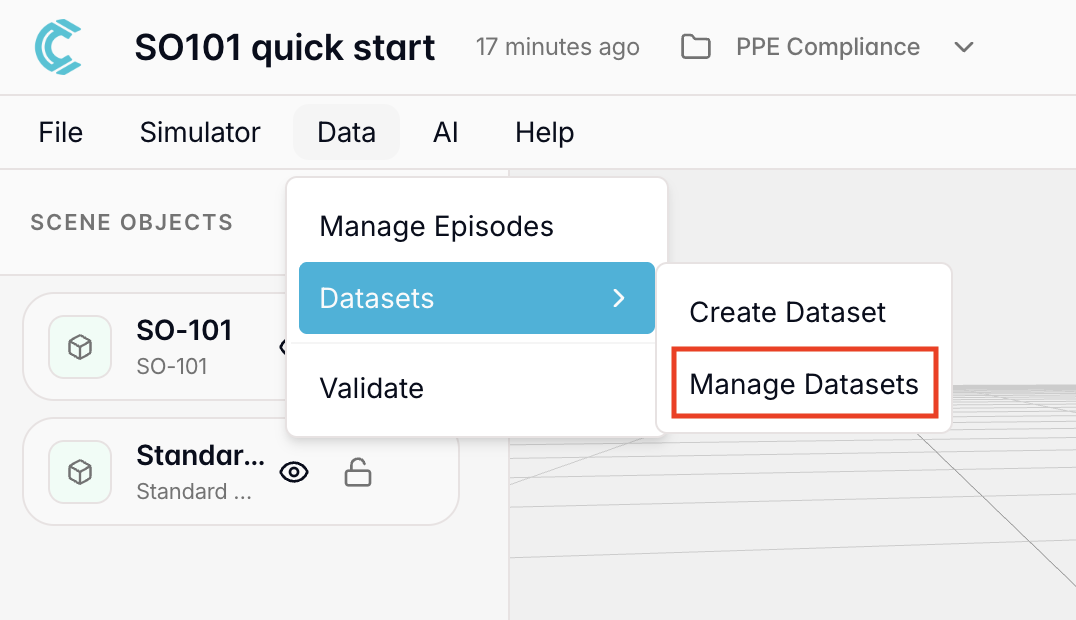
- Navigate to the Manage Datasets tab in Cyberwave
- View all your created datasets.
- Access dataset details:
- Number of episodes
- Duration
- Download datasets for local training or use them directly in Cyberwave for model training.
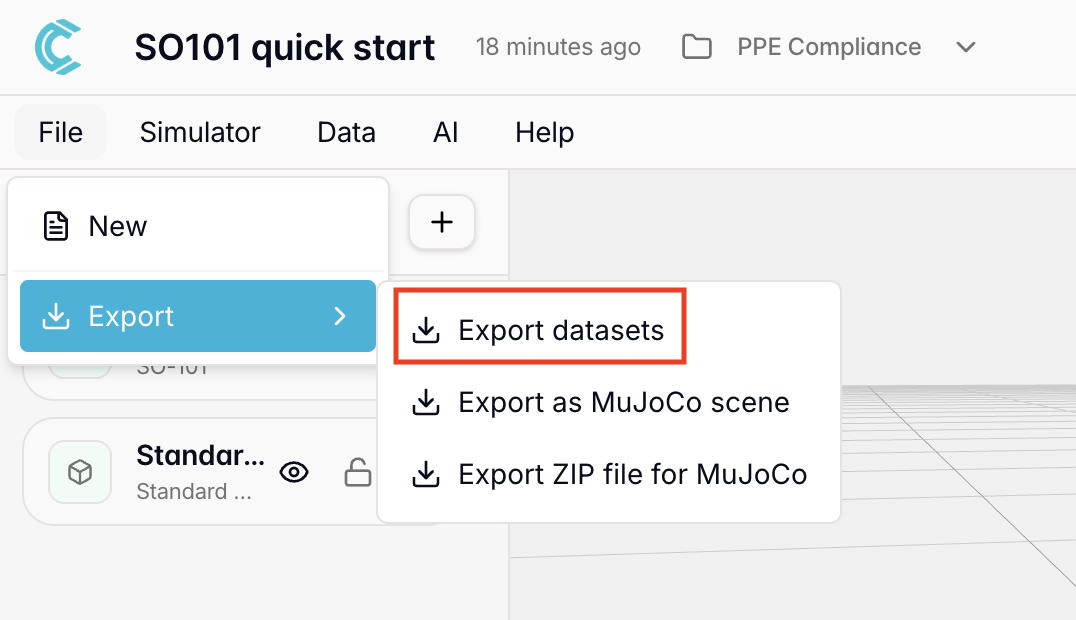
- Go to File -> Export -> Export Datasets.
- Select the specific dataset you want to export.
- Click on Export.
Dataset Created: Your dataset is now ready for training machine learning
models. Each episode contains synchronized robot movements and camera footage
that can teach autonomous behaviors.
API Reference:
GET /api/v1/datasets- List all datasetsGET /api/v1/datasets/{uuid}/zip?format=openvla|lerobot- Get signed URL for processed dataset zip file (requiresformatquery parameter)
cyberwave/twin/{uuid}/telemetry- Recording events (telemetry_start, telemetry_end)
Train and Deploy an ML Model
With your dataset created, you can now train a machine learning model to autonomously replicate the behaviors you demonstrated. Once trained, the model can be deployed as a controller policy that directly controls the SO101 robot.Step 1: Train a Model
Training transforms your recorded demonstrations into a model that can predict and execute similar actions autonomously. Configure training parameters:- Workspace: Select your workspace from the dropdown.
- ML Model: Choose the appropriate ML model.
- Dataset: Select the dataset you created earlier.
-
Advanced Settings:
Data Augmentation:
- Use the slider to select augmentation level:
0— No augmentation1— Low augmentation (recommended for most cases)2— Medium augmentation (for more robust generalization)
Training Stop Policy: Choose one of two stopping strategies:Data augmentation adds variations to your training data (like slight position changes or lighting differences) to help the model generalize better to new situations.- Save best model until iterations (recommended for beginners)
- Set the number of iterations (max: 5000)
- Training continues until reaching the specified iterations
- The best-performing model checkpoint is saved
- Stop when validation loss is under threshold (for faster training)
- Set the validation loss threshold (default: 0.01)
- Set max iterations (max: 5000)
- Training stops early when validation loss reaches the threshold
- May be faster since training stops when a valid model is found
- Use the slider to select augmentation level:
- Click Start Training to begin.
API Reference:
GET /api/v1/mlmodels- List available ML models for trainingPOST /api/v1/mltrainings- Create and start a new training jobGET /api/v1/mltrainings- List your training jobs
Step 2: Deploy a Model
Once training completes successfully, deploy the model to make it available as a controller policy. Create a Deployment:- Navigate to AI → Deployments.
- Click Start New Deployment.
- Select your trained model from the list of completed trainings.
- Select the target twins to deploy the model to.
- Click Deploy.
Model Deployed: Your trained model is now available as a controller policy
and ready to control the robot autonomously.
API Reference:
POST /api/v1/mltrainings/{uuid}/deploy- Deploy trained model to twinsGET /api/v1/mltrainings/deployed- List deployed models
cyberwave/twin/{uuid}/command- Sendscontroller-changedevent when model is deployed
Step 3: Use the Model as a Controller Policy
Now use your trained model to autonomously control the physical SO101 robot. Assign the Controller Policy:- In your environment, switch to Edit Mode.
- Click Assign Controller Policy from the right side view.
- Select your deployed model from the dropdown.
- Click Save Configuration.
- The model now appears as a controller policy in the right side view.
- Switch to Live View.
- You’ll see an option to enter a prompt.
- Type your instruction (e.g., “Pick up the object and place it in the box”).
- The model deploys the action to the SO101 in your real environment setup.
Autonomous Control Active: Your SO101 is now controlled by AI using
natural language prompts!
API Reference:
PUT /api/v1/twins/{uuid}- Assign controller policy to twinGET /api/v1/twins/{uuid}- Get twin details including assigned controller
cyberwave/twin/{uuid}/command- Controller assignment changescyberwave/joint/{uuid}/+- Joint commands from AI controller
Manual Calibration (CLI)
If you prefer to calibrate the arms via the command line instead of the Cyberwave platform, you can use theso101-calibrate command directly.
Calibrate the Leader Arm:
/dev/tty.usbmodem123 with your actual leader arm port. This registers the device as a leader arm, stores its calibration under the ID leader1, and prepares it to capture your manual movements.
Calibrate the Follower Arm:
/dev/tty.usbmodem456 with your actual follower arm port. This registers the device as a follower arm, stores its calibration under the ID follower1, and prepares it to receive and execute control commands.
The calibration process is interactive — follow the on-screen prompts to move joints to specific positions and confirm alignment.