- The SO-101 mirrored as a digital twin in Cyberwave, with a camera docked to its wrist
- A live teleoperation session running between the leader and follower arms
- A small dataset of demonstrations recorded straight from the dashboard
- A trained ML model deployed back to the same arm as a controller policy
What you’ll need
- Hardware
- Cyberwave account
- An SO-101 robot arm set (the leader and the follower). ping us if you don’t have one yet
- A USB or IP camera (anything with a halfway-decent feed will do)
- A computer to run the edge on. A laptop works, a Raspberry Pi works, a Jetson works
- The USB cables for both arms and the camera
Step 1: Build the digital twin
Before we touch any hardware, let’s mock up the setup inside Cyberwave. The idea is to recreate your real-world scene as a digital twin so the platform knows what’s connected to what. Head to the Cyberwave dashboard and click New Environment. Give it a name likeSO-101 Teleop and a quick description so future-you knows what this was for.
An environment is just a 3D space that mirrors the physical setup. Twins, sensors, and controllers all live inside it.
Drop in the SO-101. Inside the new environment, click Add from Catalog in the left panel, search for SO-101, and add it. Position it so it roughly matches where the real arm sits on your desk; it doesn’t have to be pixel perfect, just close.
Drop in the camera. Click Add from Catalog again and search for Standard Camera. Add it to the environment.
Now dock the camera to the wrist. This is the part that matters: the camera is going to sit on the follower’s wrist, so the twin hierarchy needs to reflect that.
- Click on the Standard Camera twin and switch to Edit Mode
- In Dock to Twin, pick the SO-101 twin
- In Parent Root, pick wrist
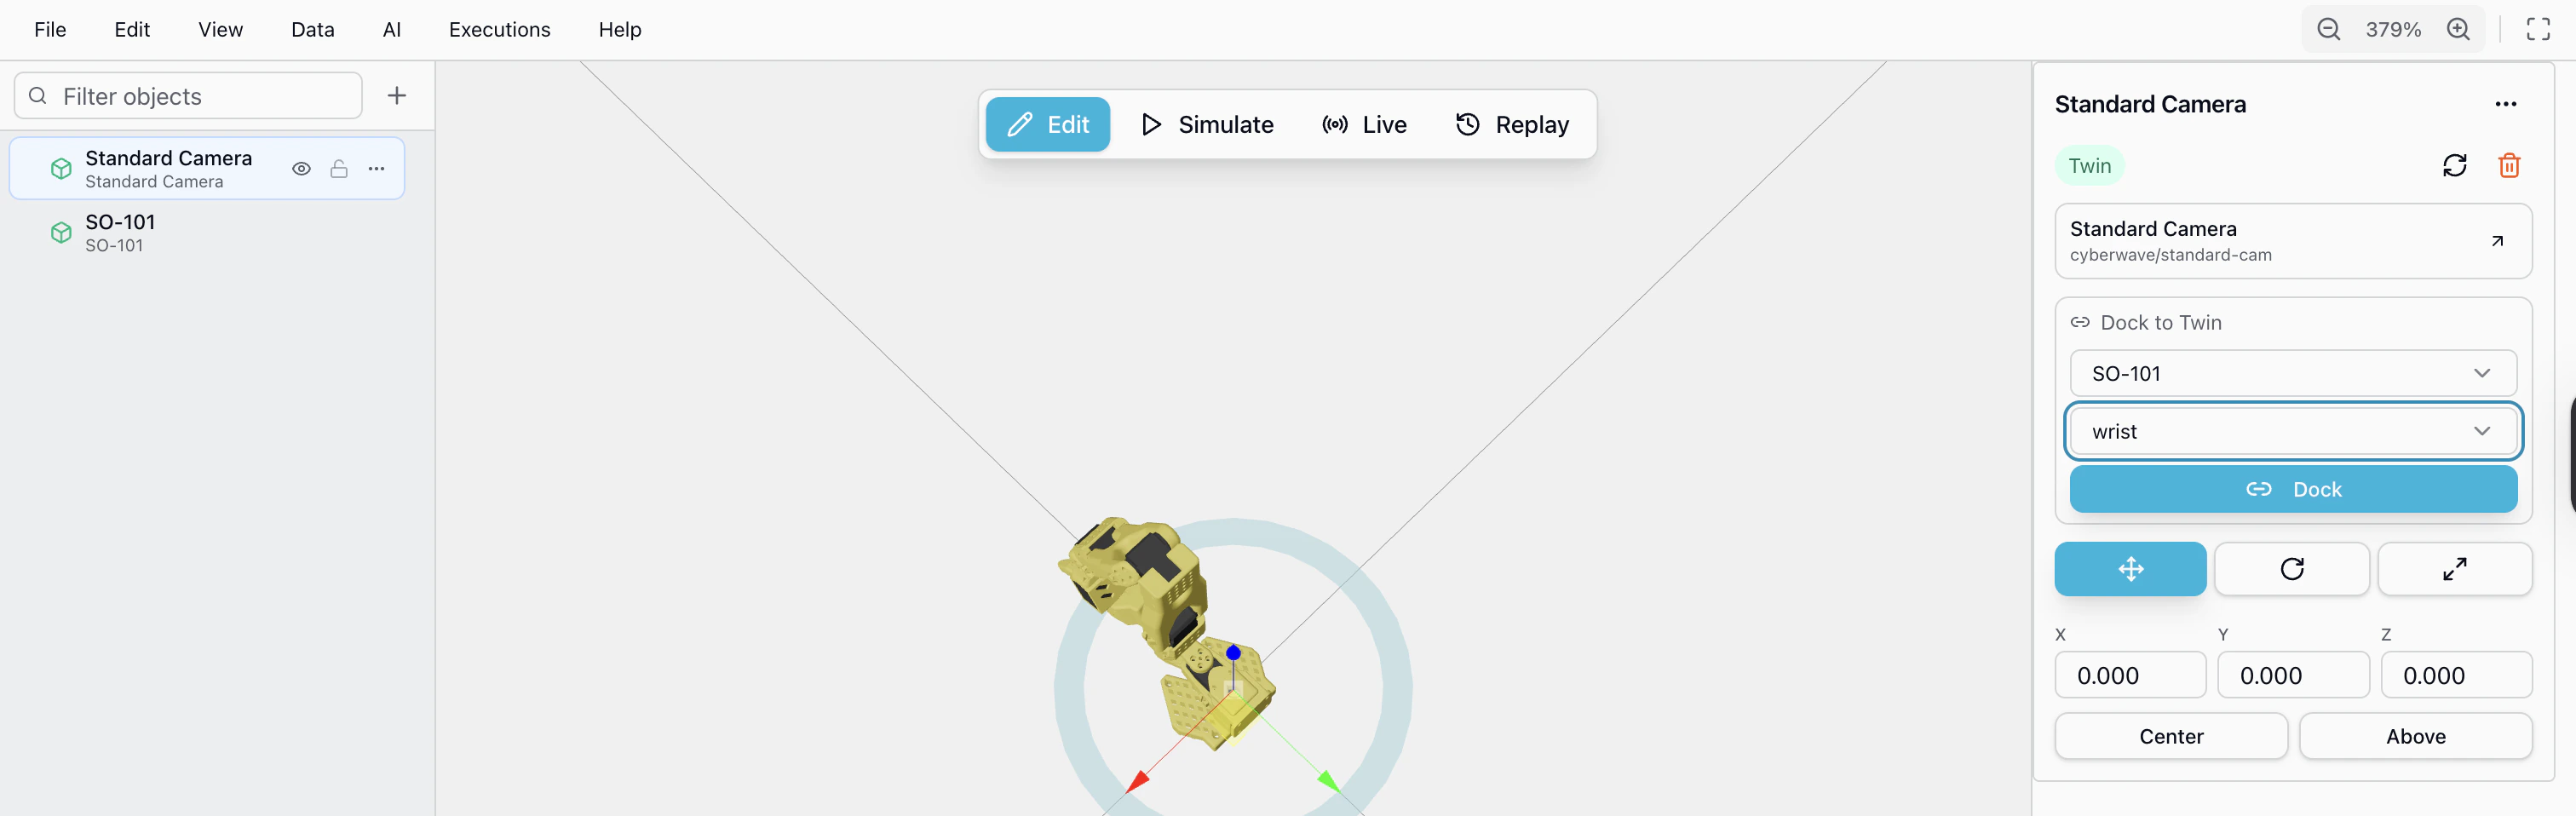
Docking the camera to the wrist means it physically follows the gripper.
That’s exactly what you want for manipulation tasks: the model gets to see
what the gripper sees, and the same view stays consistent at training and
inference time.
Step 2: Pair the hardware
Now the fun part: connecting your real arms and camera so they show up as live twins inside the environment you just built. Open a terminal on the device that’s physically wired to the SO-101 and the camera. That can be your Mac, your Raspberry Pi, or whatever you’re running. If you’re on a remote box, SSH in first:- Logs you into Cyberwave from the terminal
- Asks which environment to pair to (pick the one you just created)
- Detects the connected USB devices
- Installs the right driver for the SO-101 and for the camera
- Bridges everything that needs bridging, including USB and camera passthrough on macOS, automatically. You don’t need to set anything up by hand
- Links the physical hardware to the matching digital twins
When pairing finishes you should see your SO-101 and camera show up as
online in the dashboard, with a green presence indicator. If they don’t,
re-run
sudo cyberwave pair. It’s safe to run as many times as you need.Step 3: Calibrate (it’s automatic)
Calibration teaches the platform where each joint’s zero position is and what its valid range looks like. Without it, commands won’t translate cleanly to physical motion. The good news: the Edge Core handles this for you. The first time you connect, the dashboard will walk you through it on-screen, no terminal commands, no fiddling with serial ports. Open your environment, click on the SO-101 twin, and you’ll see a Calibrate prompt for both the leader and the follower. Hit it, follow the on-screen instructions, and physically move each joint through its range when prompted. Do the leader, then the follower. That’s the whole thing.Calibration is required once per arm. If you ever re-assemble the hardware
or something feels off, just delete the old calibration from the dashboard and
run the flow again.
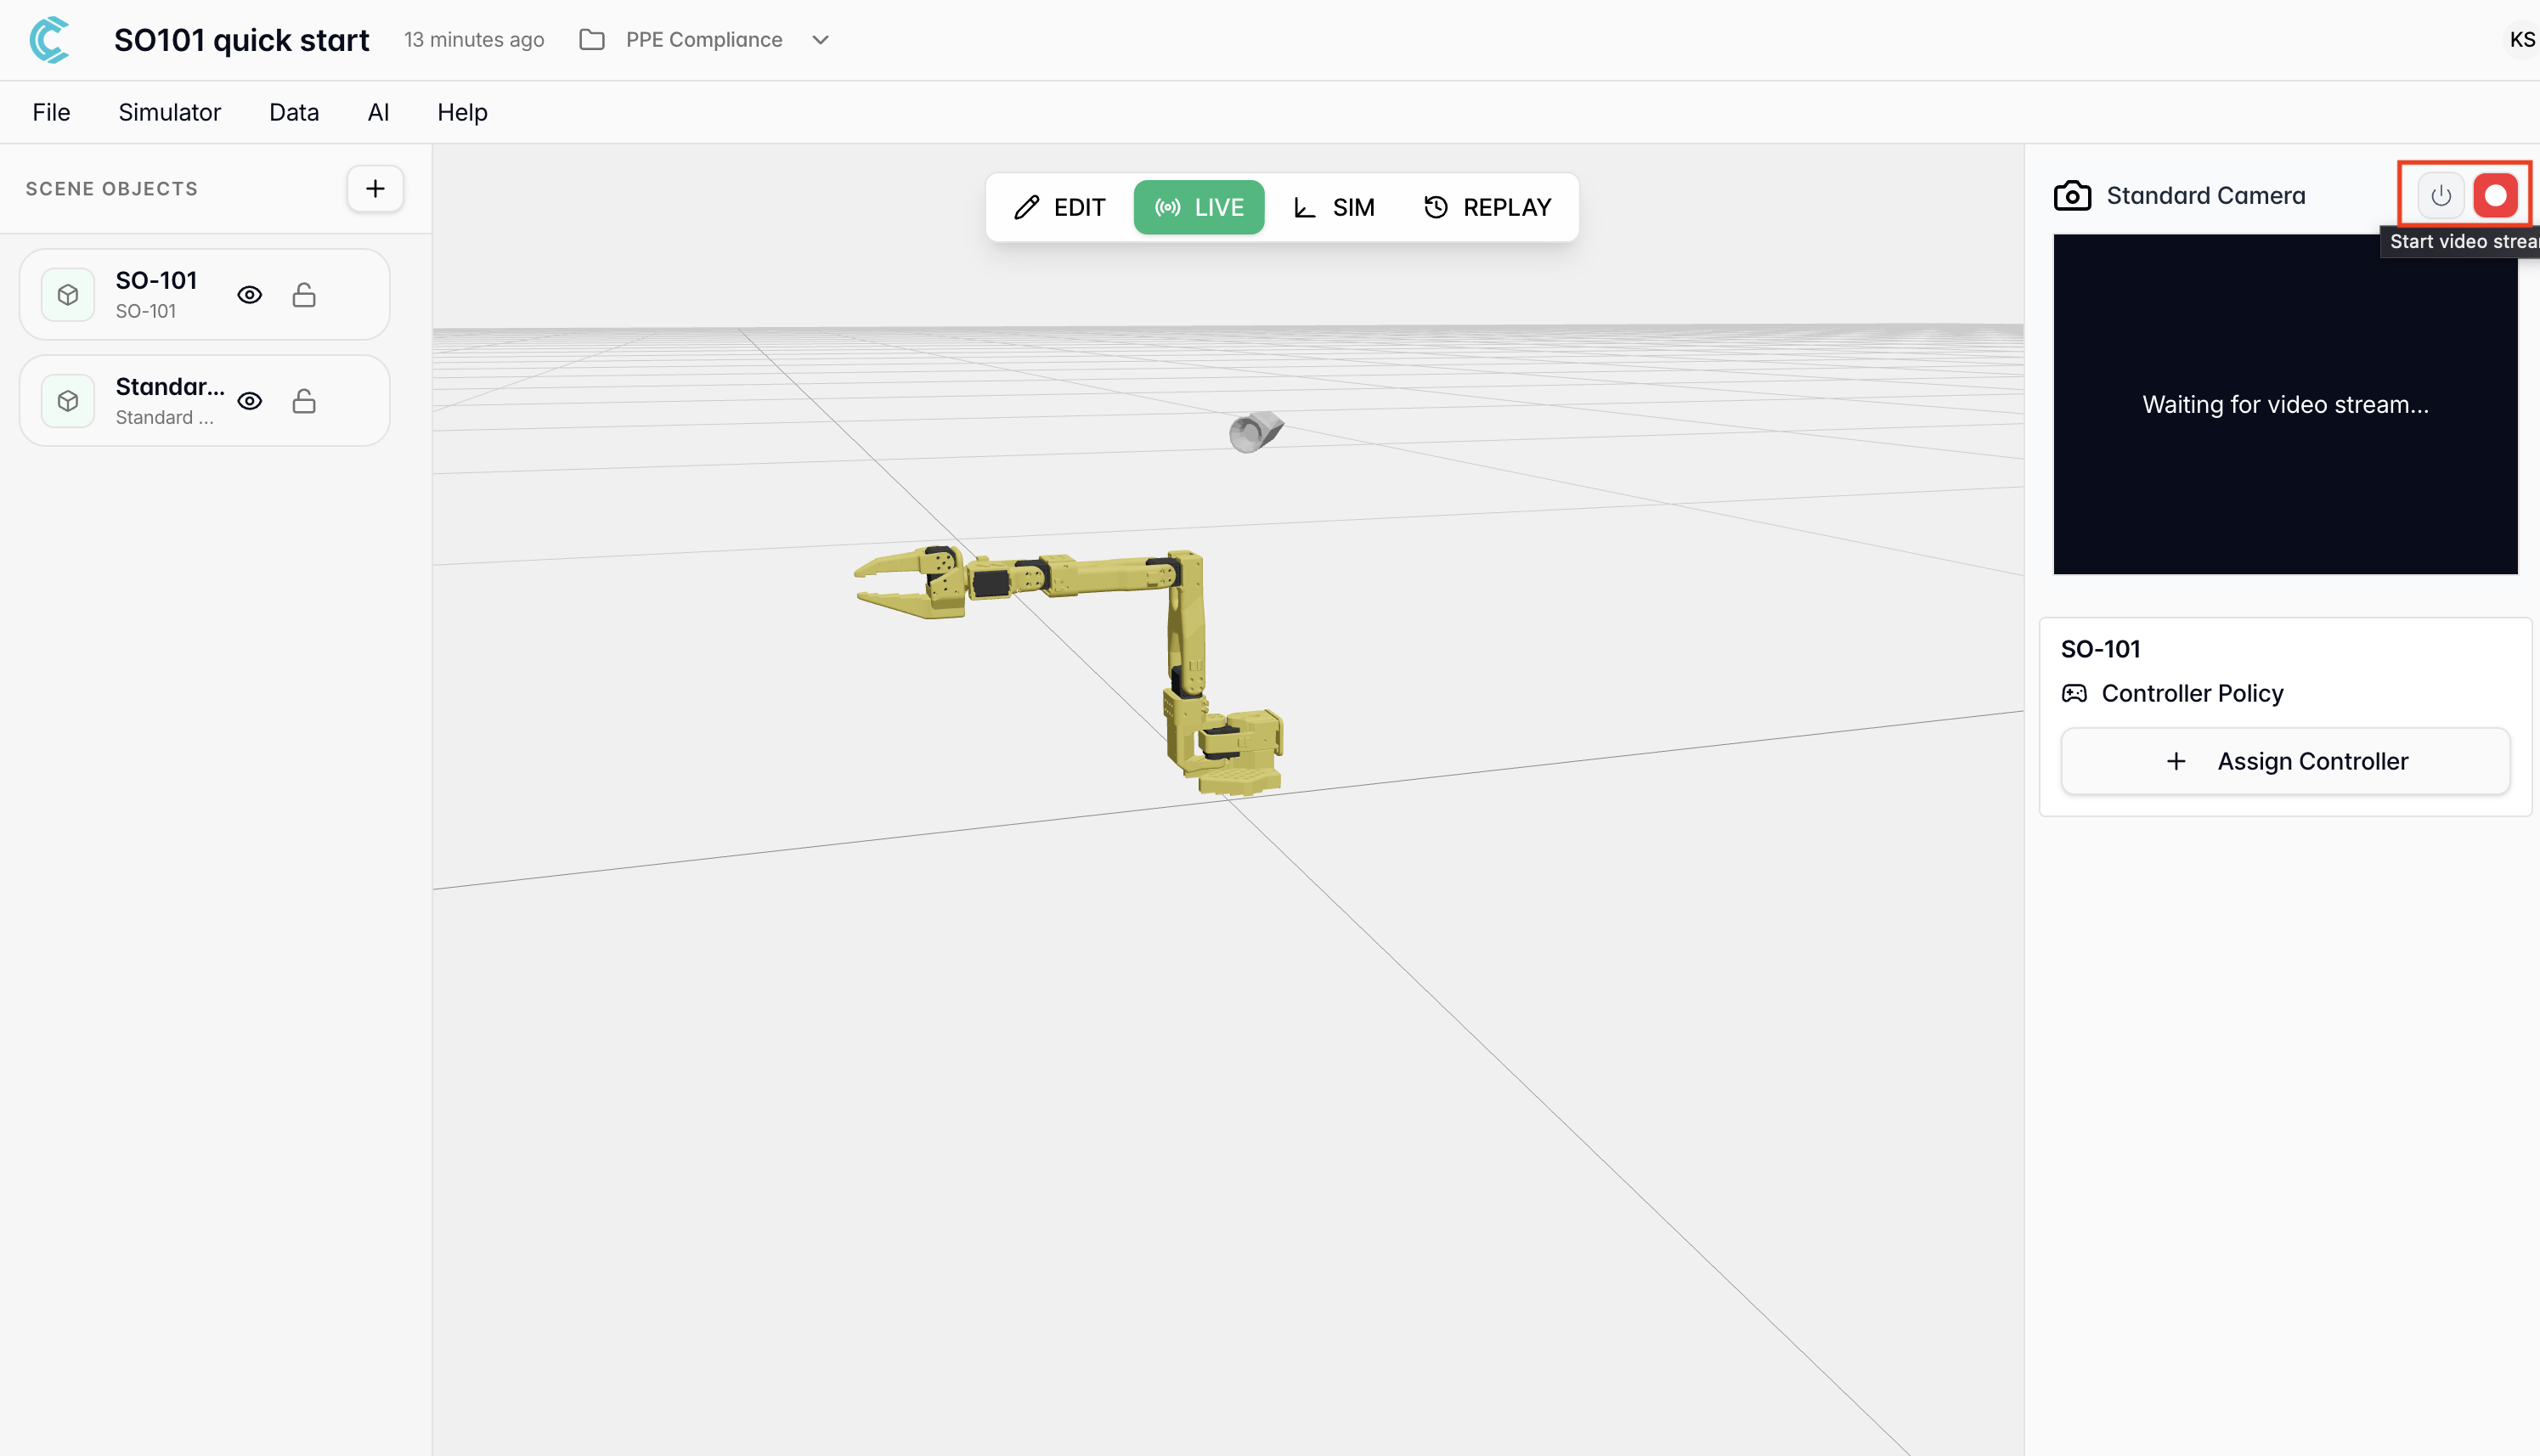
Step 4: Start teleoperating
This is the moment where it stops being a setup tutorial and starts being a robot. With teleop, moving the leader arm makes the follower mirror you in real time, and the digital twin records every joint state as you go. In the dashboard:- Open your environment
- Click Assign Controller on the SO-101 twin
- Pick Local Teleop
Teleop is live. Wave the leader around, watch the follower copy you, and watch
the twin in the dashboard match both of them in real time.
Why Local Teleop and not Keyboard? Local Teleop captures high-frequency
joint data as you physically move the leader, which gives you smooth,
consistent demonstrations. Keyboard works, but the data is lower-frequency and
jerkier, fine for poking around, not great for training.
A few things you might notice
- When you detach a controller, the follower drifts back into a safe sit pose before disconnecting. Always leave clearance around the arm.
- If you assign a non-teleop controller (Keyboard, a VLA model, etc.), the follower first moves to a zero pose when the controller comes online, then starts taking commands.
- For non-teleop controllers, collision detection is on by default. You’ll see alerts in the dashboard if something looks like it’s about to clash; heed them before the arm moves.
Step 5: Record a dataset
Now that teleop is solid, let’s capture some demonstrations. A dataset is a bunch of episodes, individual recordings of the robot completing a task. Each episode captures joint trajectories and the camera feed in lockstep.Always record datasets while running Local Teleop rather than a remote
controller. The smoother input gives you cleaner training data.
Capture a session
- Open your environment and switch to Live Mode
- Click the camera icon in the top-right and turn the feed on
- Click Start Recording
- Start with the gripper open, hovering near the object
- Move the leader to bring the follower over the object
- Close the gripper, lift, move to the box, drop
- Return to a neutral start pose
- Repeat, aiming for around 30 demos with slight variation
Trim the recording into episodes
- Open the recorded session in your environment
- Scrub through the timeline; you’ll see the video, joint trace, and any other telemetry
- Use the trim tool to mark the start and end of each clean demo
- Drop any failed attempts or pauses
- Optionally label episodes so you can find them later
Bundle them into a dataset
- Review your episodes one more time
- Tick the ones you want to include
- Click Create Dataset

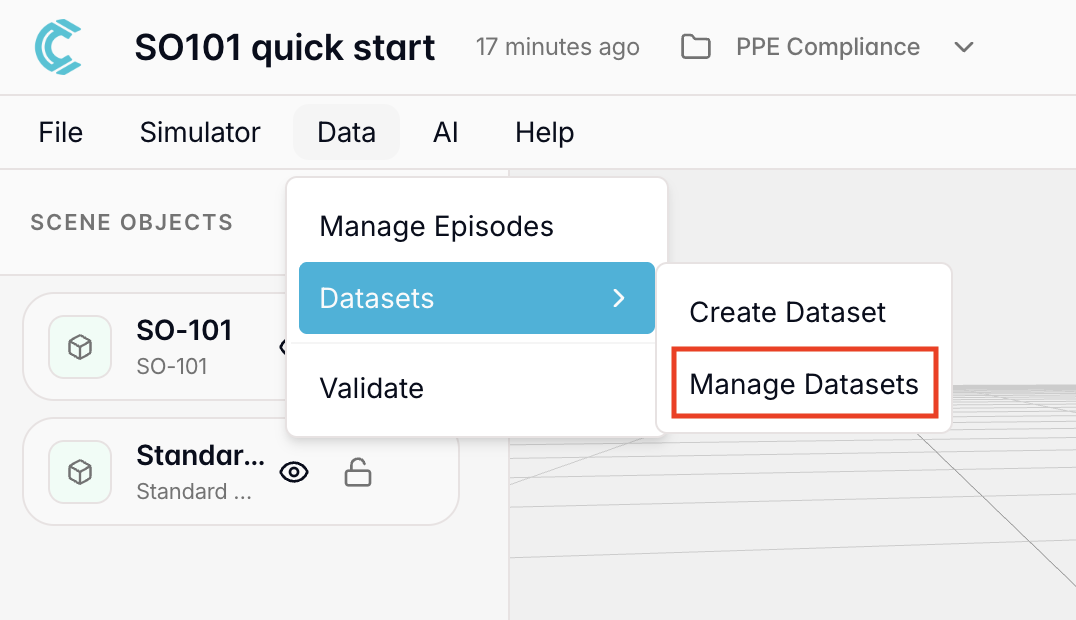
You now have a real dataset of demonstrations, ready to train a model on.
Step 6: Train a model
Cyberwave can train a model directly from the dashboard. Head to the training page and pick:- Workspace: your workspace
- ML model: the architecture you want to train (e.g. SmolVLA)
- Dataset: the one you just created
0: none1: low (a good default)2: medium, for tougher generalization
- Save best model until iterations: keeps training up to N iterations and saves the best checkpoint. Good for first attempts.
- Stop when validation loss is under threshold: bails out early when things look good. Faster, but can stop short.
Training is fully cloud-based, with no edge involvement. You can close your laptop
and check on it later.
Step 7: Deploy and run the model
Once training finishes:- Go to AI → Deployments
- Click Start New Deployment
- Pick the trained model
- Pick the SO-101 twin (or twins) you want to deploy it to
- Click Deploy
- In your environment, switch to Edit Mode
- Click Assign Controller Policy
- Pick the deployment you just created
- Click Save Configuration
- Switch to Live Mode
Your SO-101 is now driven by a model you trained yourself, from demonstrations
you recorded yourself. That’s the full loop.
Bonus: remote operation without a leader arm
You don’t always need a leader arm. Remote operation means assigning any non-teleop controller (keyboard, gamepad, scripted sequence, VLA) to the follower and driving it from afar.- Open your environment
- Click Assign Controller on the SO-101 twin
- Pick one of:
- Keyboard: drive individual joints from your keyboard
- VLA model: let a vision-language-action model take over
- Custom controller: anything you’ve registered in the platform
Heads-up: the moment you assign a non-teleop controller, the follower moves to
a zero pose before it starts taking commands. And collision detection runs
by default, so expect alerts if anything looks tight.
A note on training-vs-inference setup
For VLA models especially, match inference to training as closely as you can. Same camera mount, same lighting, same table, same general scene layout. The biggest source of “but it worked in training!” is a small change in viewpoint or workspace at deploy time. If you keep the physical setup stable, the model has a much better shot.Where to go next
Robotic Arms Overview
The 4-step pattern for any arm in the catalog.
SO-101 Voice Pick & Place
Drive the SO-101 with your voice using a VLA model.
Manipulation Capability
The full picture of what arms can do on Cyberwave.