Overview
This tutorial walks you through the complete workflow for training and deploying Vision-Language-Action (VLA) models on SO101 robot arms using Cyberwave. You’ll learn how to:- Set up your physical robot hardware and connect it to Cyberwave
- Calibrate robots for accurate teleoperation
- Collect high-quality demonstration data through teleoperation
- Create and manage datasets from recorded episodes
- Train ML models on your custom datasets
- Deploy trained models as autonomous controllers
This tutorial assumes you’ve already completed the SO101 Get Started guide and have a working teleoperation setup.
Prerequisites
Before starting this tutorial, ensure you have:- Hardware Setup
- Software Setup
- SO101 robot arm set (leader and follower) properly connected
- Wrist-mounted camera on the follower arm
- Edge device (computer or SBC) running Cyberwave Edge Core
- Physical workspace cleared and ready for demonstrations
Step 1: Initial Setup and Calibration
Create Your Environment
If you haven’t already created an environment:- Sign up for a Cyberwave account
- Create a new environment with:
- One SO101 robot twin
- One wrist camera twin (docked to the SO101’s wrist)
- Optional: Additional USB cameras for multi-view recording
API Reference:
POST /api/v1/environments- Create a new environmentPOST /api/v1/twins- Create digital twinsGET /api/v1/environments/{uuid}/twins- List twins in an environment
cyberwave/twin/{uuid}/command- Receive commands from cloud (subscribed by edge)cyberwave/twin/{uuid}/telemetry- Send telemetry events (connected, disconnected, telemetry_start, telemetry_end, initial_observation)
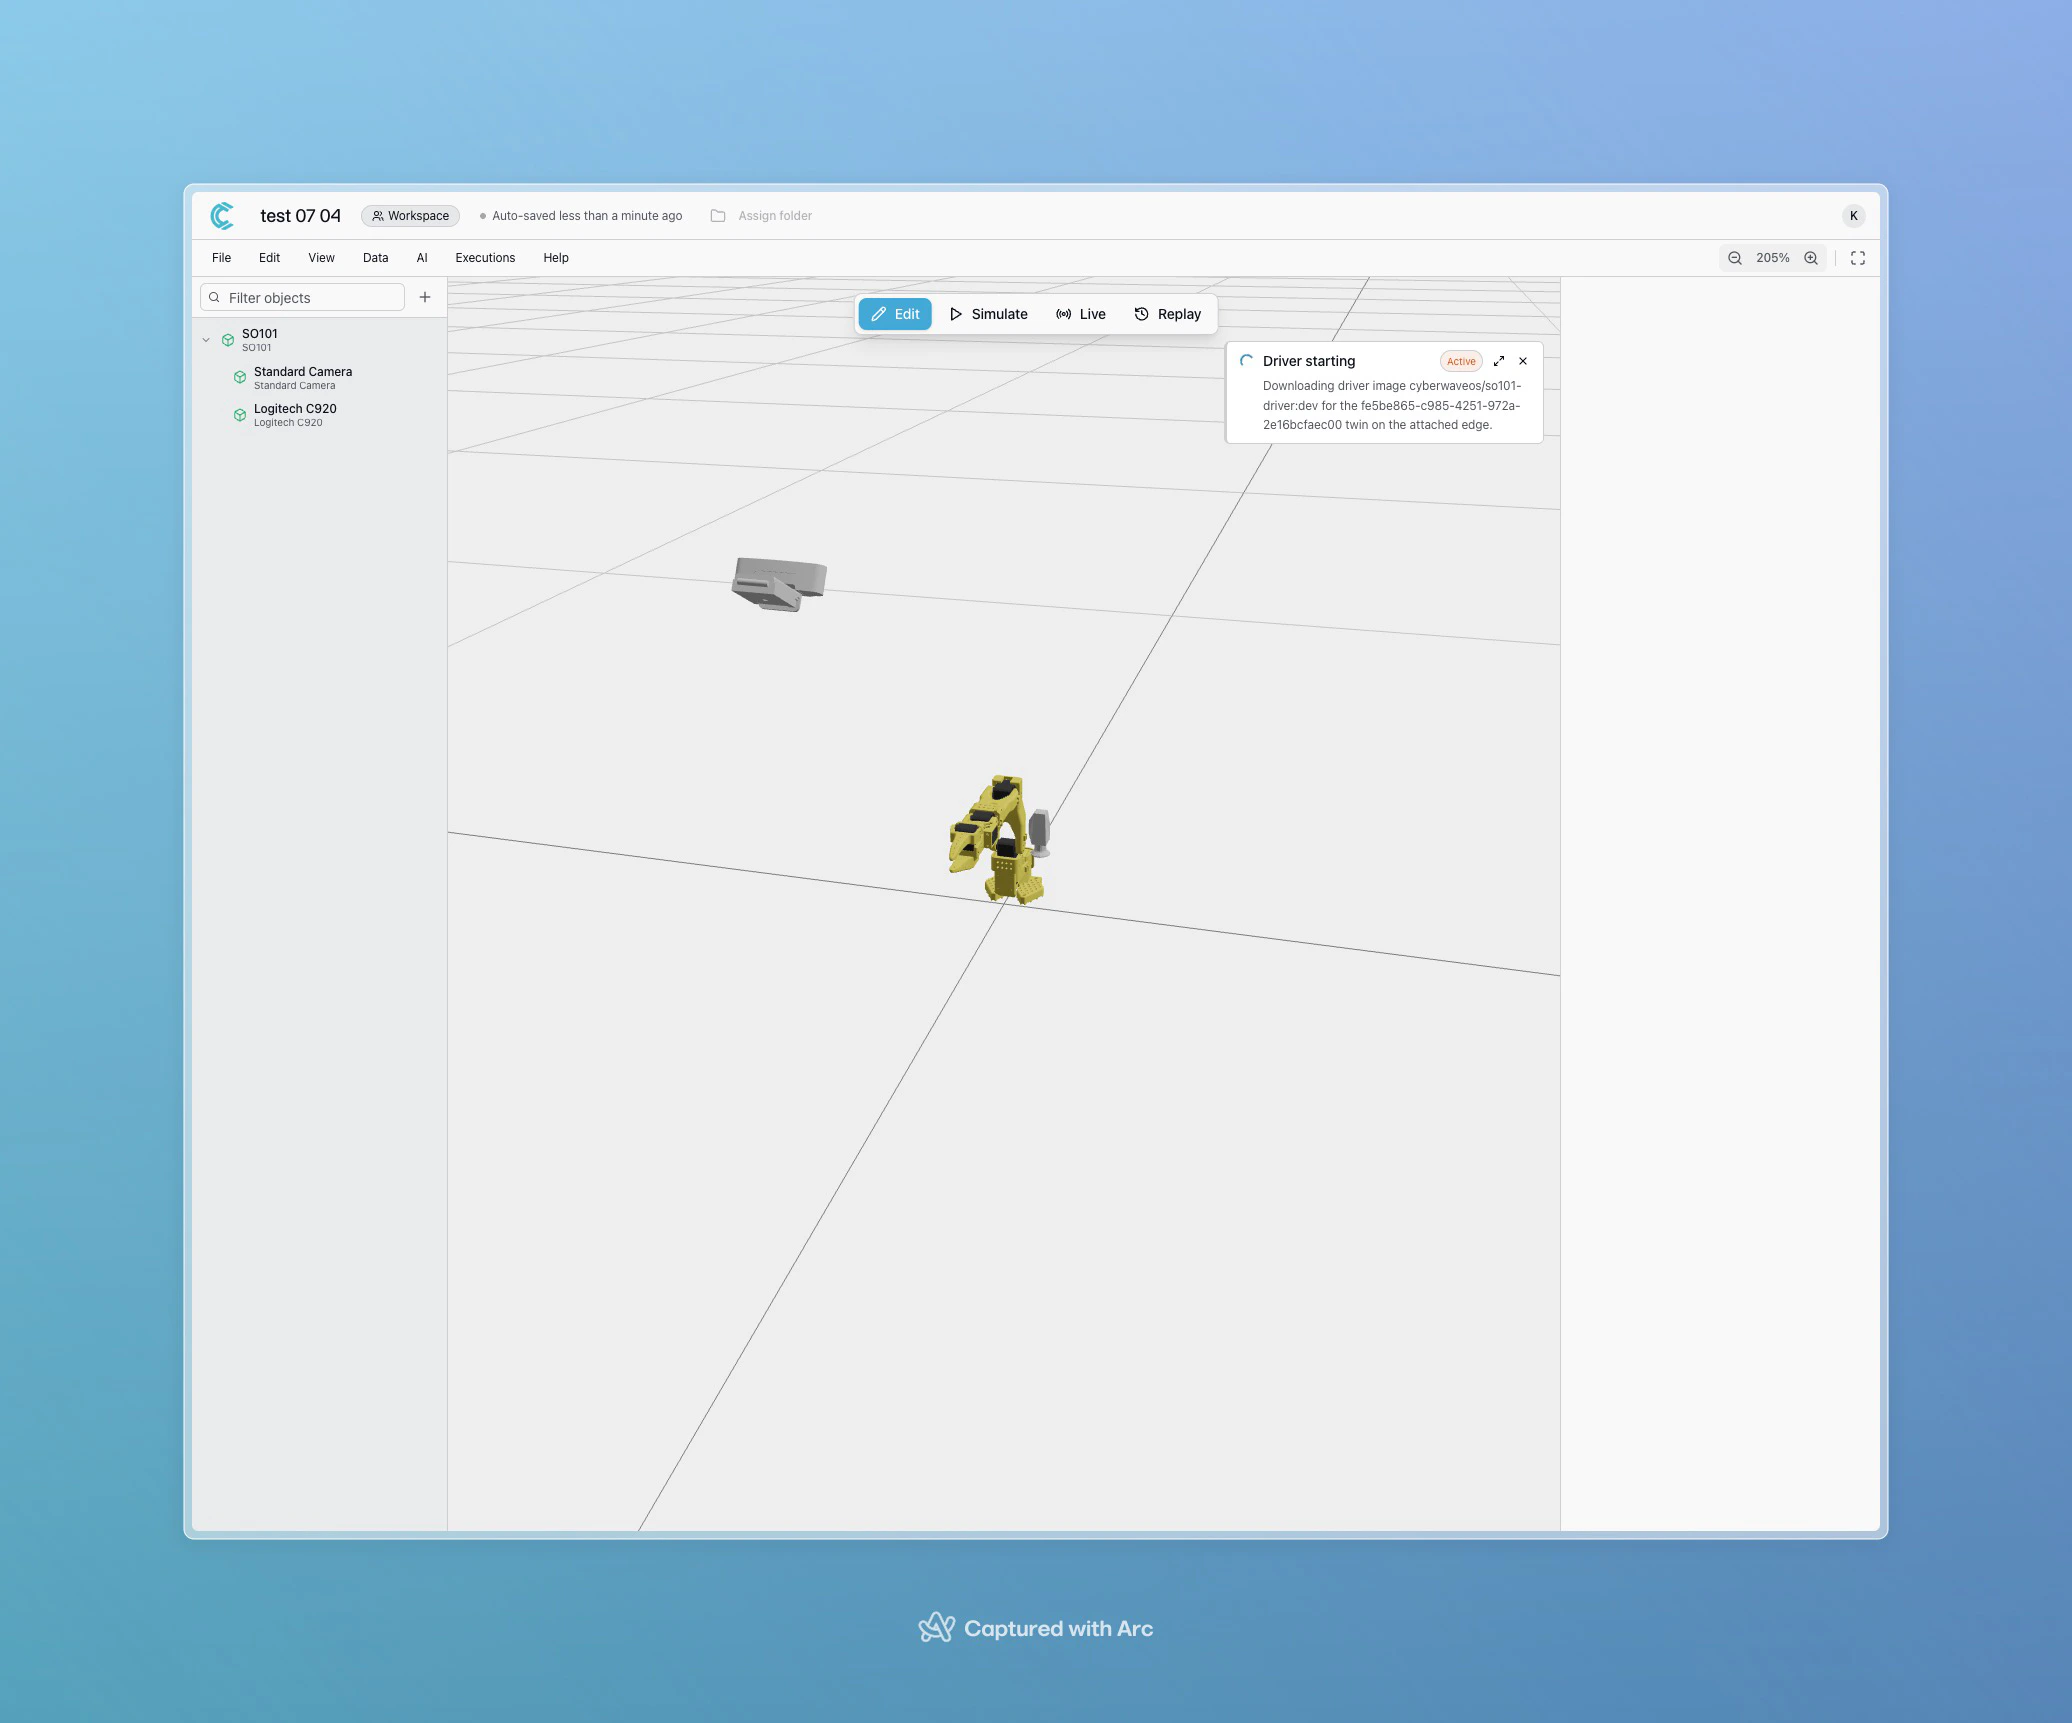
Install Cyberwave Edge
Connect your edge device to Cyberwave:- Log in with your Cyberwave credentials
- Select your environment
- Pair physical hardware with digital twins
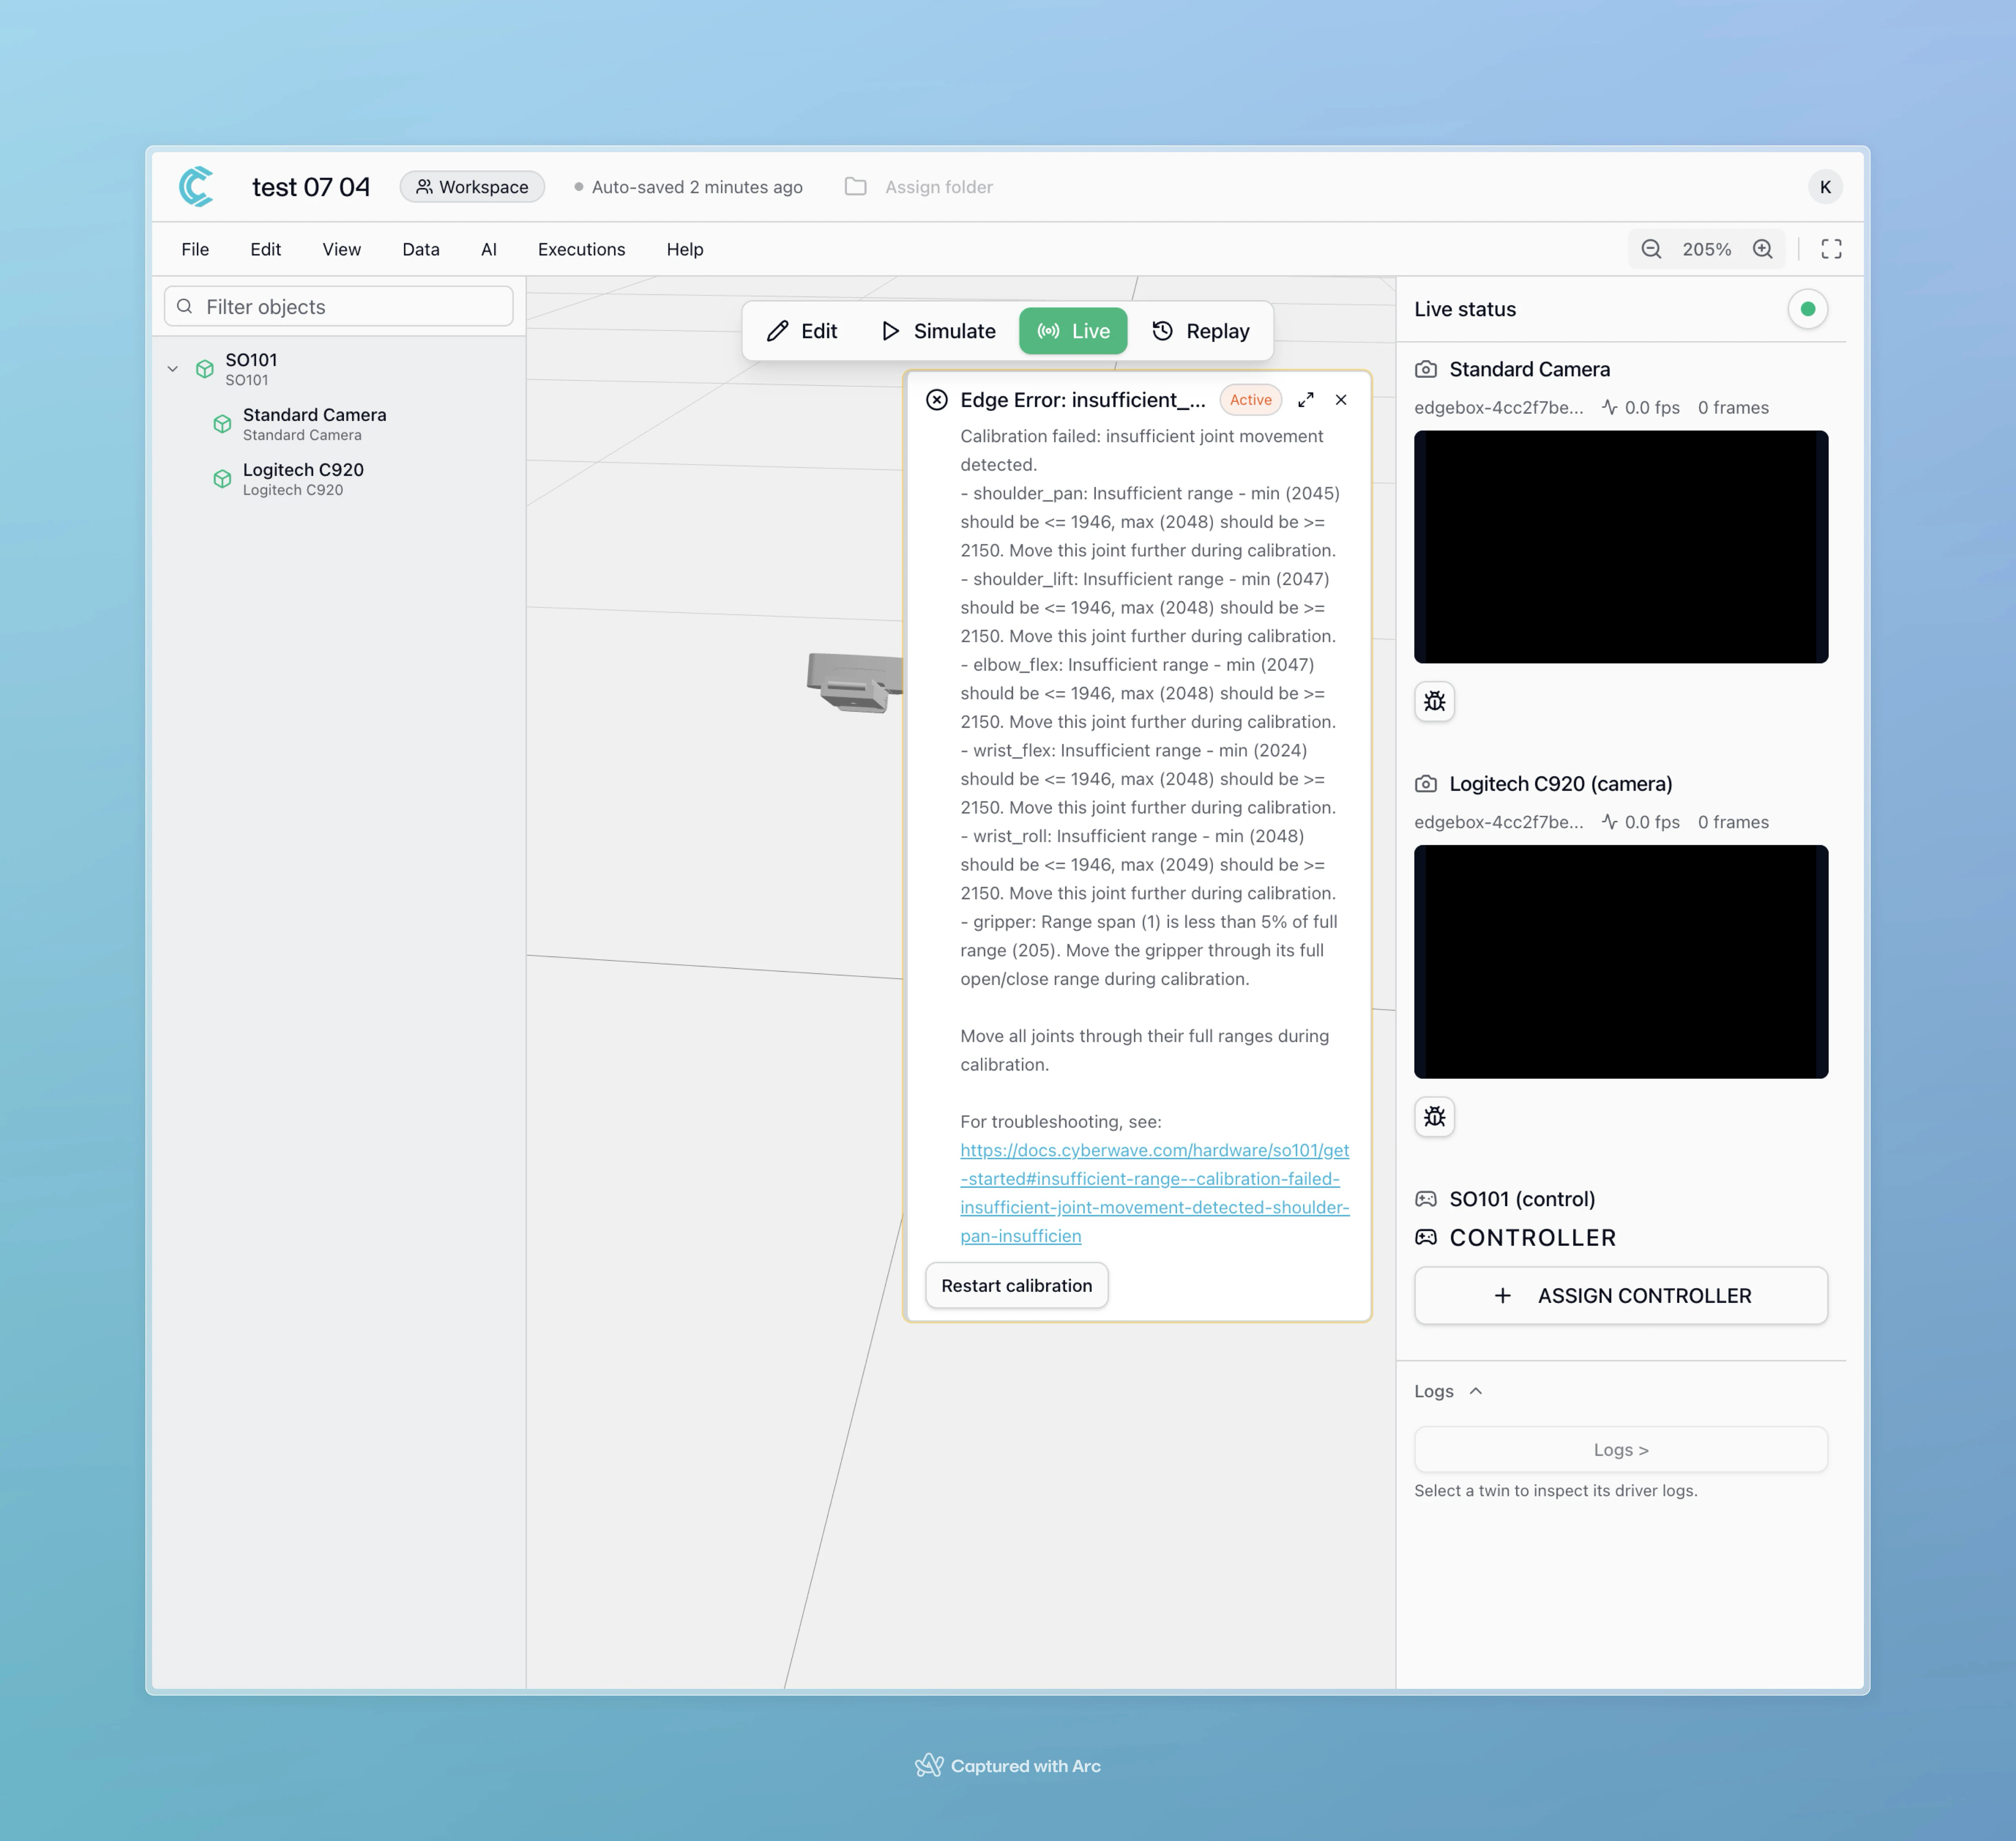
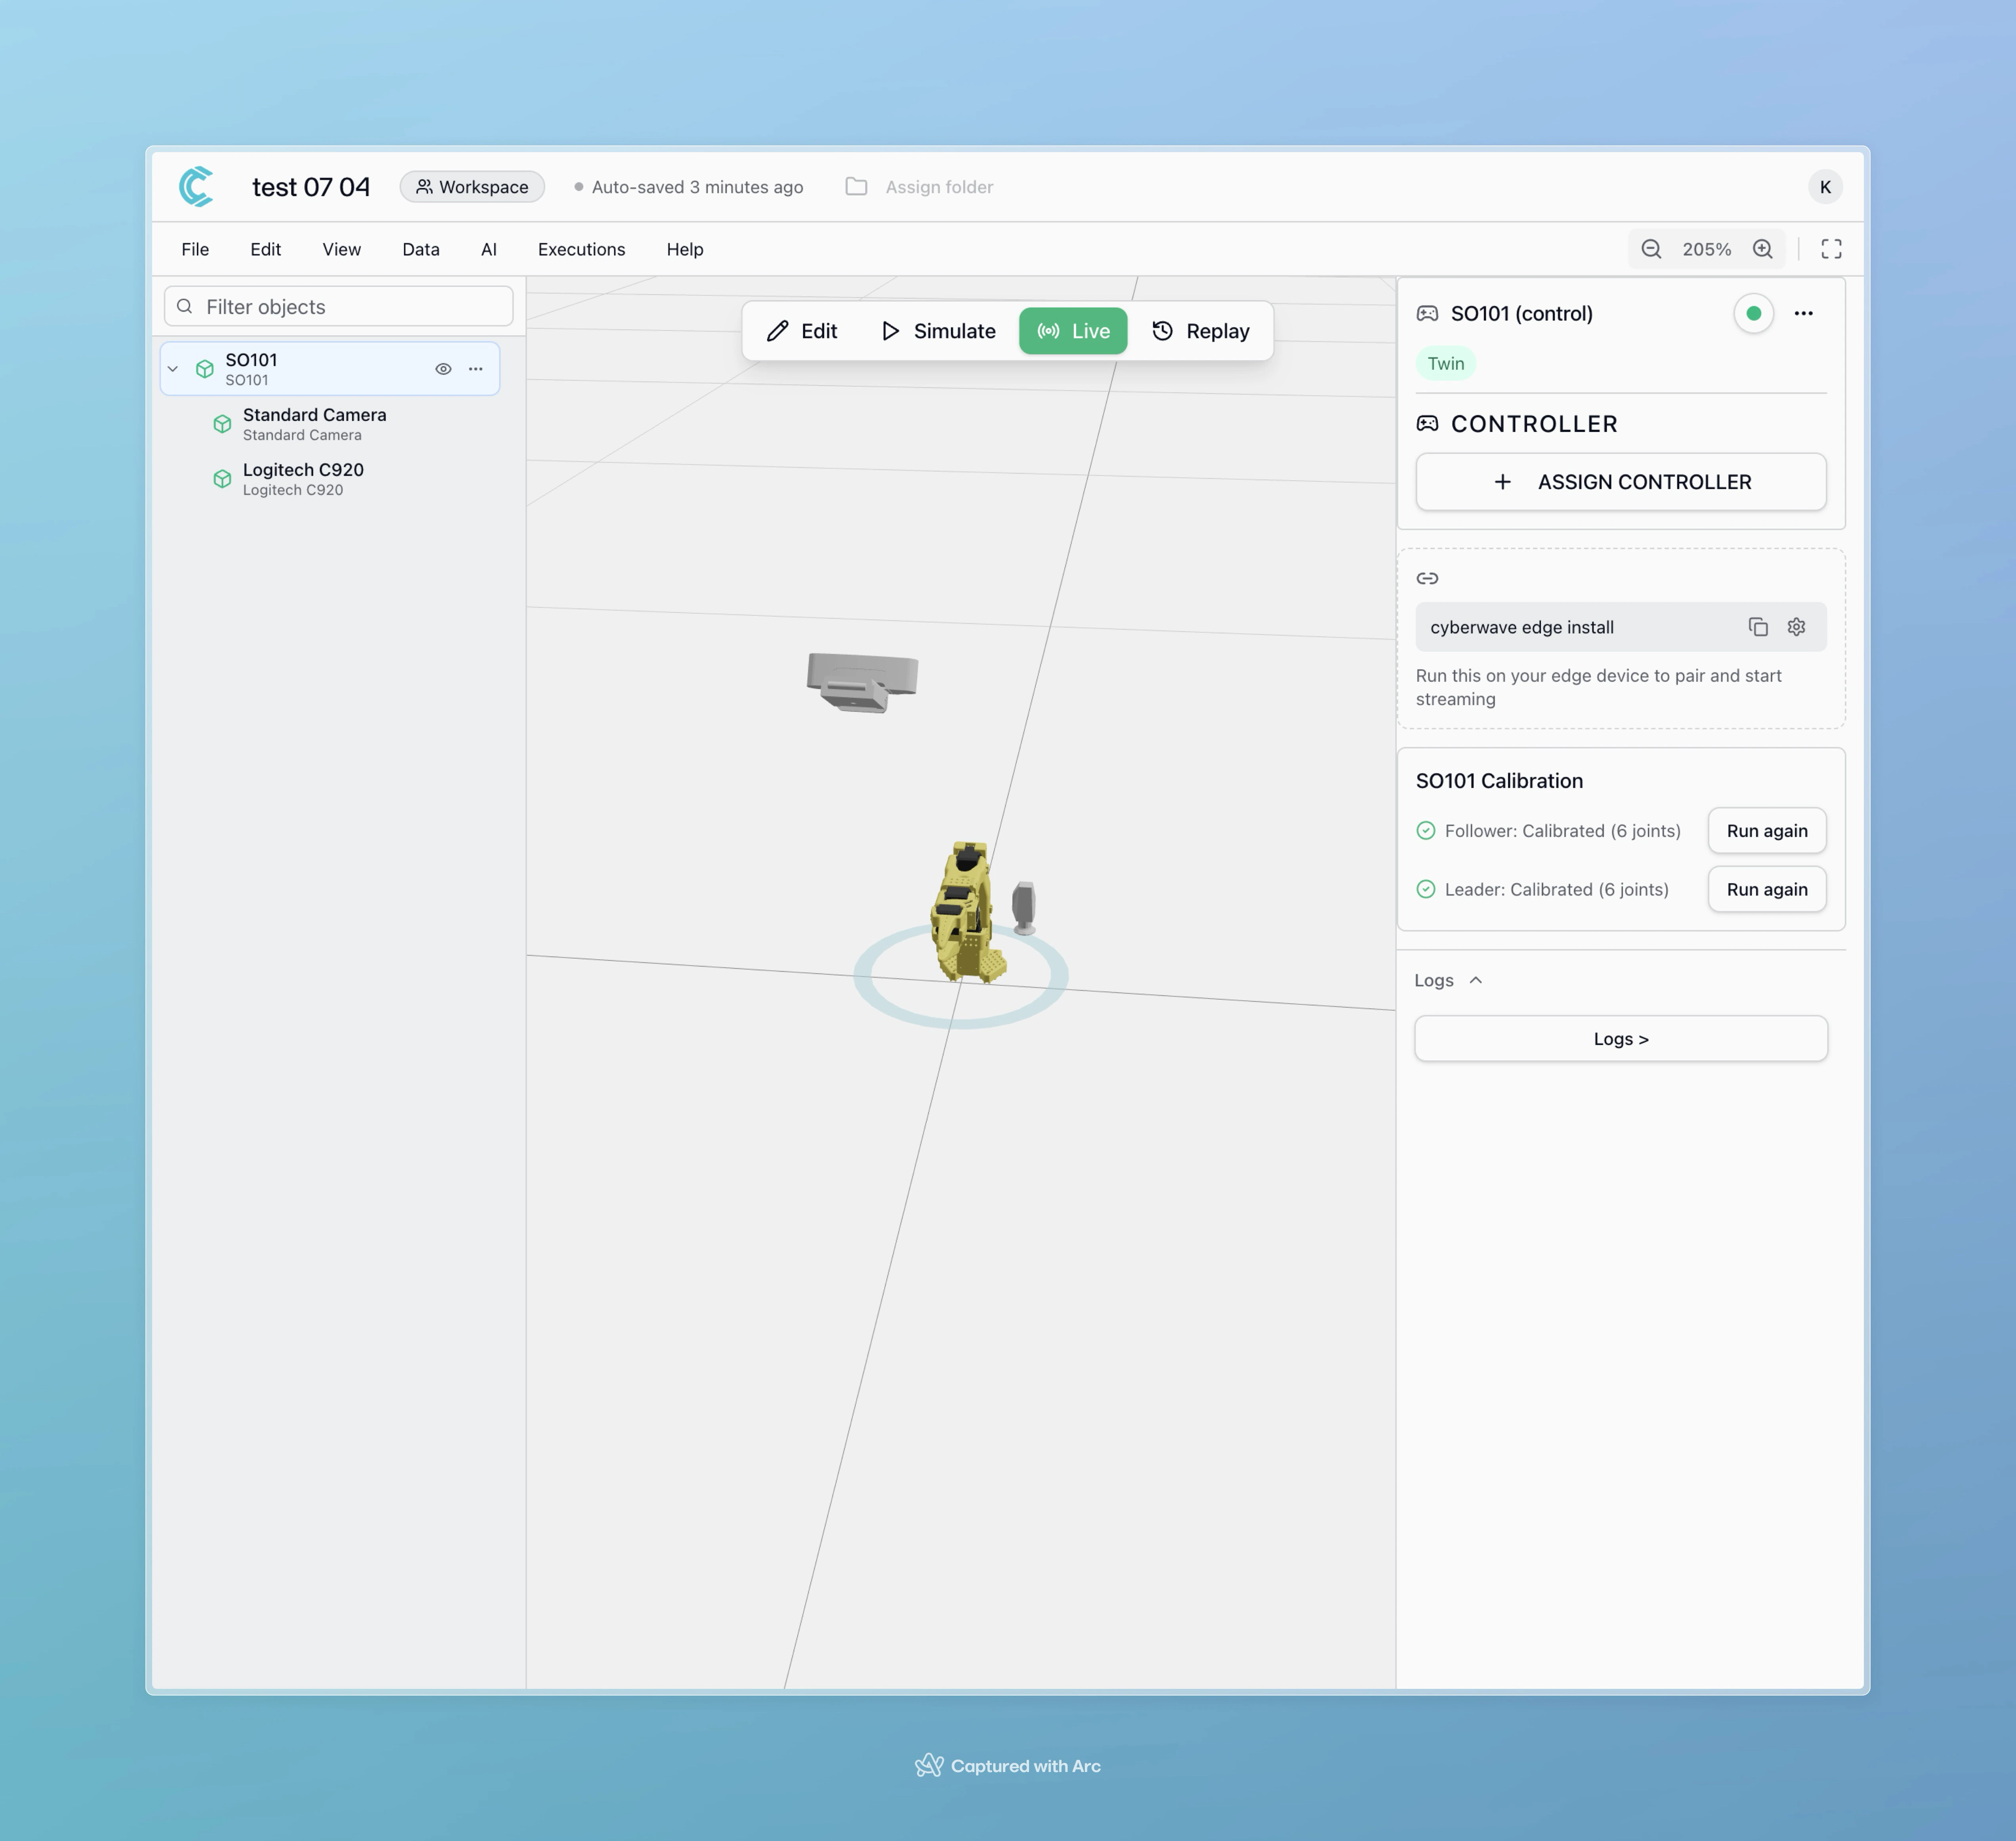
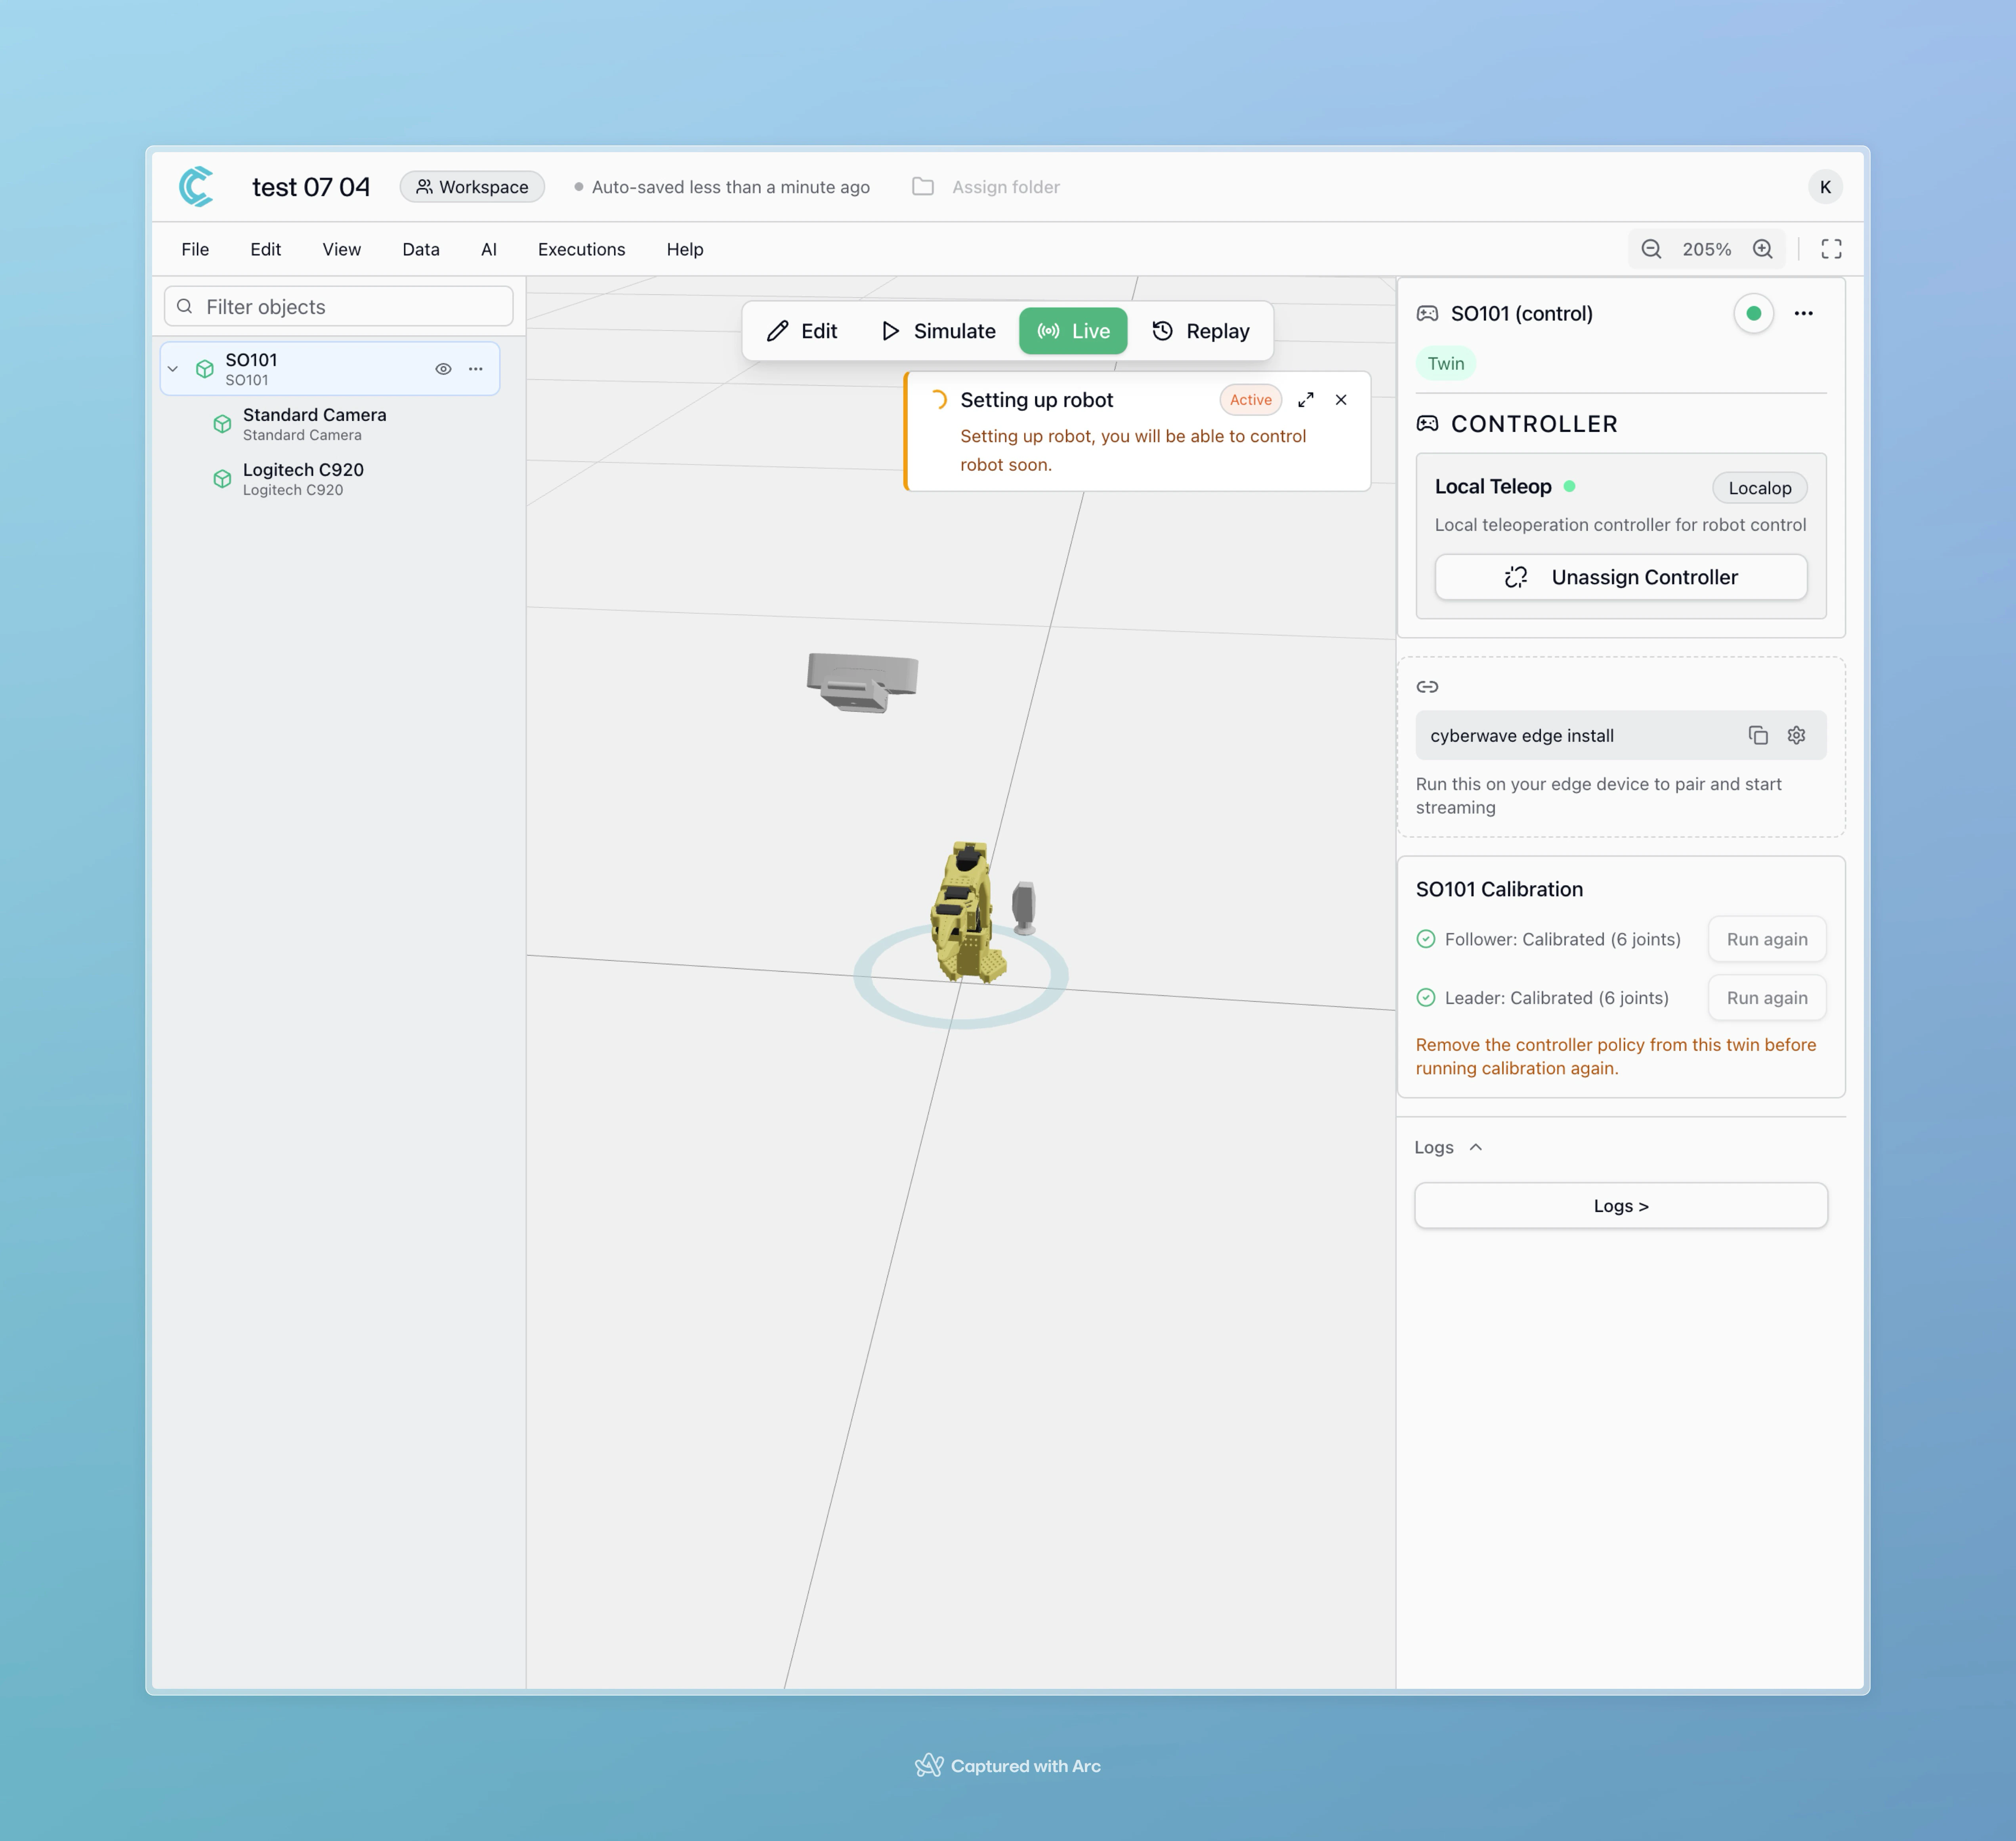
Calibrate Your Robots
Calibration is required before using the SO101 for teleoperation or control. The platform will alert you when calibration is missing or required.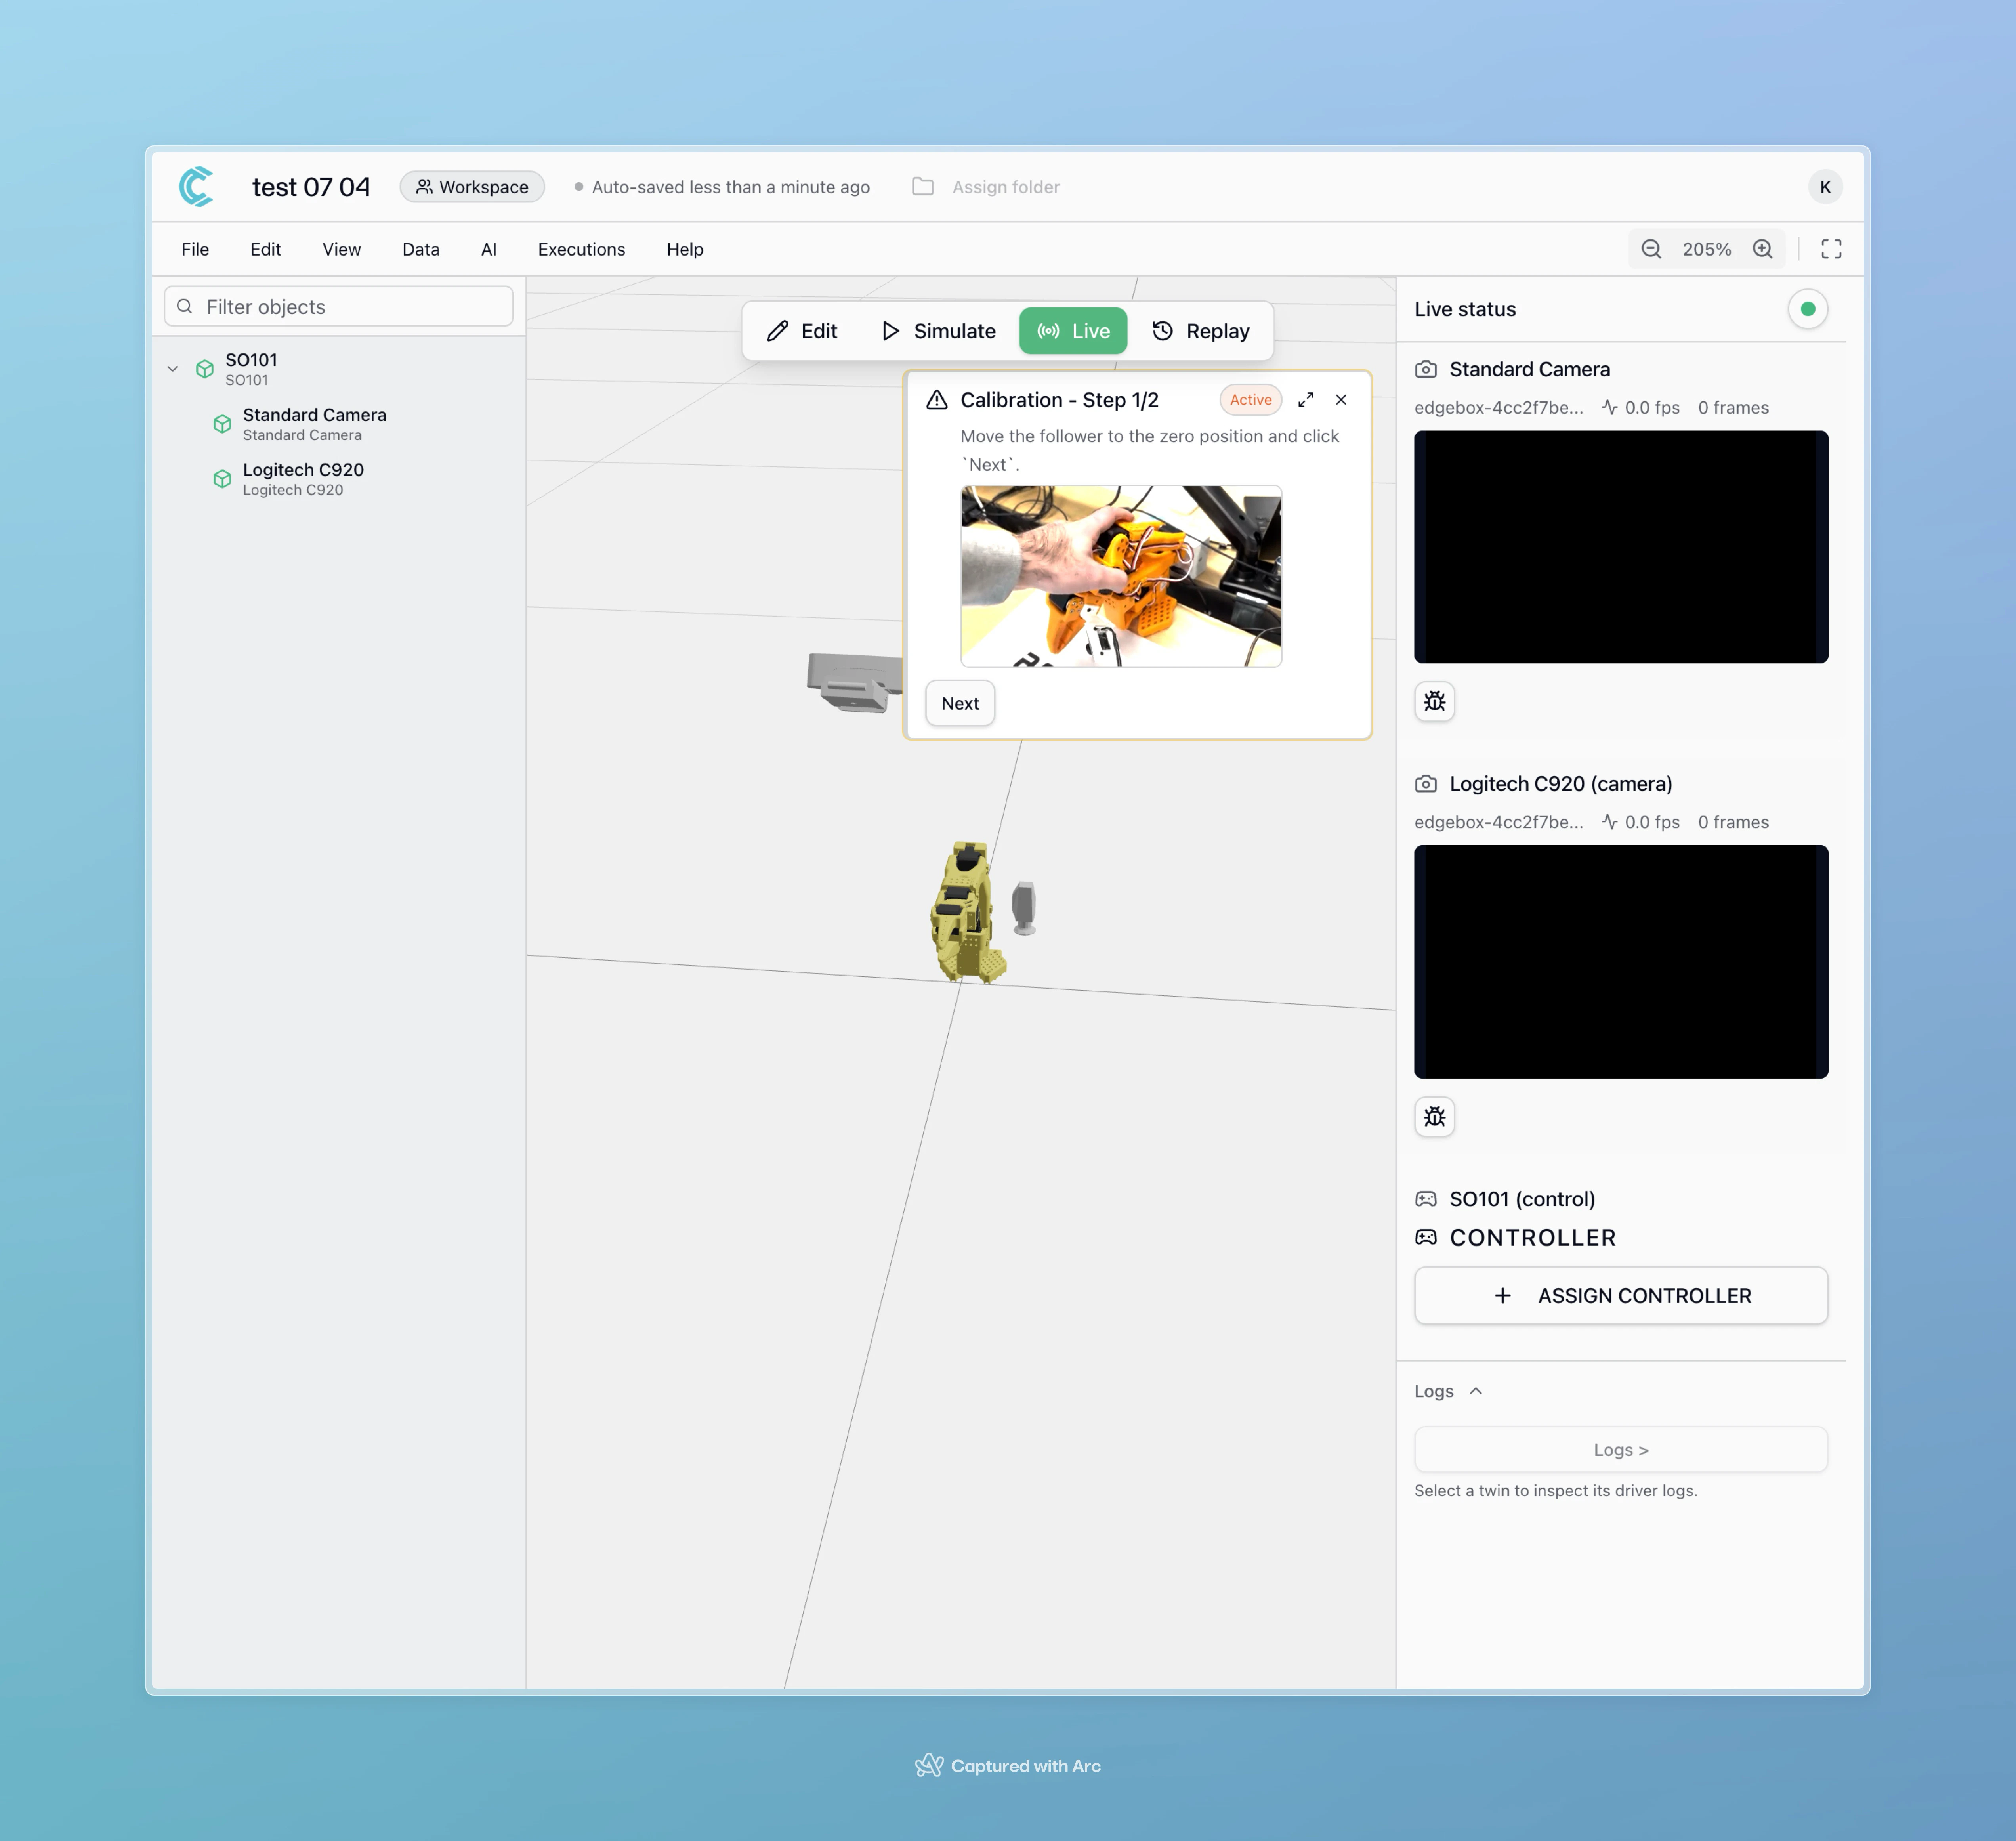
- Navigate to your environment in Live Mode
- Select the SO101 twin
- Click the Calibrate button for each arm (leader and follower)
- Follow the on-screen instructions to move joints through their full range
- Success: Calibration completes without alerts; proceed to teleoperation
- Poor quality: Platform warns that calibration may be inaccurate; consider re-taking
- Failure: Calibration fails with specific error messages; review errors and retry
API Reference:
GET /api/v1/twins/{uuid}/calibration- Get twin calibration dataPOST /api/v1/twins/{uuid}/calibration- Update twin calibrationDELETE /api/v1/twins/{uuid}/calibration- Delete calibration data
cyberwave/twin/{uuid}/command- Calibration commands (start, next, complete)
Step 2: Collect Demonstration Data
Now that your robots are calibrated, you’ll collect demonstration data by performing the task you want the AI model to learn.Assign the Local Teleop Controller
The Local Teleop controller is specifically designed for high-quality data collection. It operates the follower arm at high frequency based on leader arm movements, producing smooth, consistent demonstrations ideal for ML training.- In your environment, switch to Live Mode
- Select the SO101 twin
- Click Assign Controller
- Select Local Teleop from the controller list
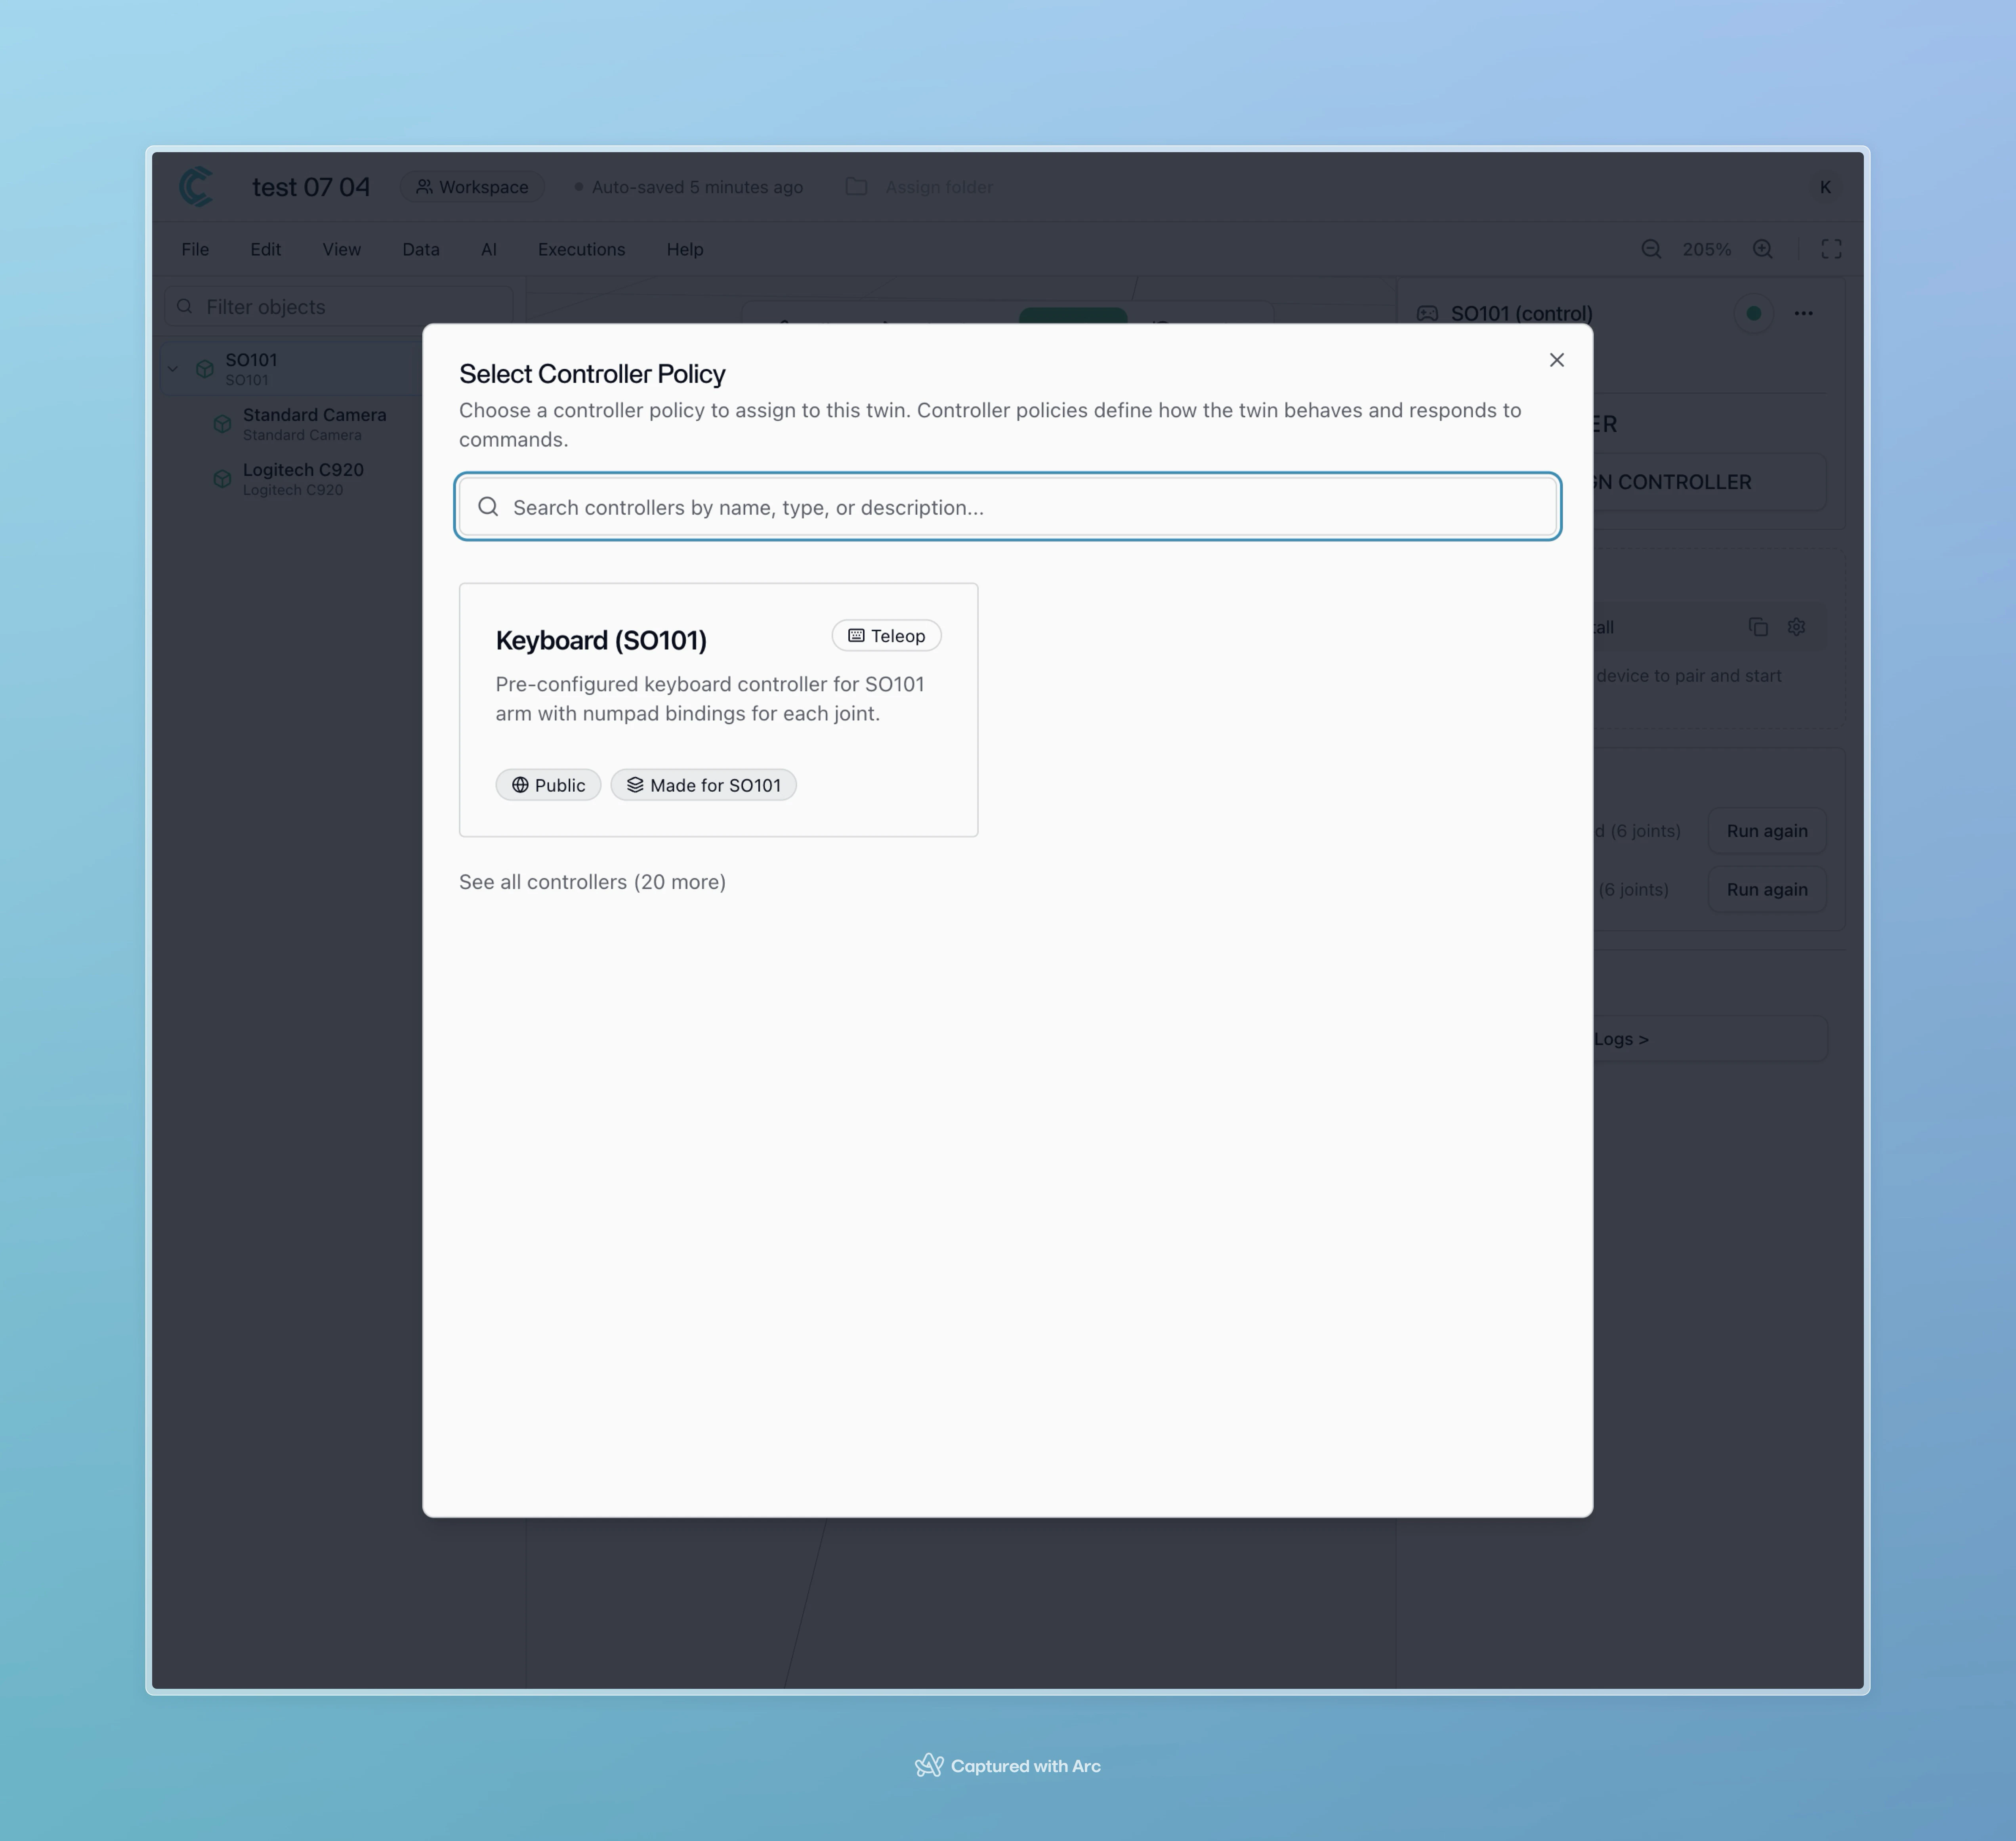
Why Local Teleop for data collection?Local Teleop generates high-frequency control data as you move the leader arm, producing smooth trajectories. Other controllers (like Keyboard) operate at much lower frequencies and produce jerky, inconsistent data unsuitable for training ML models.
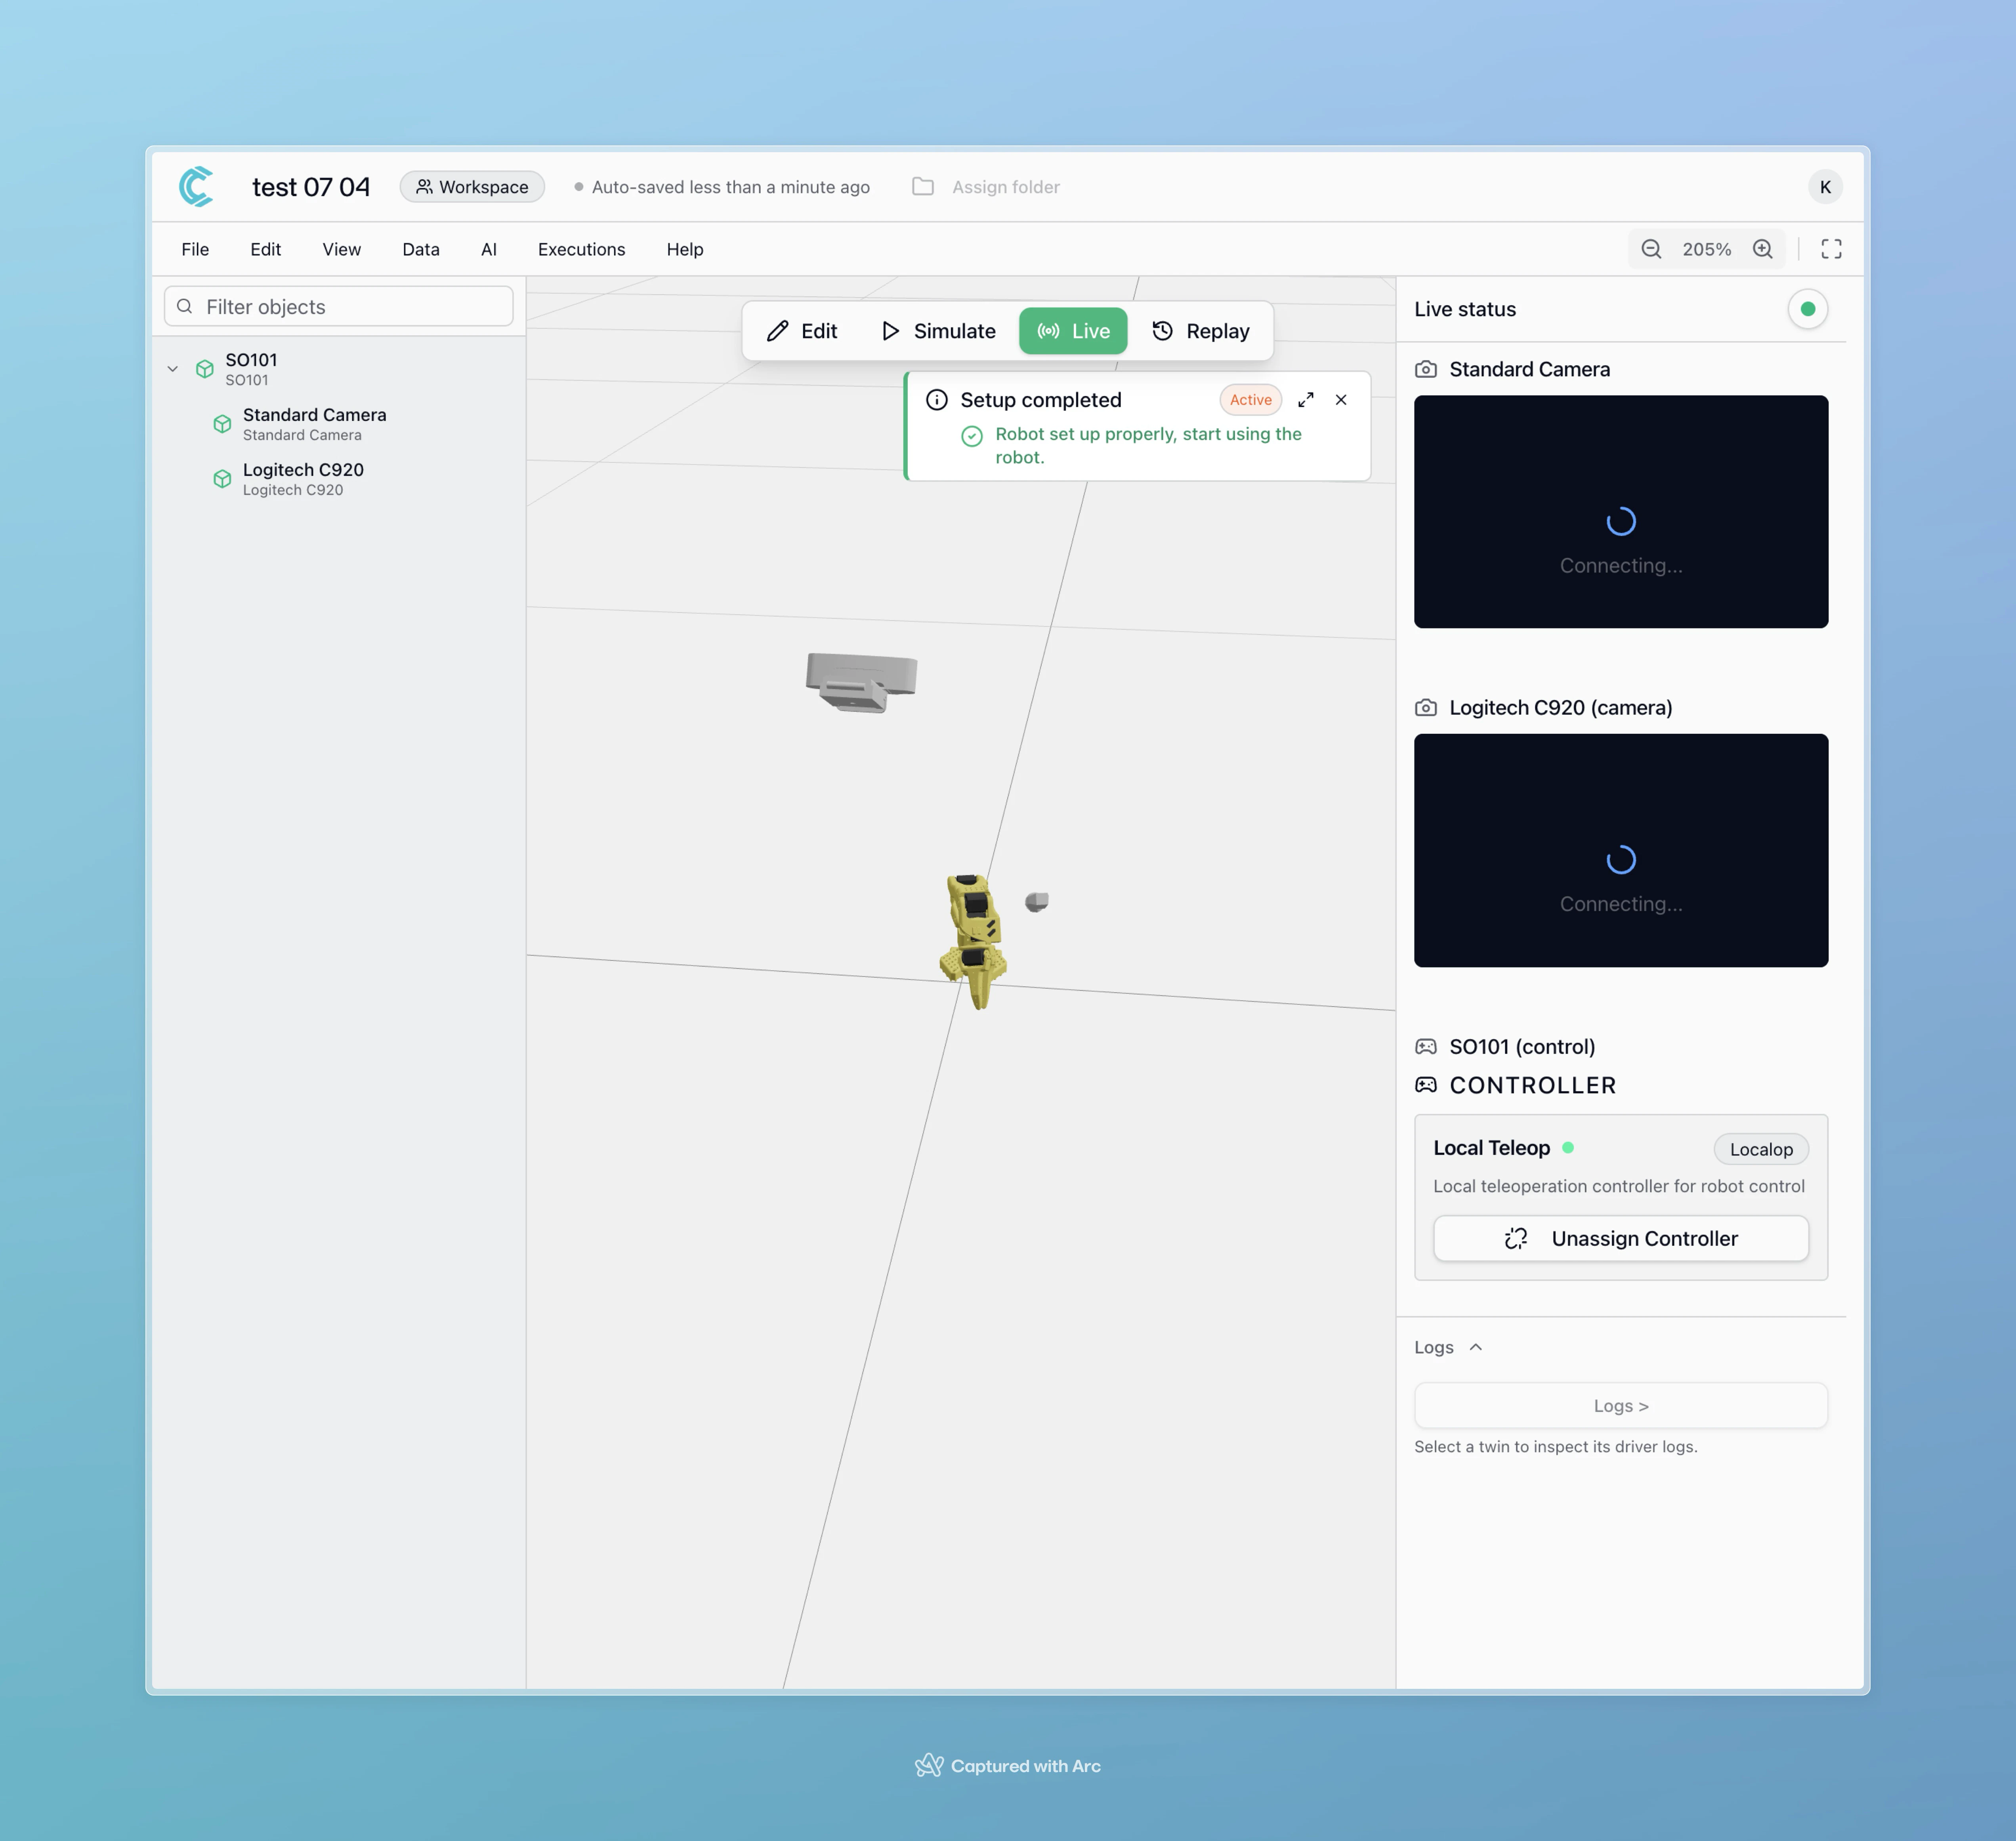
Verify Teleoperation is Active
Confirm the system is ready:- Cameras are streaming video
- Leader arm movements are mirrored by the follower arm
- Cyberwave is recording telemetry data

By default, a keyboard controller may be assigned to your robot. The platform automatically removes it when calibration alerts appear or when you assign Local Teleop.
Perform Task Demonstrations
With teleoperation active and recording:- Plan your task: Decide exactly what behavior you want to teach (e.g., “pick up red cube and place in box”)
- Execute demonstrations: Use the leader arm to guide the follower through the task
- Repeat with variation: Perform the same task 20-50 times with slight variations in:
- Starting positions
- Object placement
- Movement speed
- Approach angles
Stop Recording
When you’ve collected enough demonstrations:- Select the SO101 twin
- Click Remove Controller or detach the Local Teleop controller
- Your recorded data is automatically saved to the platform
API Reference:
PUT /api/v1/twins/{uuid}- Update twin properties (assign/remove controller)GET /api/v1/environments/{uuid}/recordings- Get recordings for an environment
cyberwave/twin/{uuid}/telemetry- Recording lifecycle events:telemetry_start- Recording begins (triggers cloud processing)telemetry_end- Recording ends (triggers final processing and storage)initial_observation- Initial robot state snapshotcamera_stored- Video stream saved
cyberwave/joint/{uuid}/+- Joint state updates during recordingcyberwave/twin/{uuid}/command- Controller assignment changes
Step 3: Create Episodes and Datasets
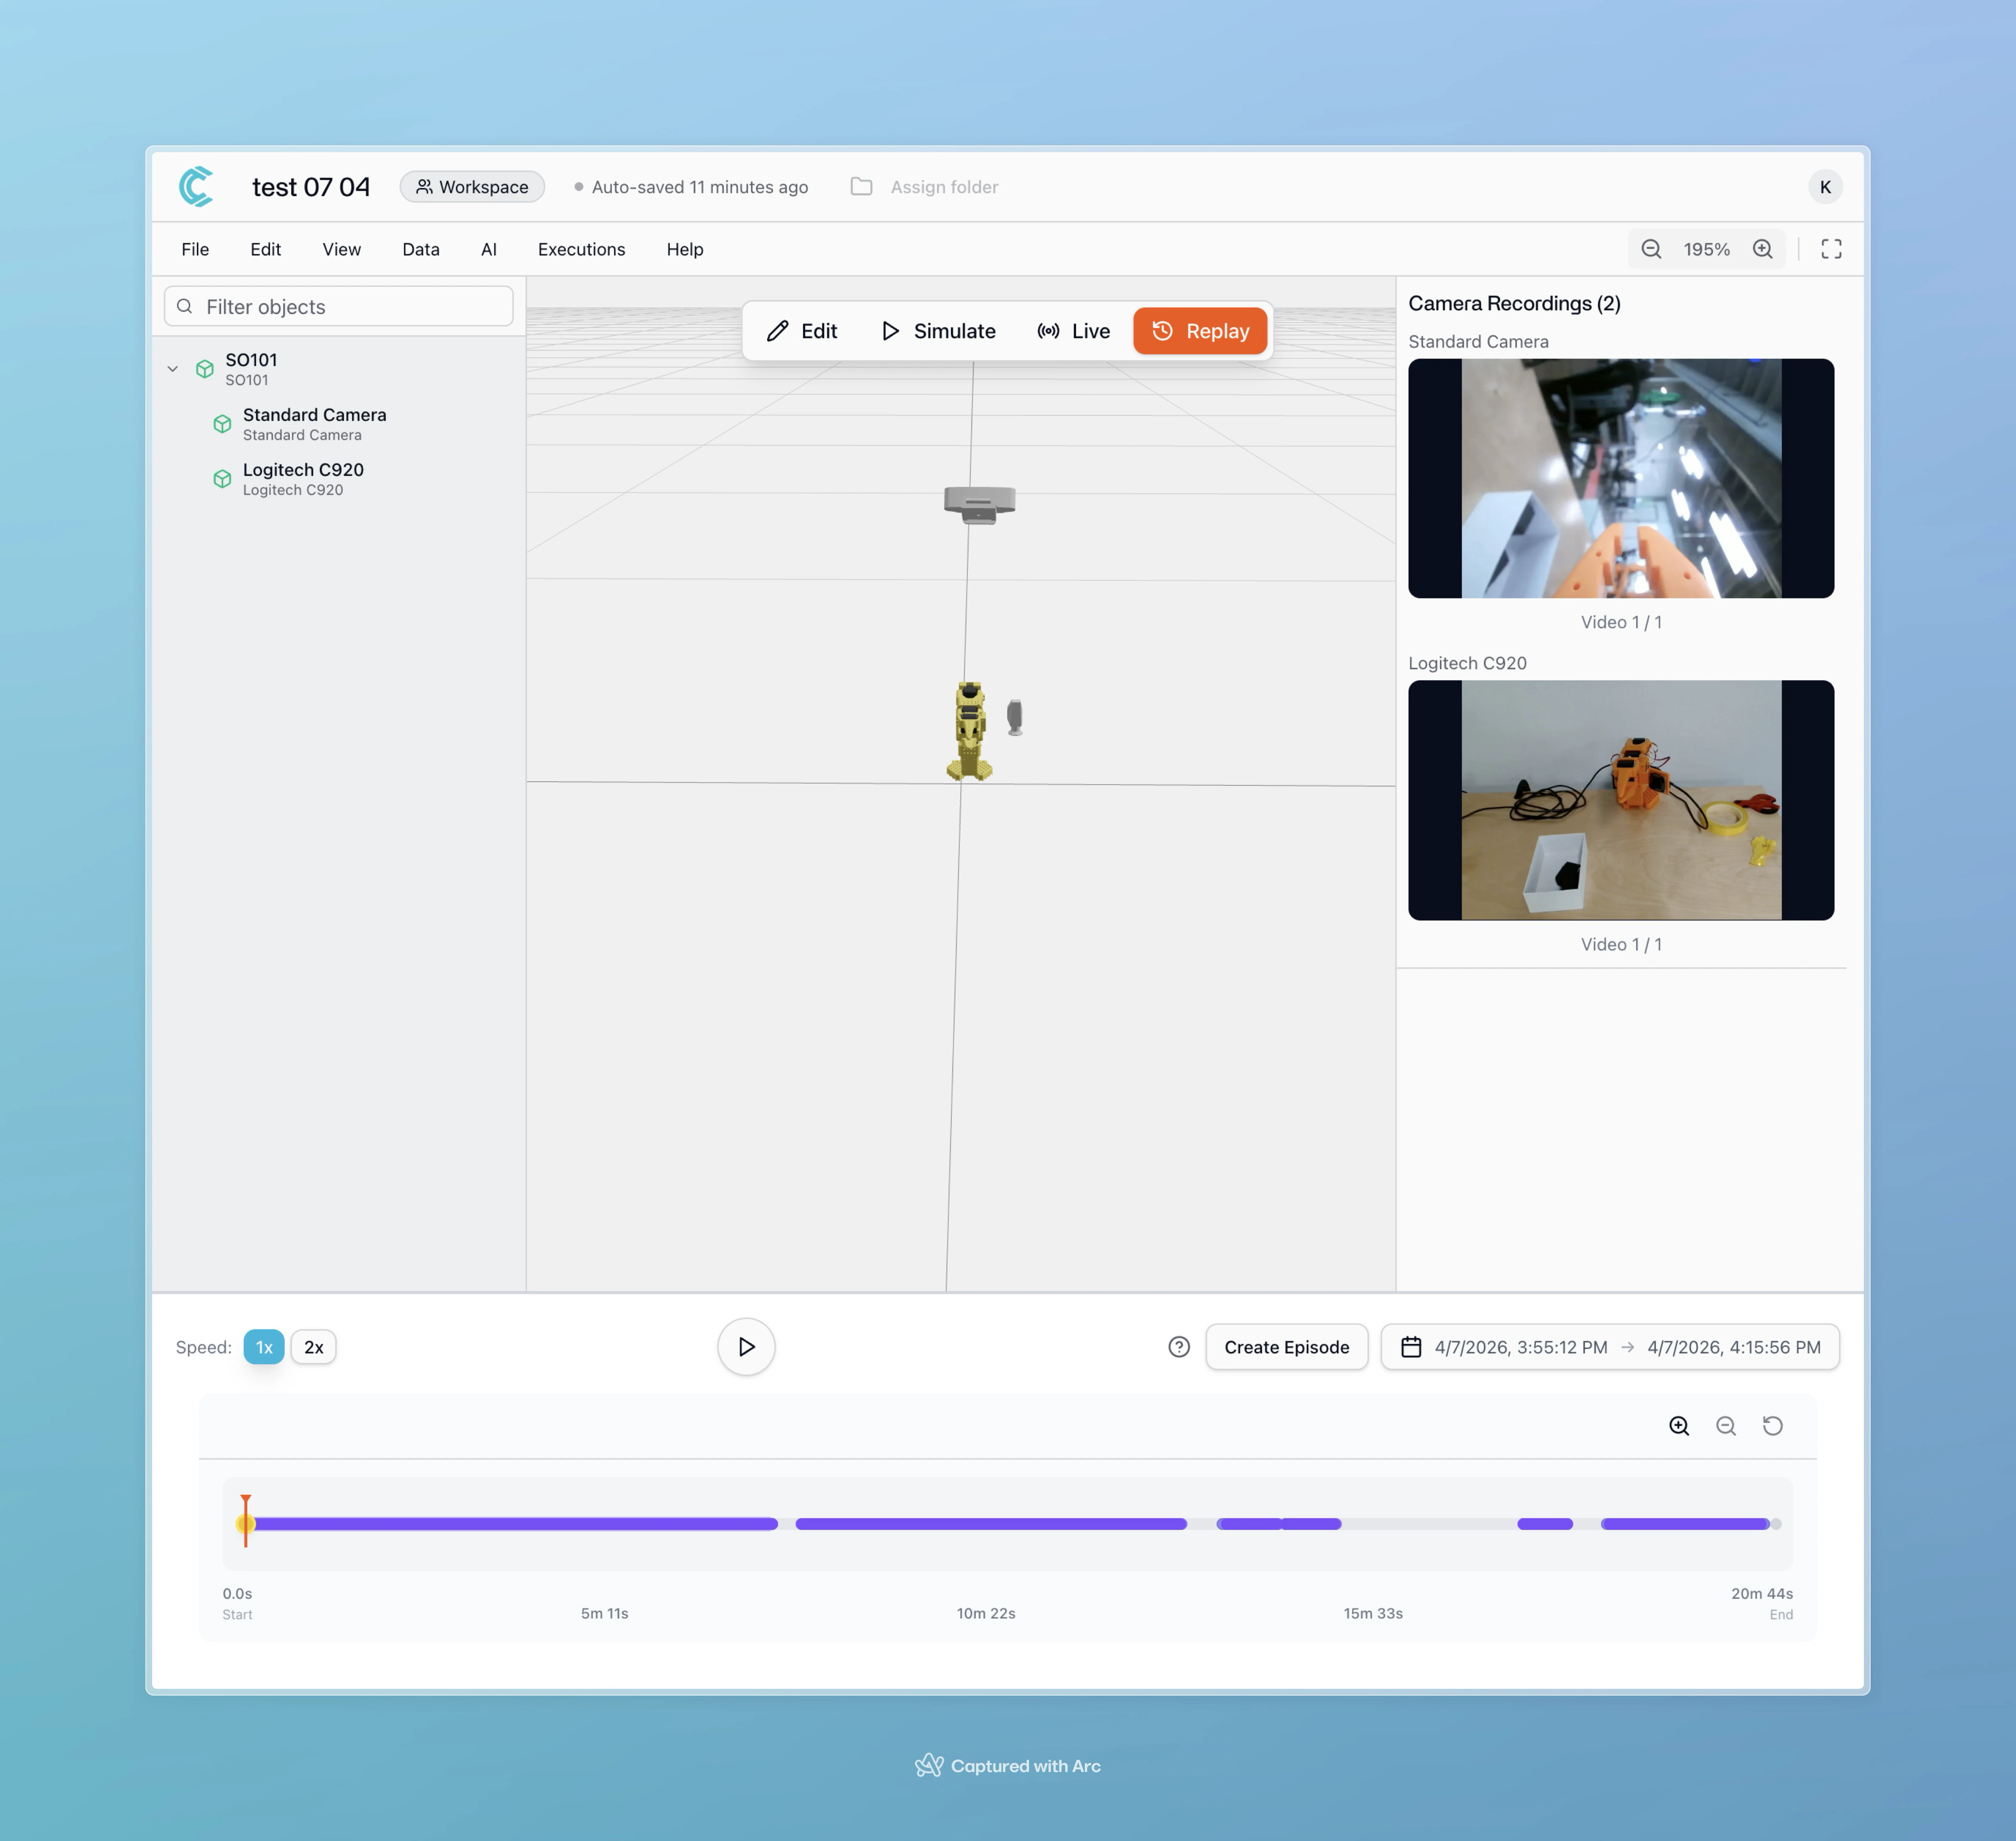
After data collection, you’ll review recordings and create structured datasets for training.Review Recorded Data in Replay Mode
- Switch to Replay Mode in your environment
- Locate your recent recording sessions in the timeline
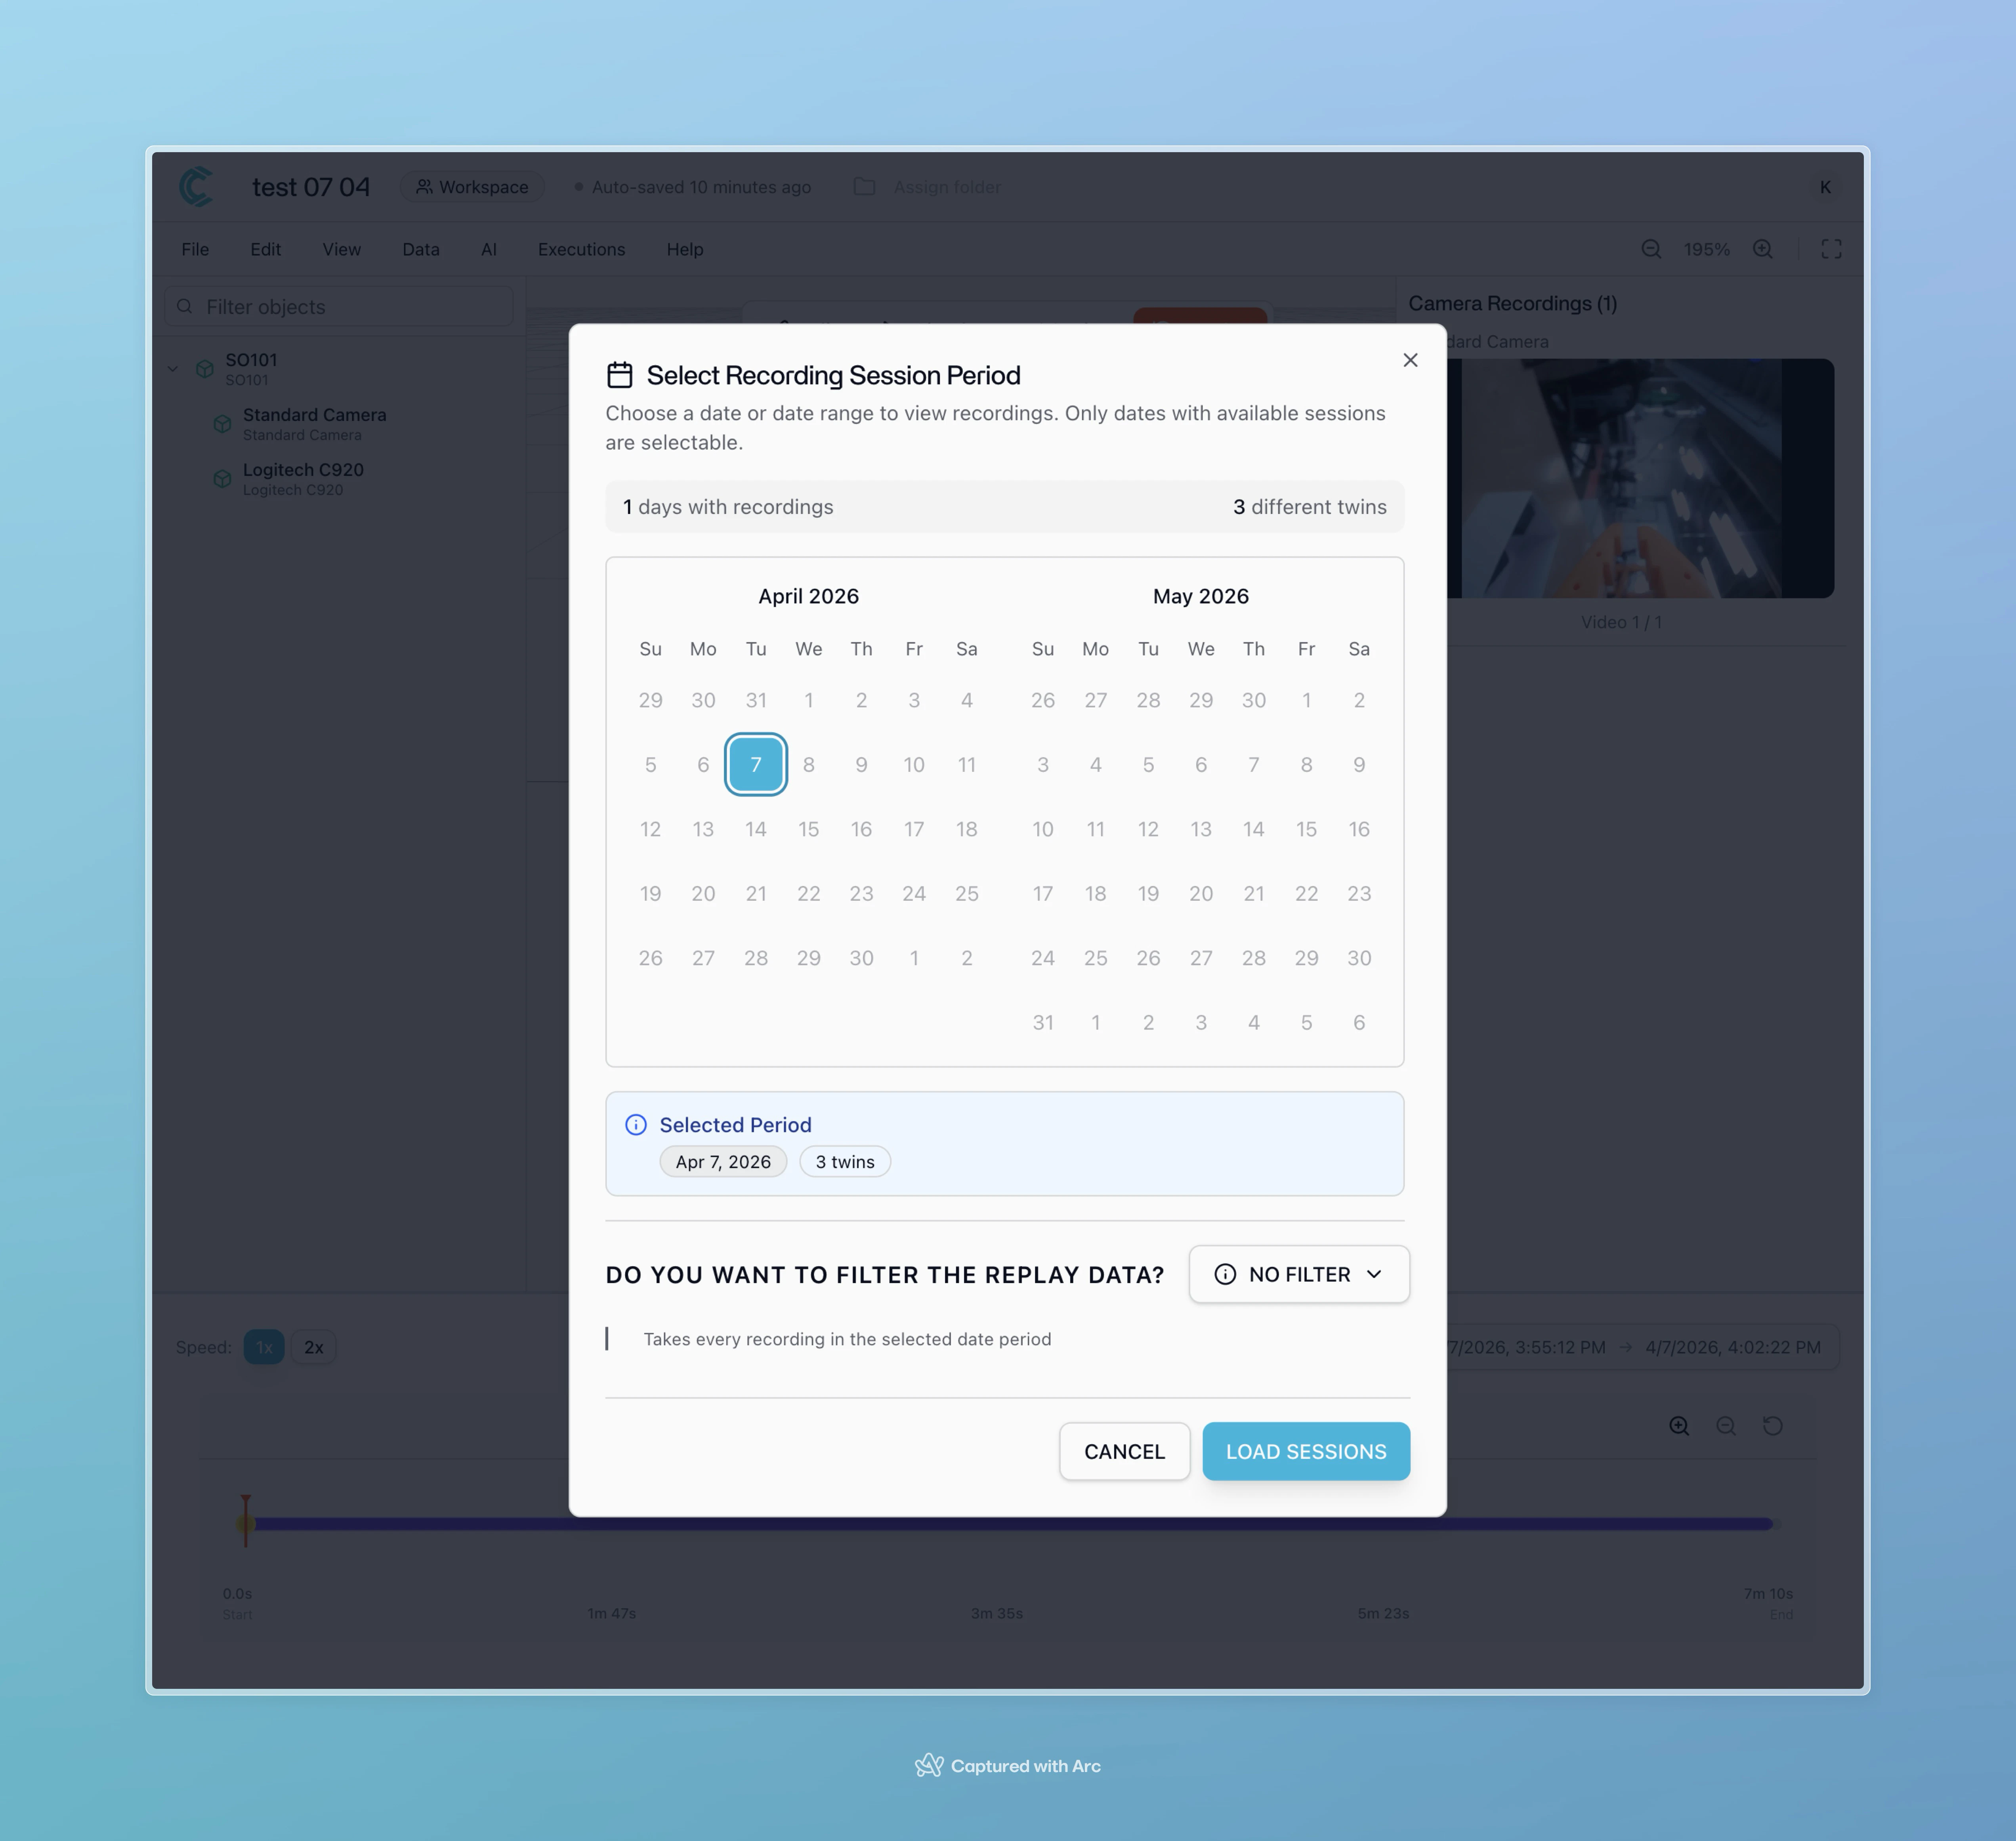
- Joint positions over time
- Camera feeds
- Control inputs
Create Episodes
Episodes are trimmed segments of your recording that contain single, complete task demonstrations.- In Replay Mode, identify the start and end of each successful demonstration
- Use the episode creation tool to trim each segment:
- Set the start point (task begins)
- Set the end point (task completes)
- Name the episode descriptively (optional)
- Remove any failed attempts, setup time, or pauses between demonstrations
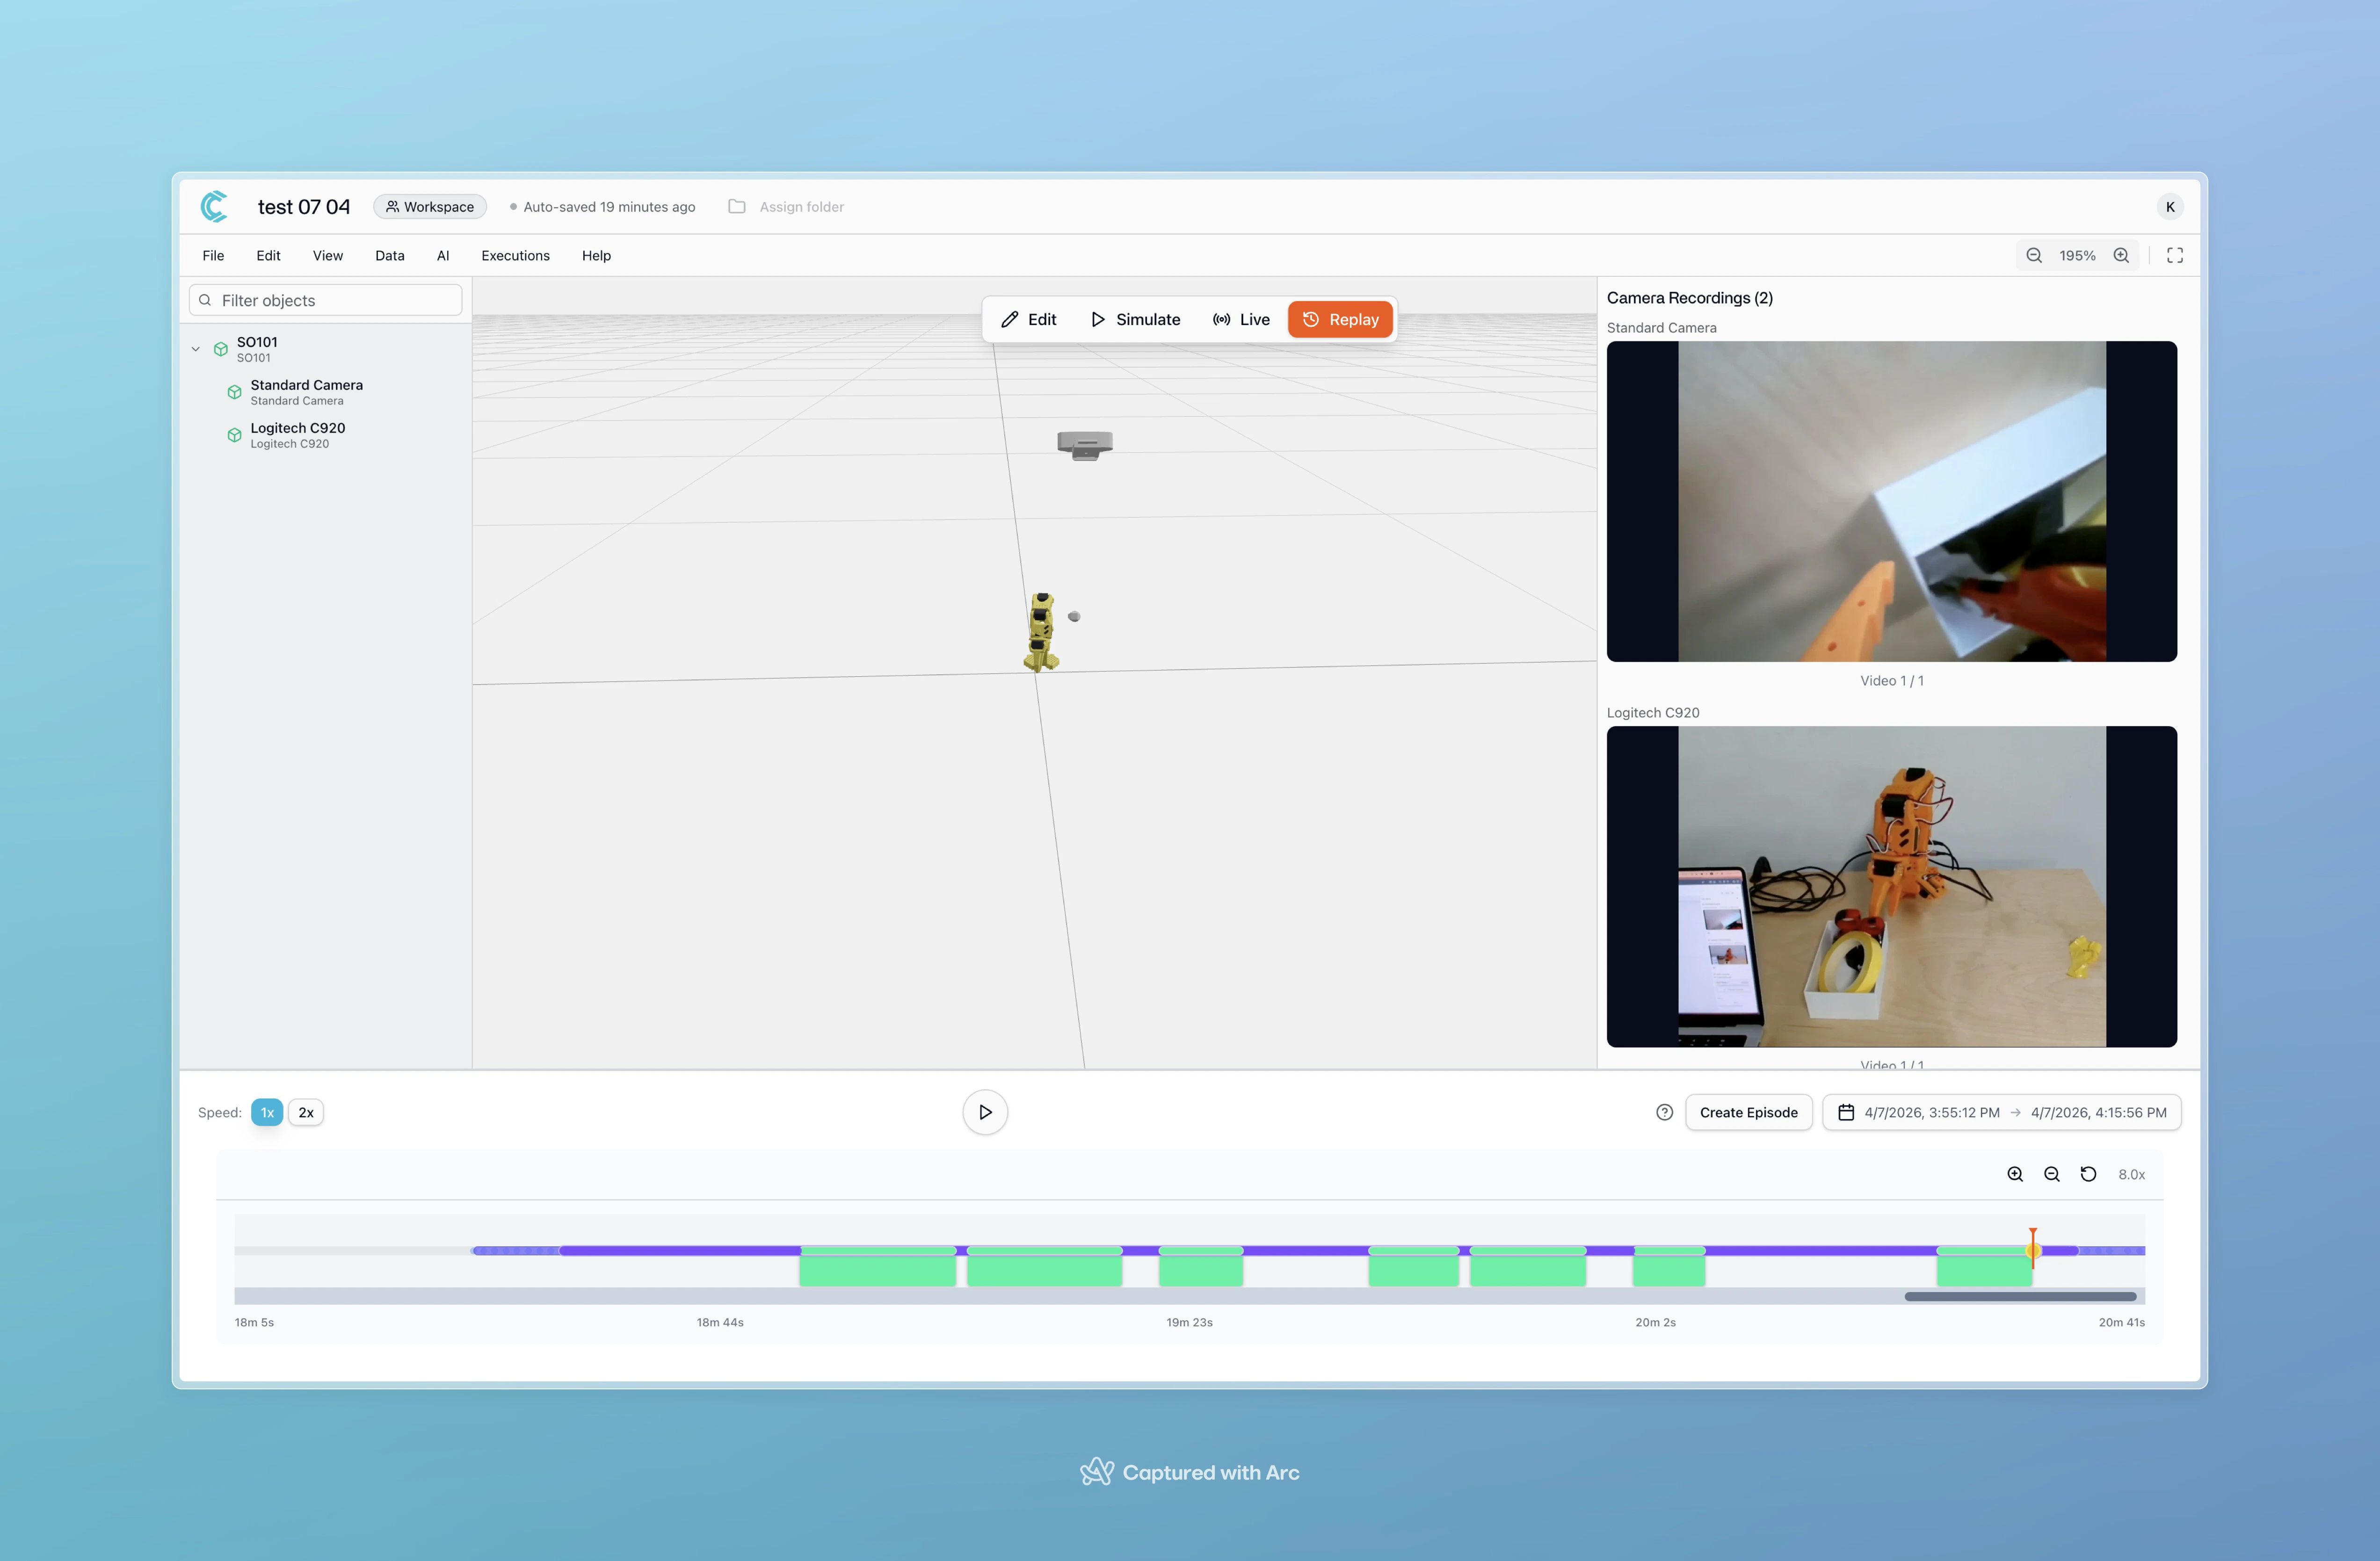
stub: Keyboard arrow navigation for timeline scrubbing is currently being improved to reduce mouse usage during episode creation.
Create a Dataset
Once you’ve created multiple episodes:- Review all episodes for quality
- Select the episodes to include in your dataset (use checkboxes)
- Click Create Dataset
- Name your dataset descriptively (e.g., “pick-place-red-cube-v1”)
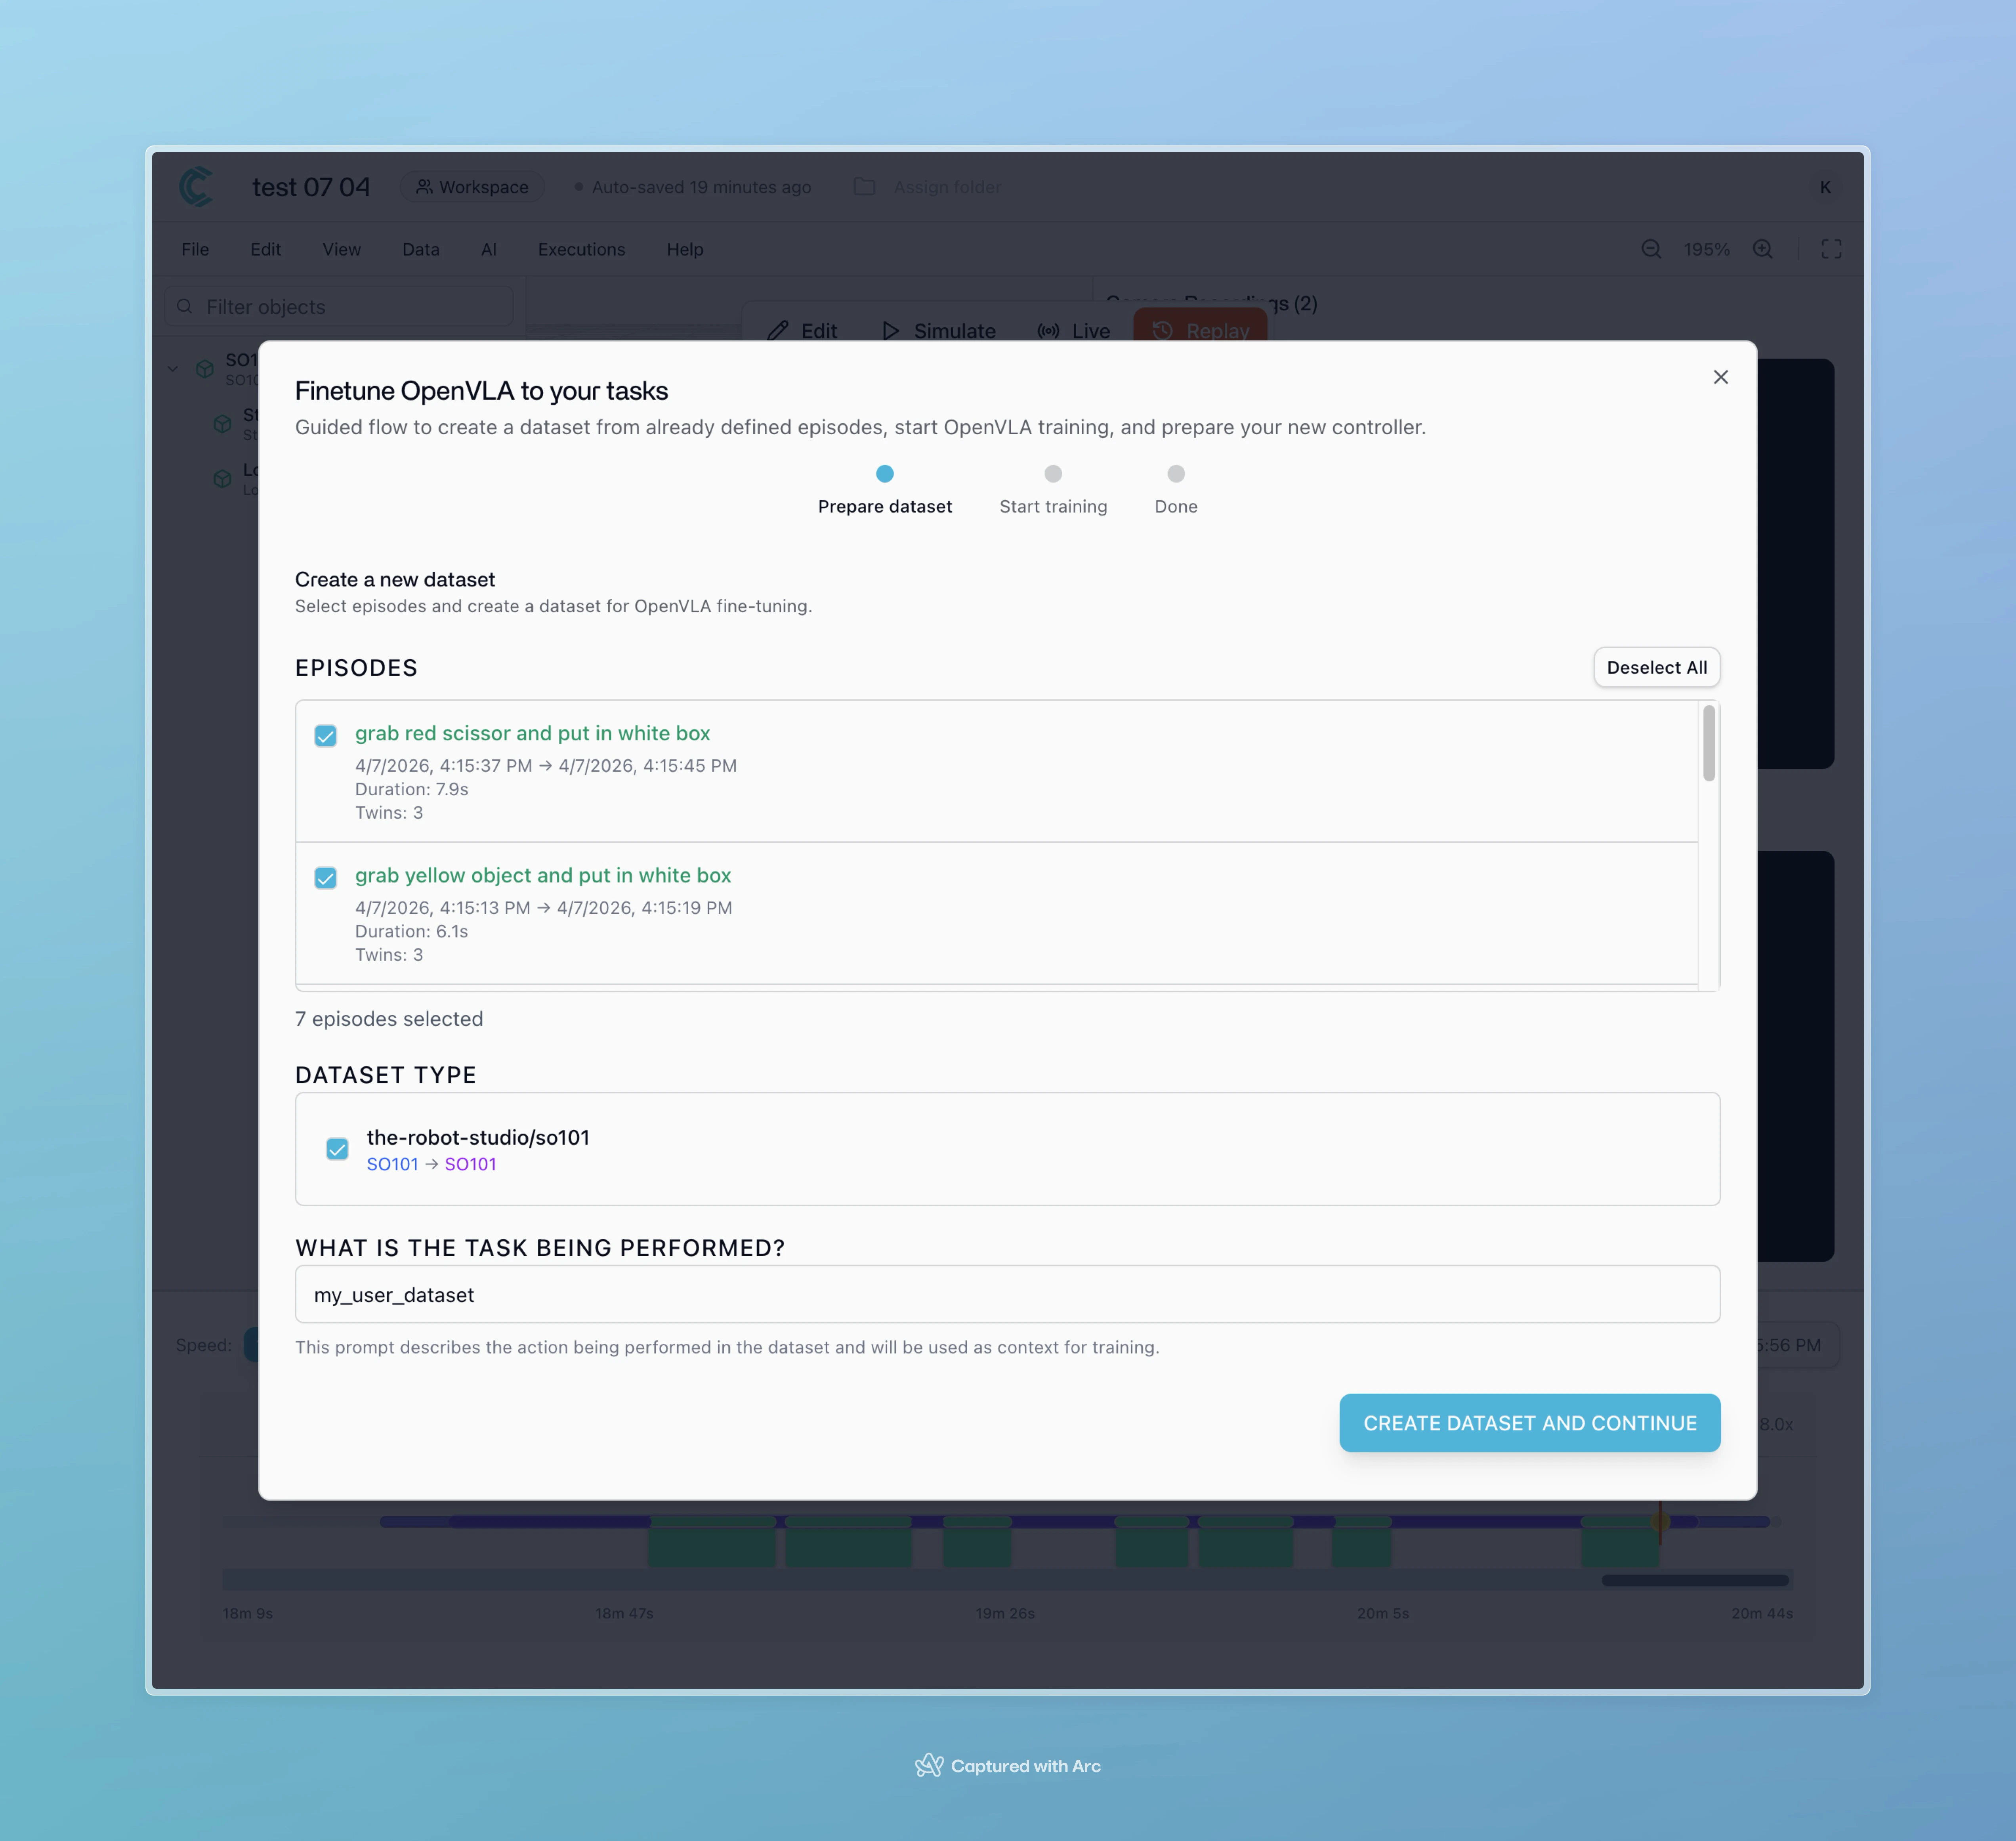
Dataset created successfully. You now have structured training data containing multiple demonstrations of your task.
API Reference:
GET /api/v1/episodes- List episodes (filter by environment)POST /api/v1/episodes- Create a new episodeGET /api/v1/datasets- List datasetsPOST /api/v1/datasets- Create a dataset from episodesGET /api/v1/datasets/{uuid}- Get dataset details
telemetry_end event on cyberwave/twin/{uuid}/telemetry.Step 4: Train an AI Model
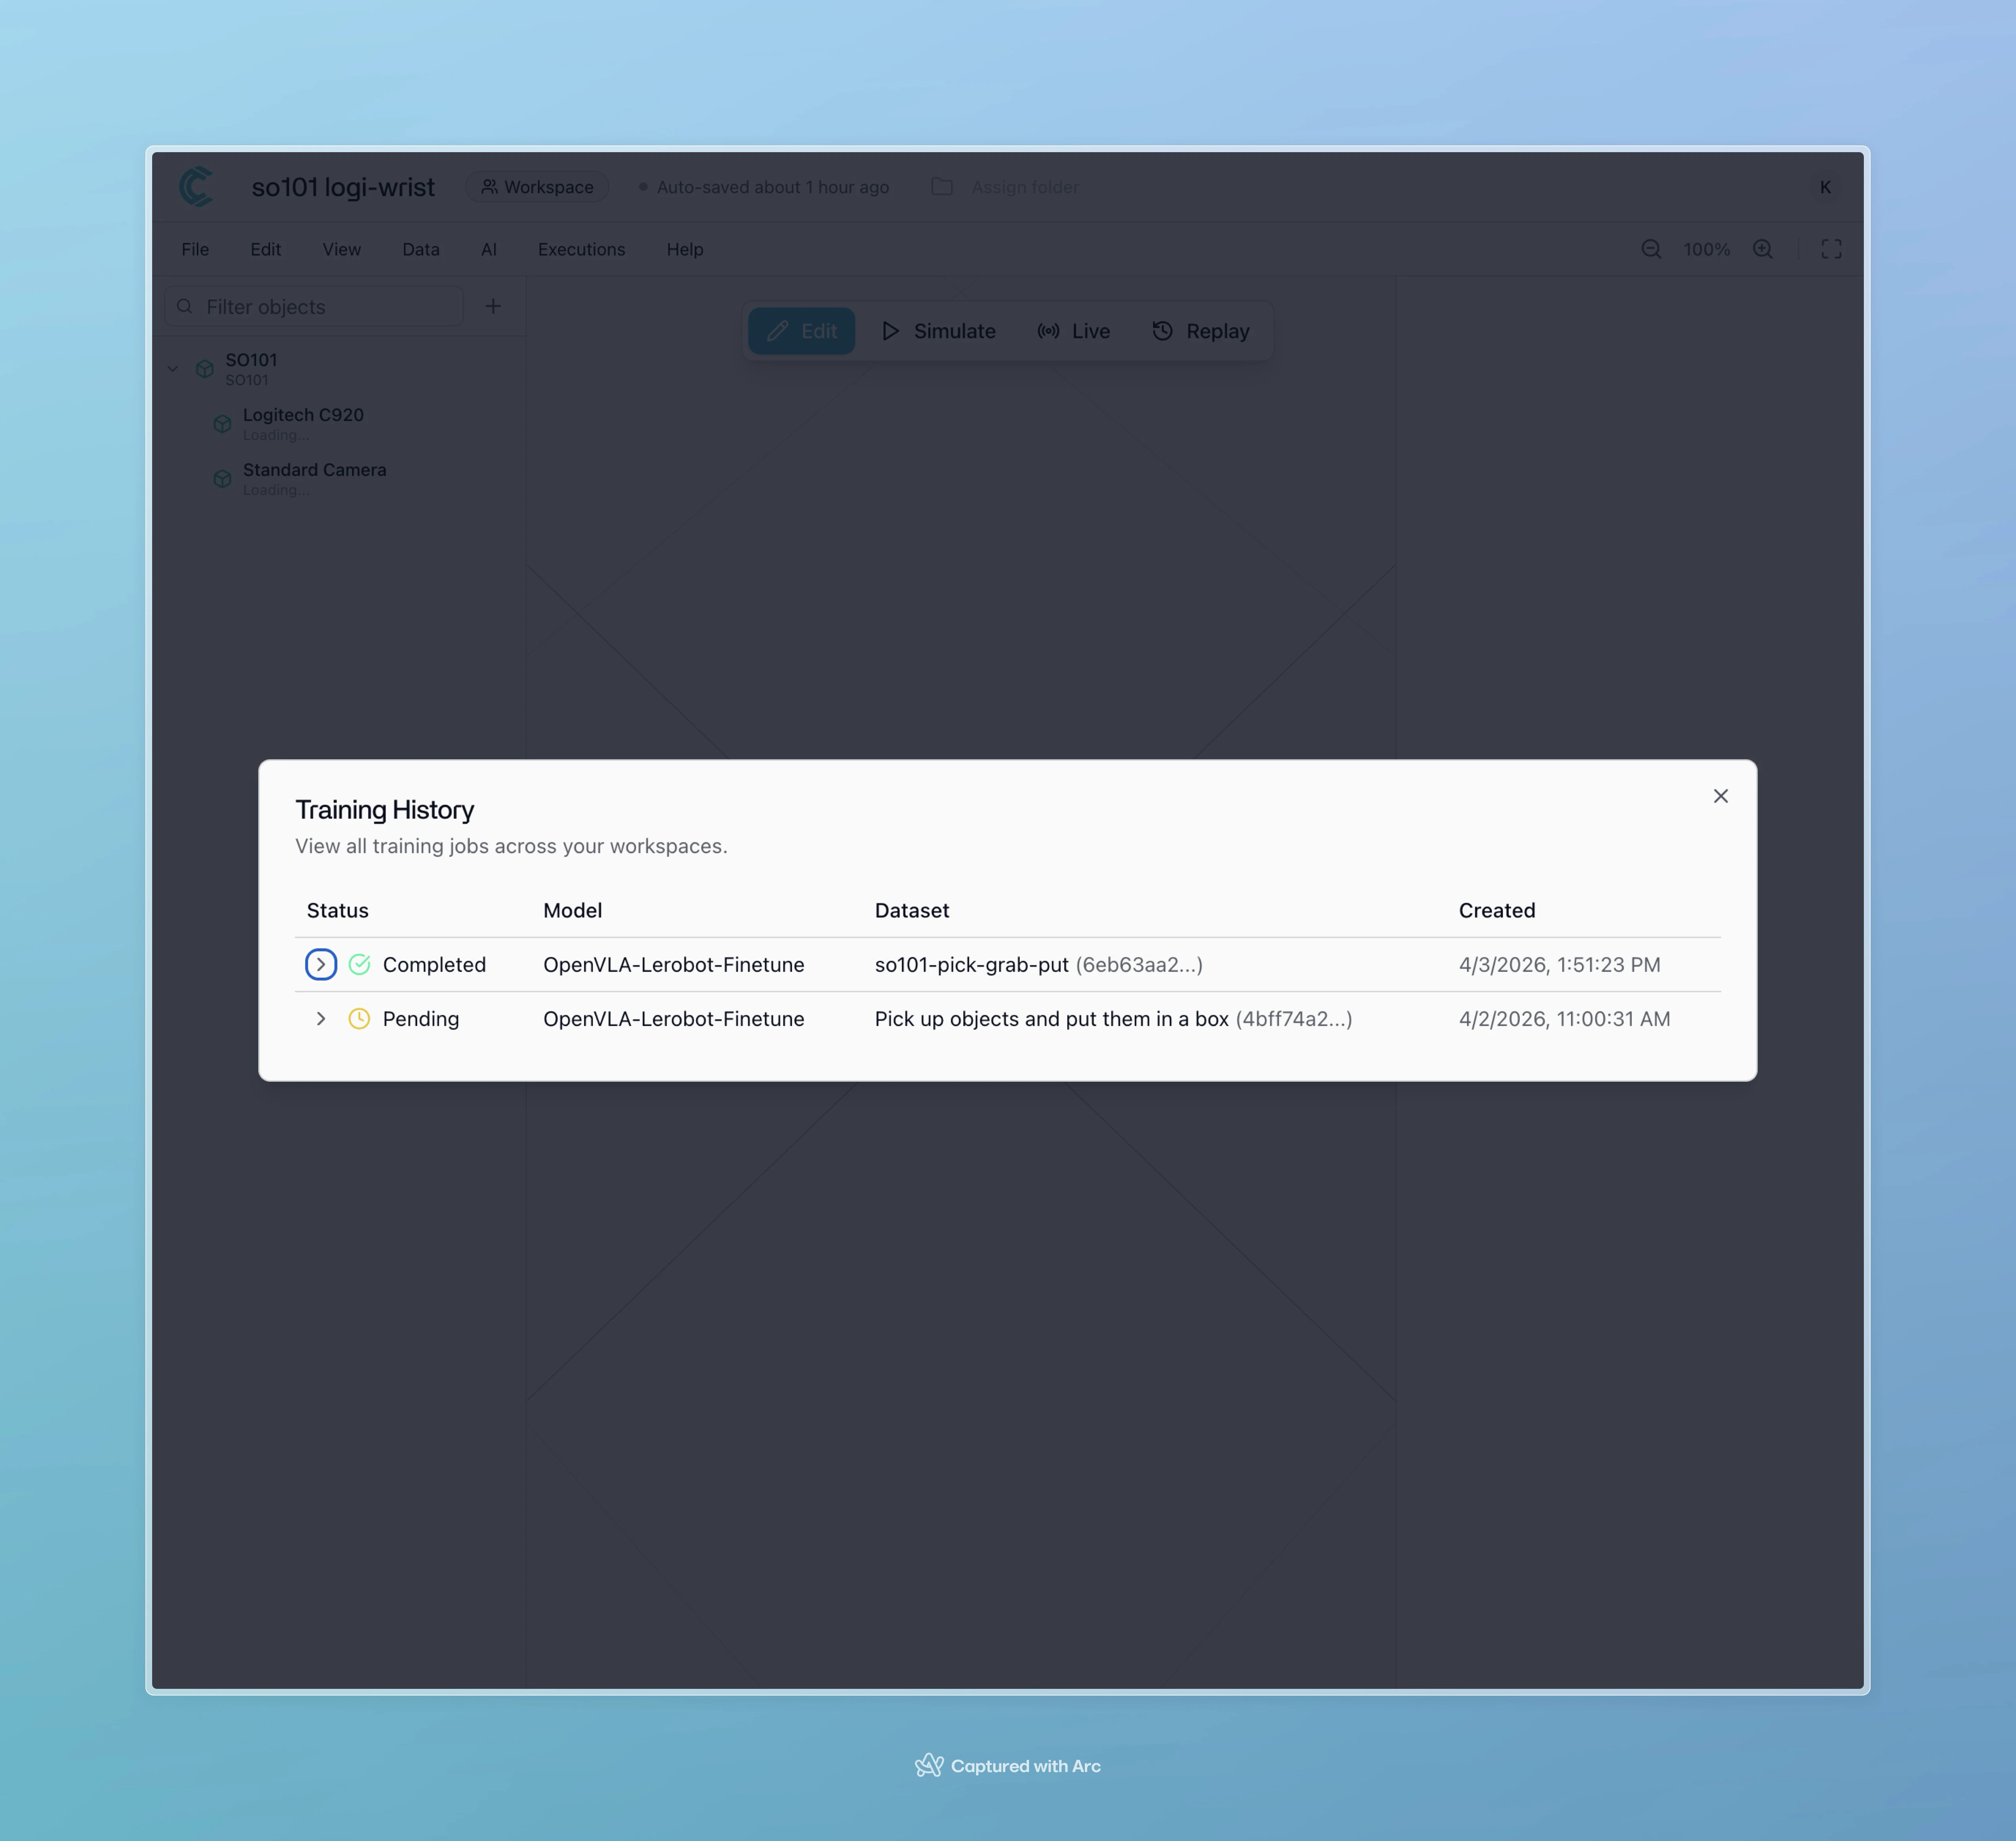
With your dataset ready, you’ll train a VLA model that can learn to replicate the demonstrated behavior.Start the Training Wizard
- Click the AI menu in your environment header
- Select Guided Training Wizard
- Choose your dataset from the list
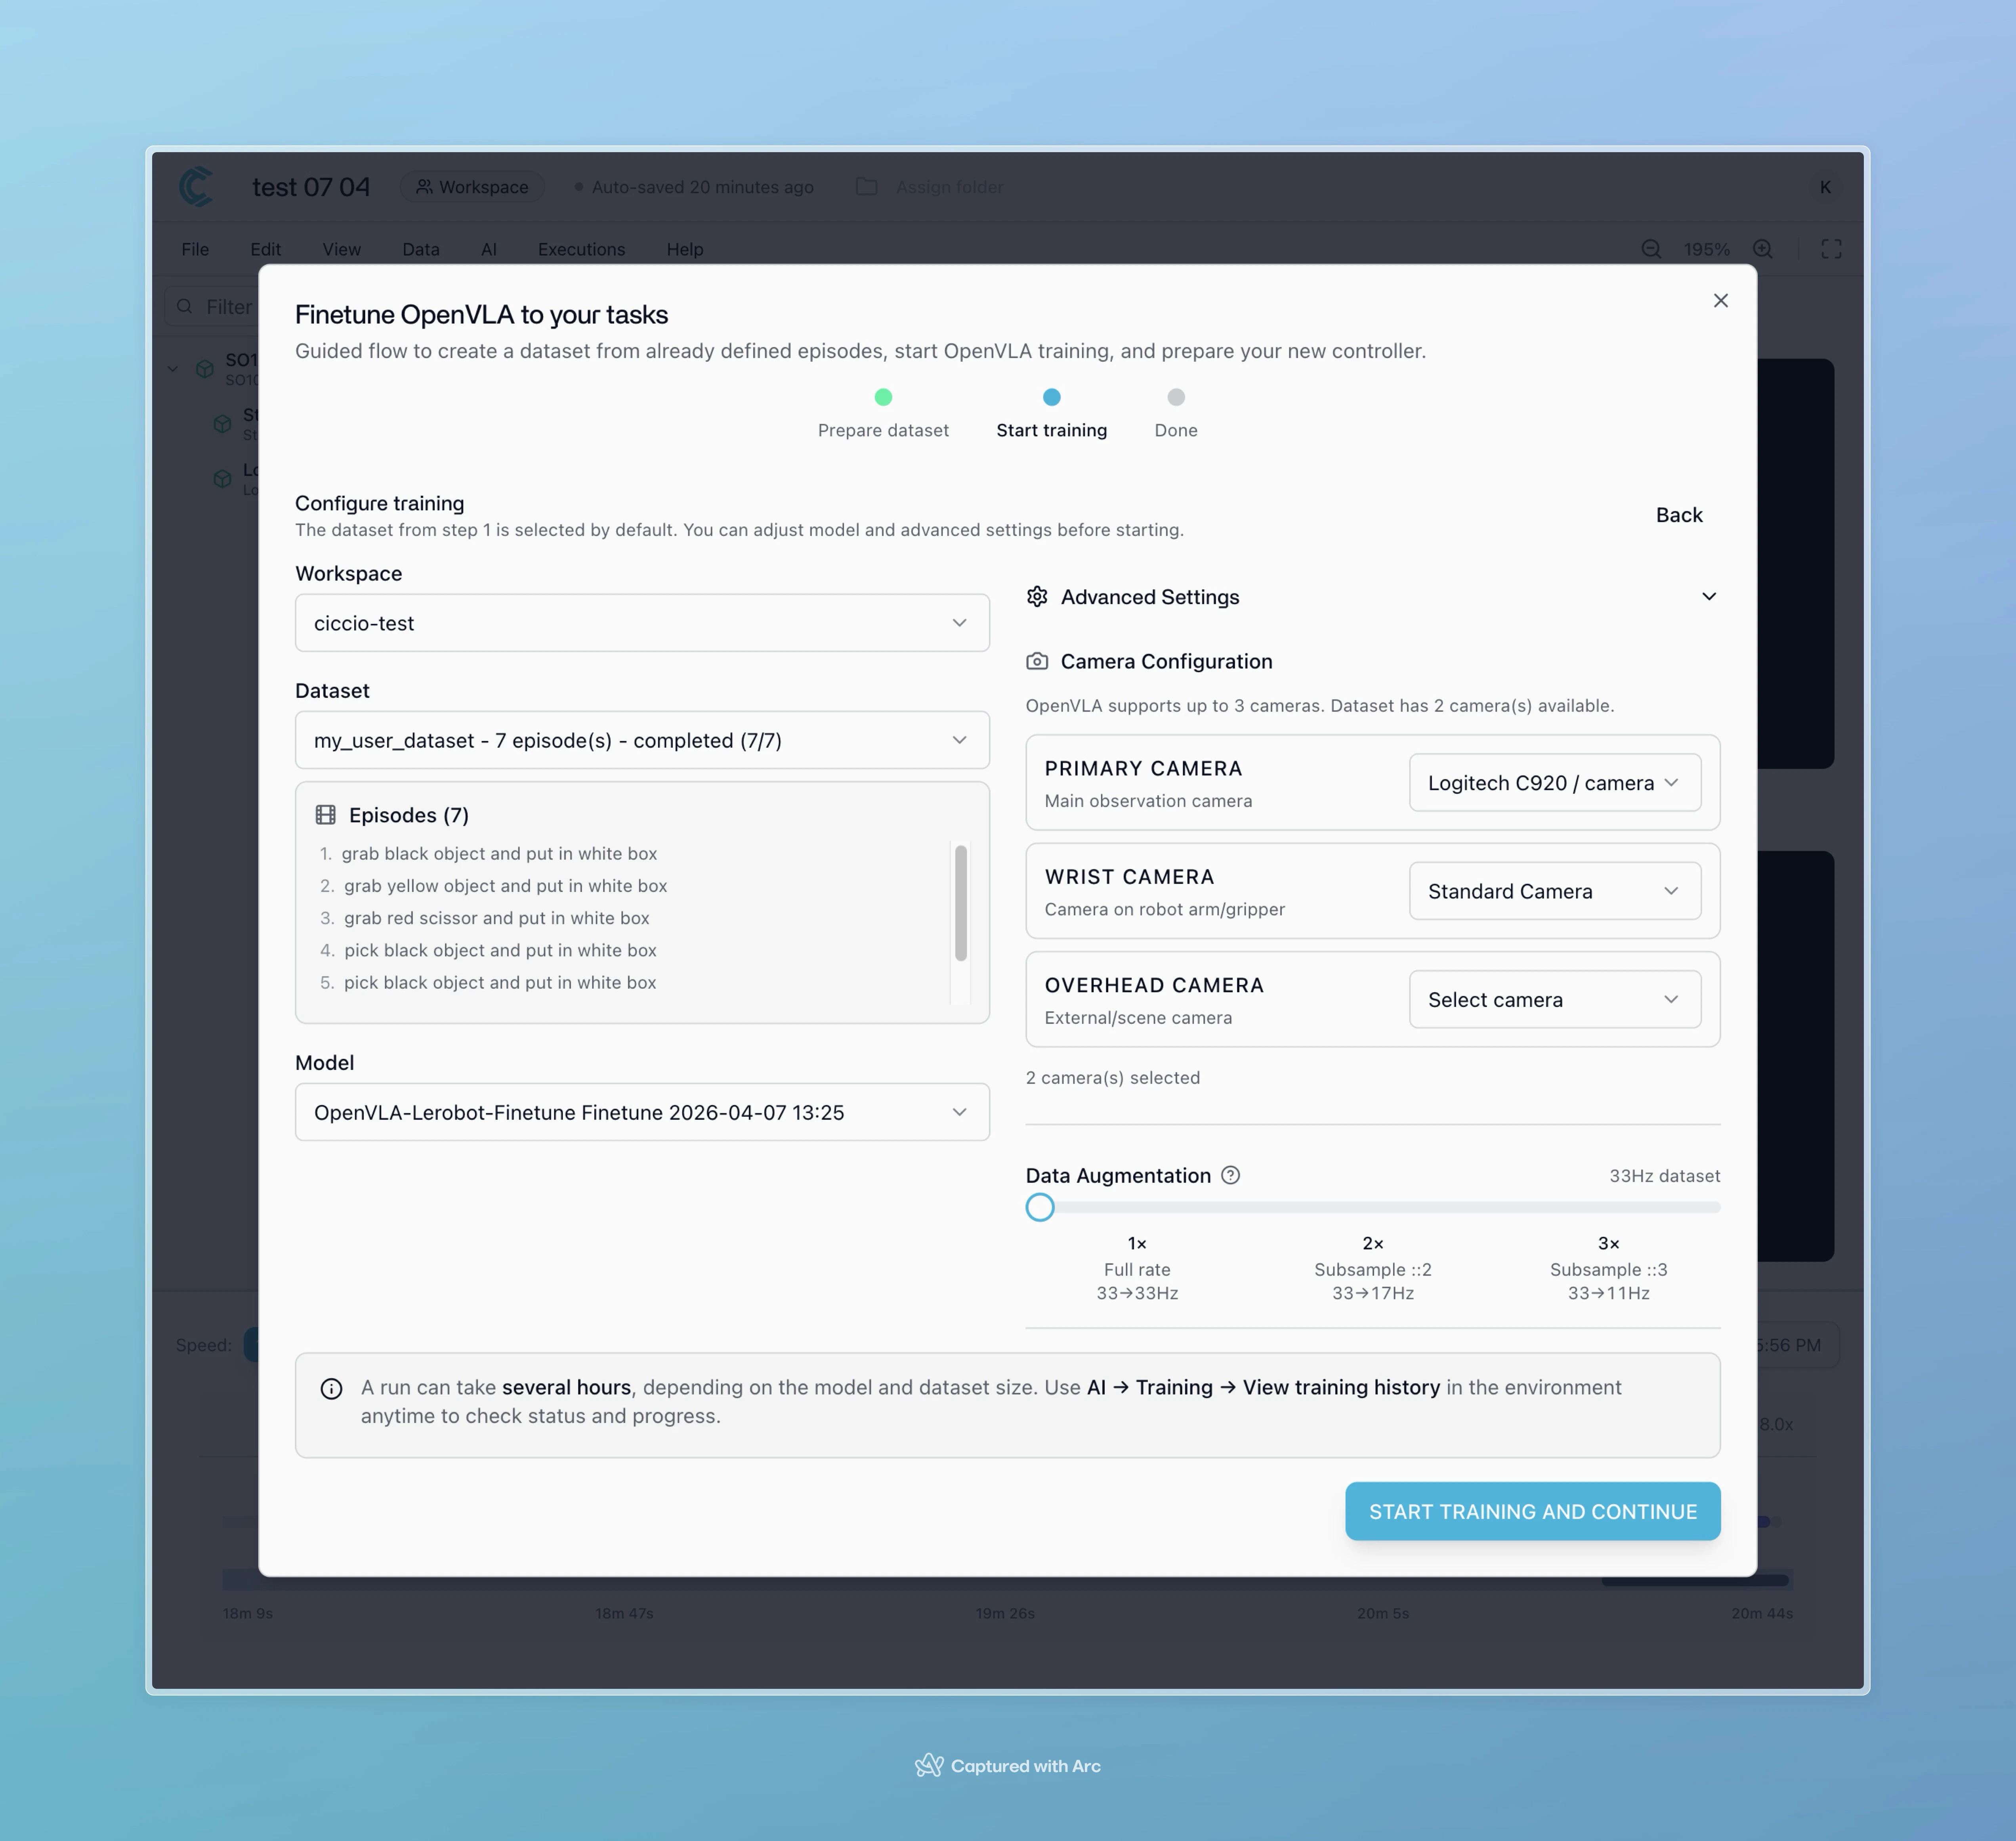
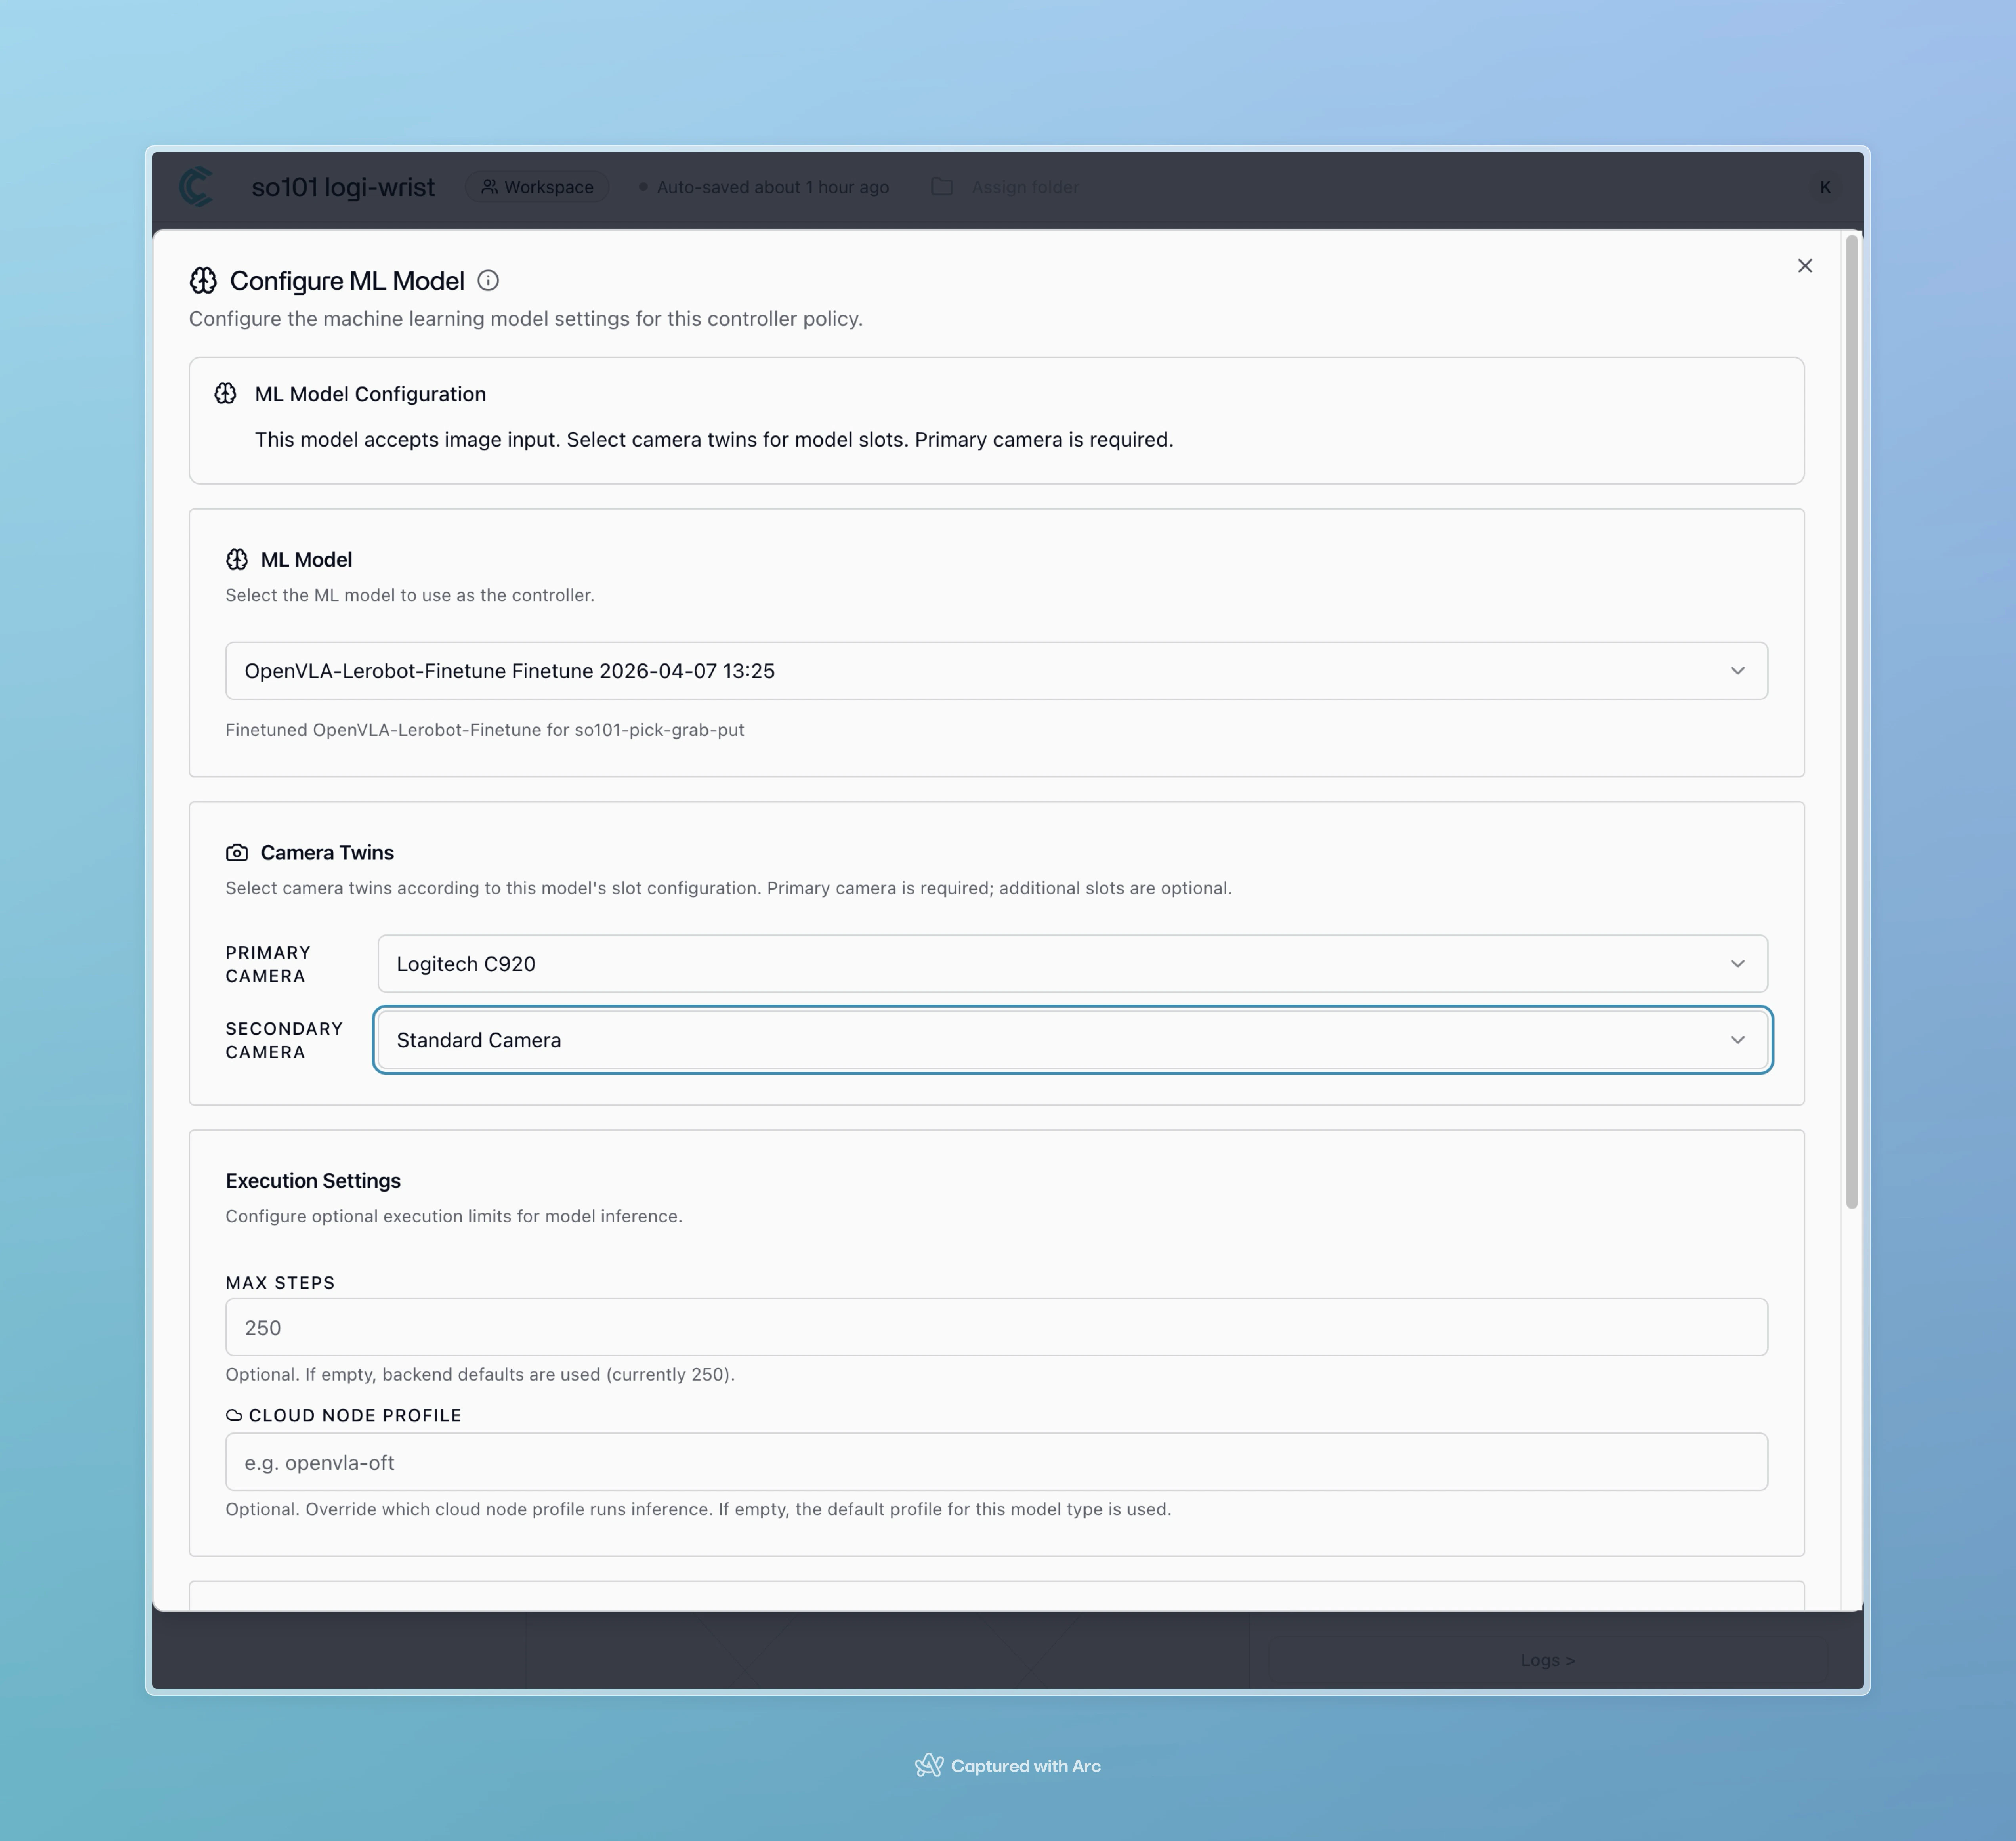
Configure Camera Roles
The wizard will ask you to match camera twins to specific roles:- Wrist camera: Camera mounted to the robot’s wrist (moves with end-effector)
- Overhead camera: Fixed camera viewing the workspace from above
- Primary/Secondary cameras: Additional viewing angles
Configure Training Parameters
Set training hyperparameters based on your needs:- Dataset: Select your created dataset
- ML Model: Choose the appropriate VLA architecture (defaults provided)
- Training iterations: Set max iterations (recommended: 5000 for first training)
- Data augmentation: Choose augmentation level (0 = none, 1 = low, 2 = medium)
- Stop policy:
- “Save best model until iterations” (recommended)
- “Stop when validation loss is under threshold” (faster, may stop early)
For your first training, use default settings: 5000 iterations with “Save best model” policy. You can experiment with augmentation levels in subsequent trainings.
Monitor Training Progress
Training will run on Cyberwave’s cloud infrastructure. Monitor progress via the training dashboard:- Training loss over time
- Validation metrics
- Estimated time remaining
- Model checkpoints
- Dataset size (number of episodes)
- Model architecture
- Configured iteration count
Training in progress. Your model is learning from your demonstrations. You’ll receive a notification when training completes.
API Reference:
GET /api/v1/mlmodels- List available ML modelsPOST /api/v1/mltrainings- Start a new trainingGET /api/v1/mltrainings/{uuid}- Get training statusPUT /api/v1/mltrainings/{uuid}- Update training (used by training scripts)
Step 5: Deploy the Trained Model
After training completes successfully, deploy your model to make it available as a controller for your physical robot.Create a Model Deployment
- Navigate to AI → Deployments in your environment
- Click Start New Deployment
- Select your trained model from the list
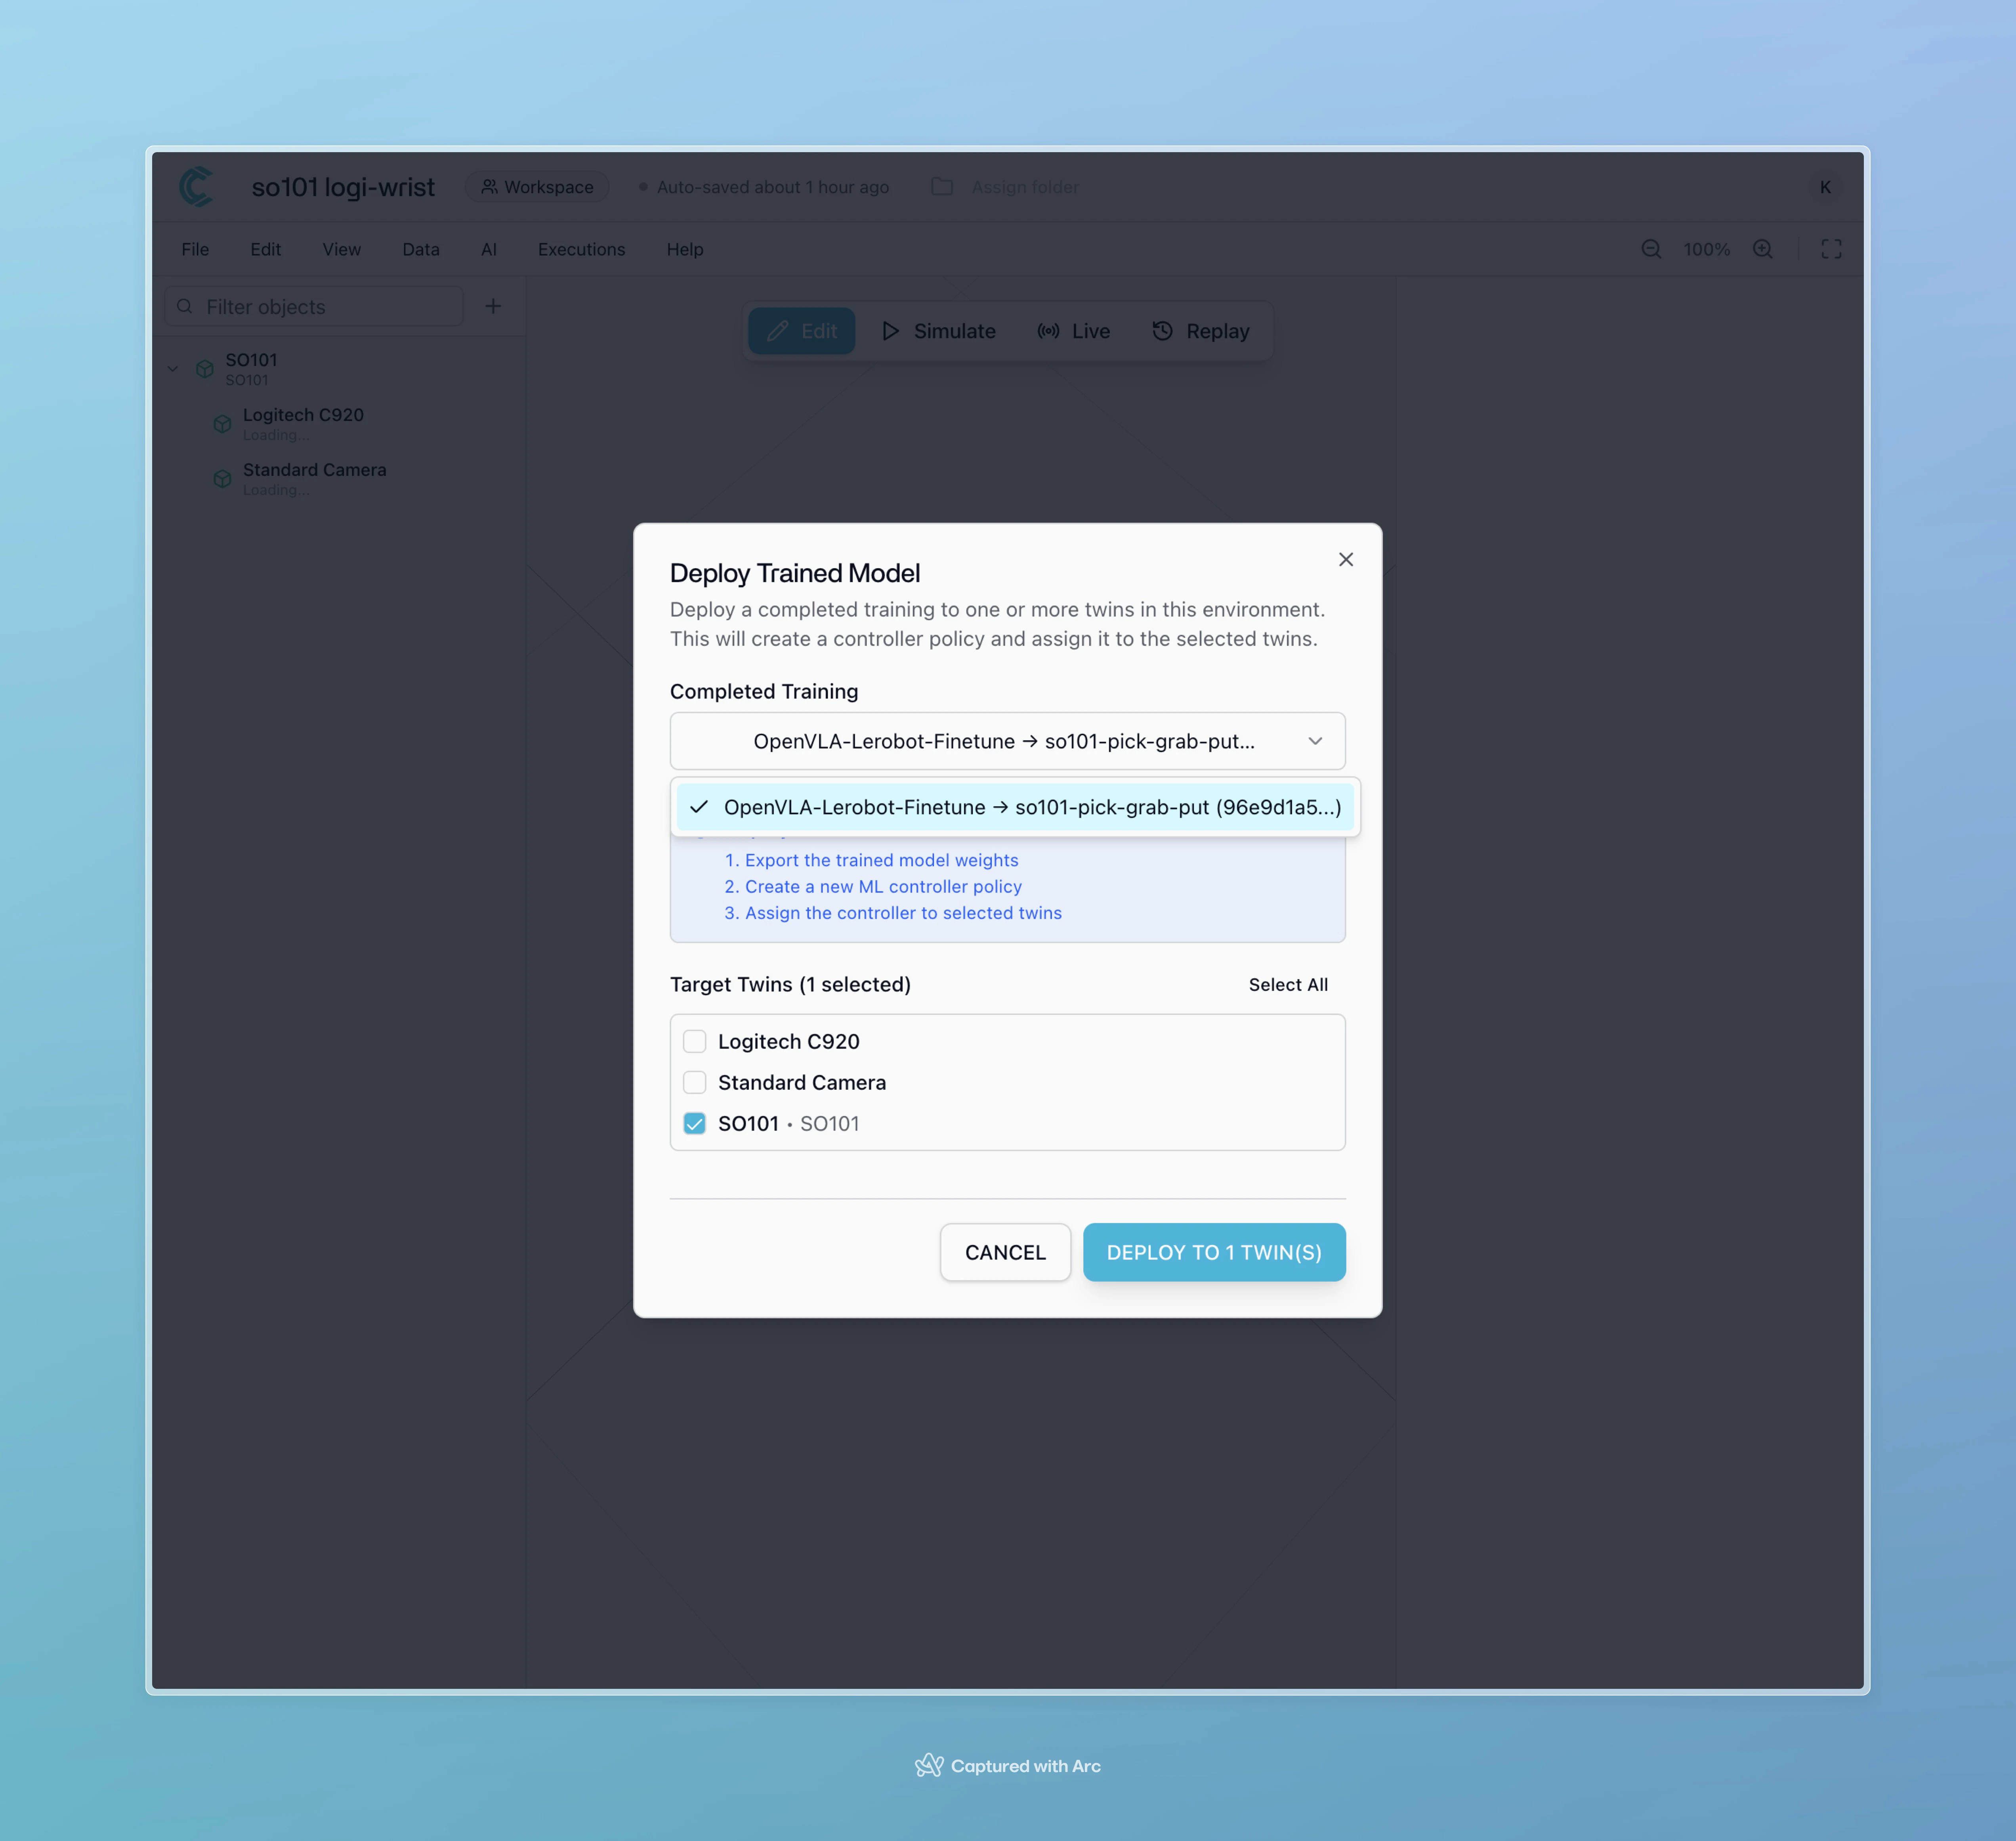
- Select the target twins (your SO101 robot)
- Configure deployment settings (default settings work for most cases)
- Click Deploy
Model deployed successfully. Your trained AI model is now ready to control the robot autonomously.
API Reference:
POST /api/v1/mltrainings/{uuid}/deploy- Deploy a trained model to twinsGET /api/v1/mlmodels/{uuid}/weights- Download model checkpoint weights
cyberwave/twin/{uuid}/command- Sendscontroller-changedevent to edge device
Step 6: Control the Robot with Natural Language
Now you’ll use your deployed model to control the physical SO101 robot using natural language prompts.Assign the VLA Controller
- Switch to Edit Mode in your environment
- Select the SO101 twin
- Click Assign Controller Policy from the right side panel
- Select your deployed VLA model from the dropdown
- Click Save Configuration
Execute Tasks with Prompts
- Switch to Live View
- Locate the natural language prompt input field
- Type your instruction (e.g., “Pick up the red cube and place it in the box”)
- Press Enter or click Execute
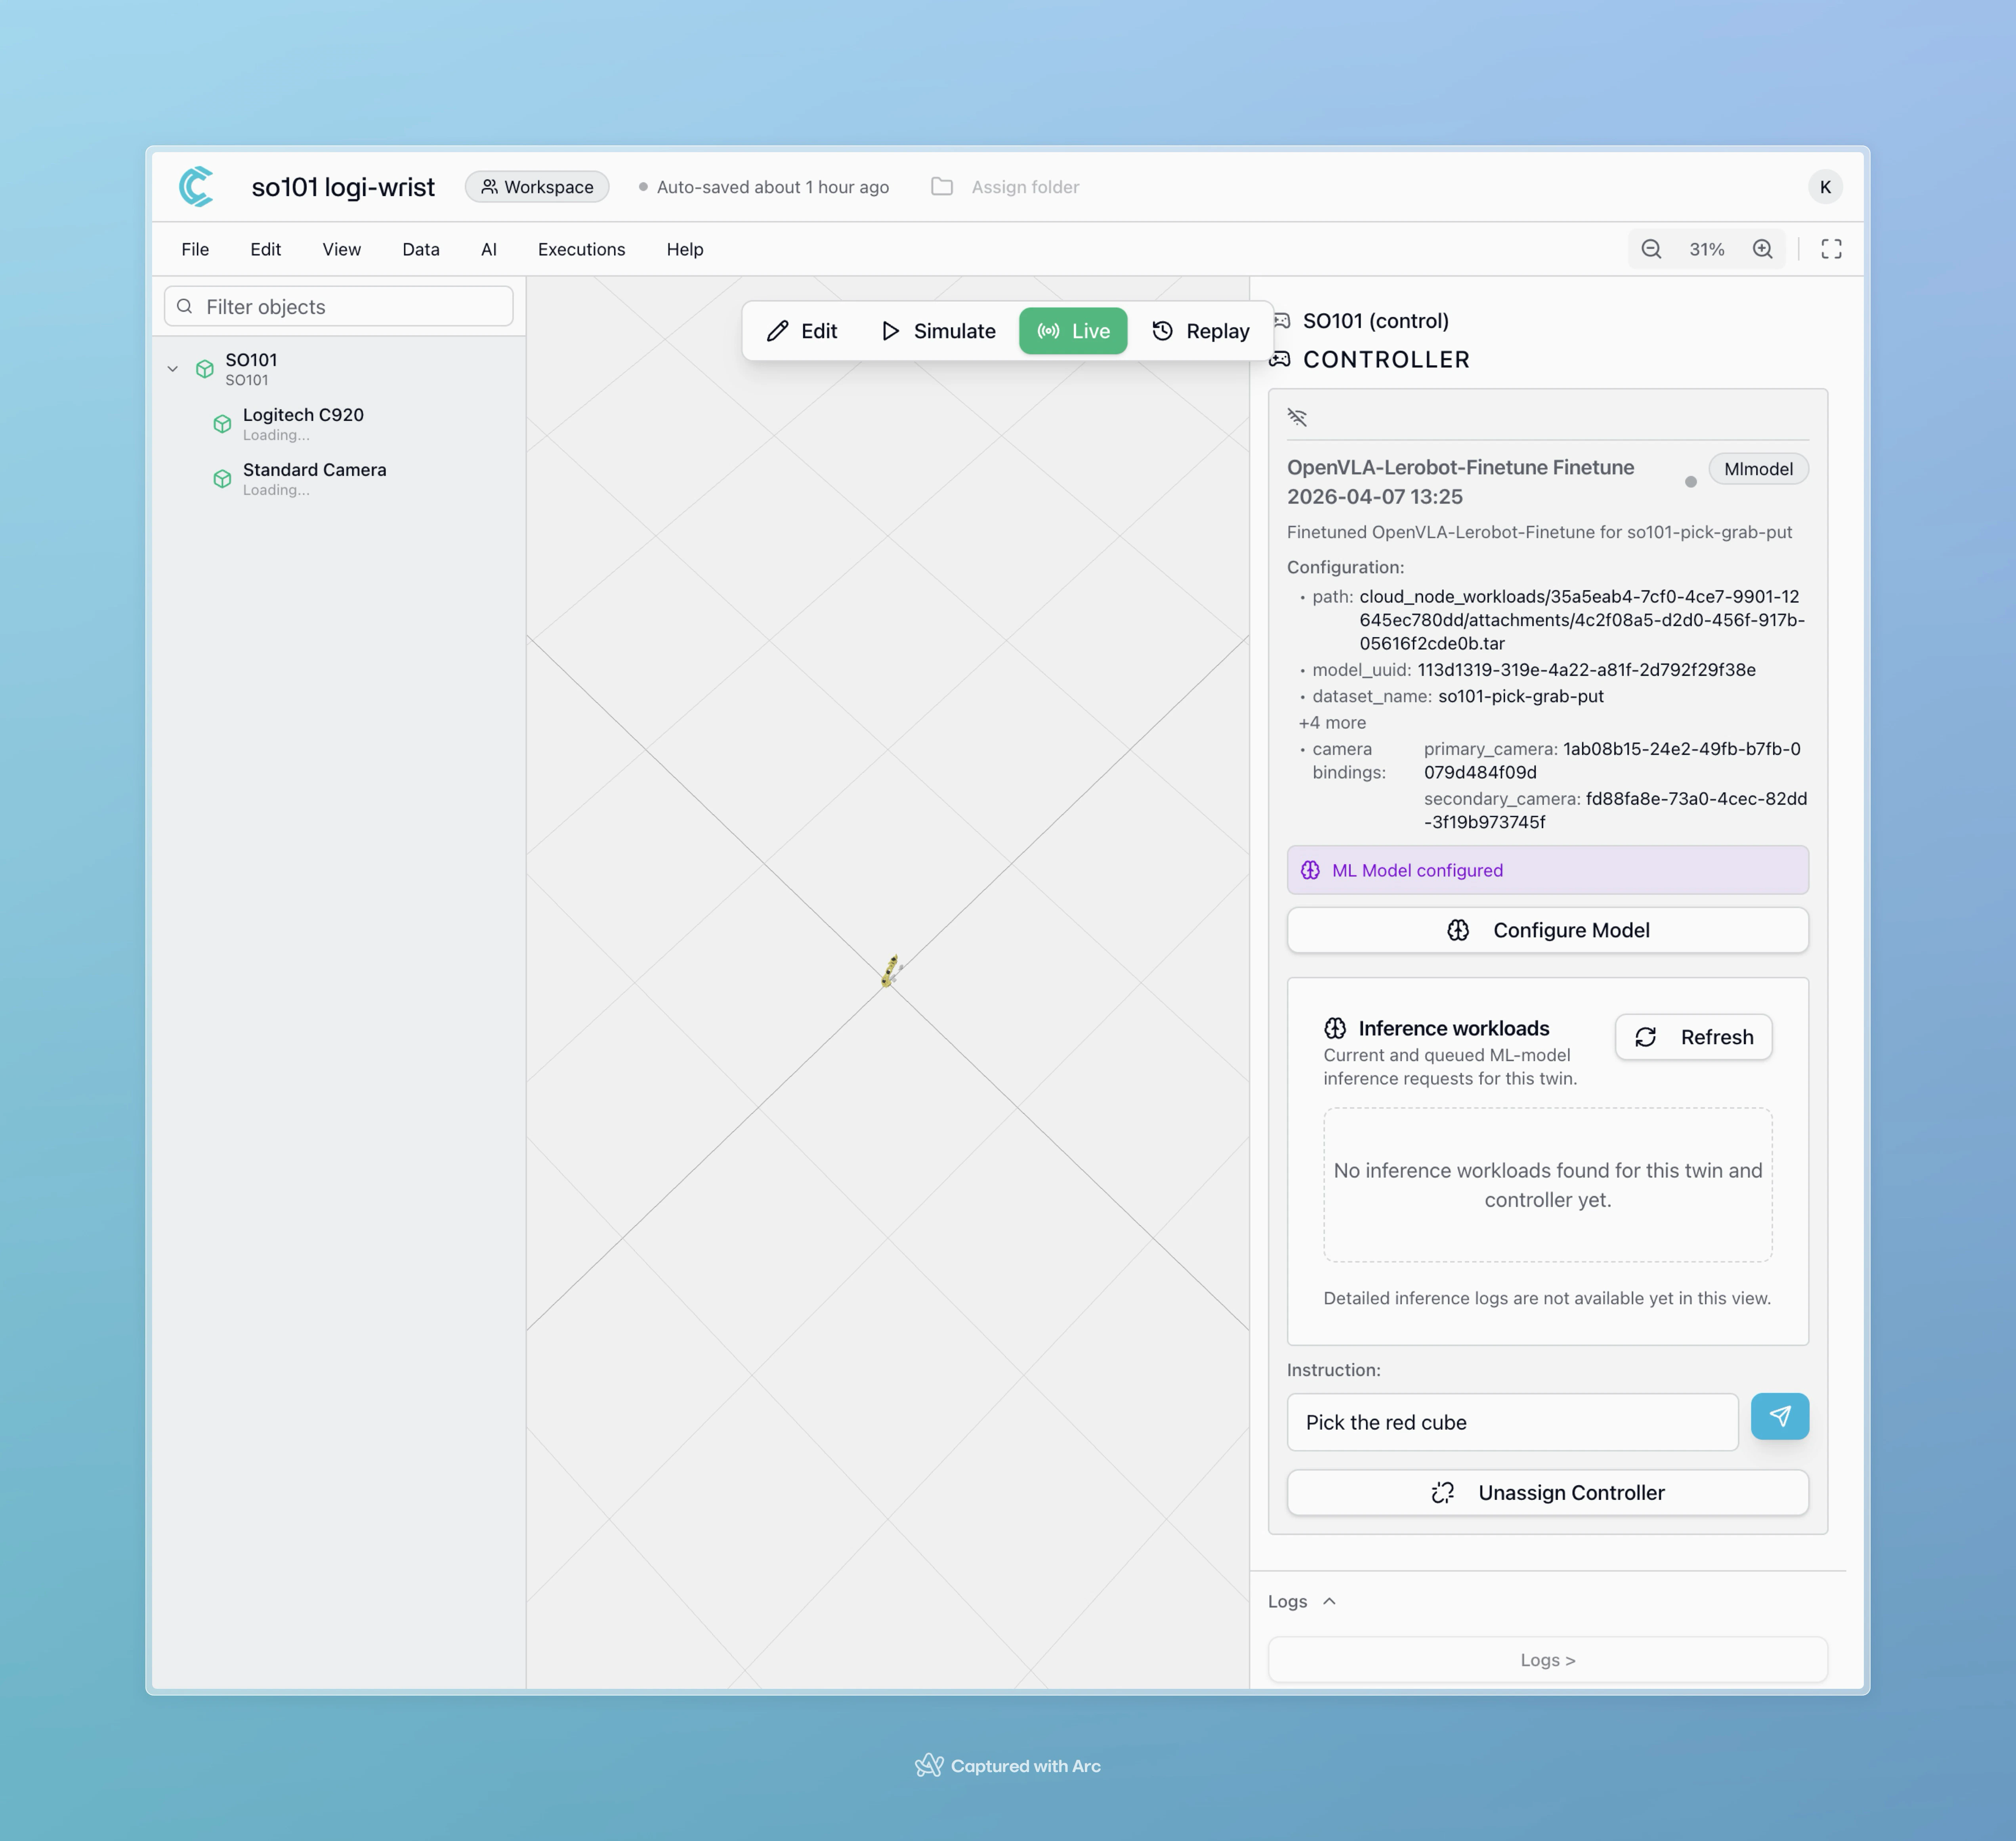
- Process your prompt
- Generate a sequence of actions
- Execute the task on the physical robot in real-time
Collision detection and safety:When controlled by VLA models or other controllers (anything except Local Teleop), the SO101 has built-in collision detection that monitors motor currents and joint resistance. This system attempts to stop the robot if it detects:
- Excessive force on joints (potential collision)
- Joint binding or resistance beyond normal operation
- Motor current spikes indicating obstruction
- Collision detection is not perfect, so always supervise autonomous operations
- High-speed movements may not be stopped before minor contact occurs
- The system protects against self-destruction and major damage, but cannot prevent all collisions
- False positives may occur (robot stops unnecessarily during normal operation)
- False negatives are possible (collision not detected in time)
Autonomous control active! Your SO101 is now controlled by AI using natural language prompts based on your custom training data.
API Reference:
POST /api/v1/twins/{uuid}/actions- Execute motion actions on a twinGET /api/v1/twins/{uuid}/actions/{action_id}- Get action execution status
cyberwave/joint/{uuid}/+- Joint state commands from AI (subscribed by edge)cyberwave/twin/{uuid}/position- Position updates from AIcyberwave/twin/{uuid}/rotation- Rotation updates from AI
Troubleshooting
Calibration Issues
Problem: Calibration fails repeatedly Solutions:- Check USB connections to both arms
- Ensure joints move freely through full range
- Review error messages in the calibration alert
- Try recalibrating in a different order (follower first, then leader)
Poor Teleoperation Quality
Problem: Follower arm doesn’t mirror leader smoothly Solutions:- Verify calibration is complete and accurate
- Check for USB cable issues or loose connections
- Ensure Edge Core is running (
cyberwave edge status) - Monitor edge device CPU/memory usage
Model Performance Issues
Problem: Deployed model doesn’t perform tasks correctly Solutions:- Camera role mismatch (most common): Verify camera roles are assigned identically between training and deployment. If you trained with wrist=camera1 and overhead=camera2, deployment must use the same assignments. Swapped roles cause completely incorrect spatial understanding.
- Camera position changes: Even with correct role assignments, physical camera movement (angle, height, position) between training and deployment will degrade performance. Document and replicate exact camera positions.
- Workspace changes: Ensure physical setup matches training conditions (lighting, object placement, background)
- Insufficient data: Collect more demonstrations with greater variation in starting positions and object placements
- Data quality: Review episodes for smooth, consistent demonstrations without jerky movements or pauses
- Overfitting: Increase data augmentation level and retrain
- Collision detection may be triggering false positives
- Check for mechanical binding or friction in joints
- Review motor current logs to identify which joint triggered the stop
- Ensure workspace is clear of obstacles the model didn’t encounter during training
- Consider retraining with more varied demonstrations if the model consistently attempts unsafe movements
Dataset Recording Problems
Problem: Recorded data doesn’t appear in Replay Mode Solutions:- Wait for processing to complete (depends on session duration)
- Verify Local Teleop controller was properly attached during recording
- Check Edge Core logs for errors:
cyberwave edge logs - Ensure edge device has sufficient disk space for recordings
Next Steps
Now that you have a working VLA model deployment:- Collect more data: Expand your dataset with new tasks and variations
- Multi-task training: Combine datasets to train models that handle multiple tasks
- Fine-tune models: Retrain with additional data to improve performance
- Deploy to multiple robots: Use the same model across multiple SO101 setups
- Experiment with prompts: Test different natural language instructions to understand model capabilities
Related Resources
- SO101 Get Started Guide: Initial setup and hardware configuration
- Deploy ML Models: Advanced deployment options
- Controller Policies: Understanding controller types
- Dataset Management: Advanced dataset creation techniques